background image

20

 PROGRAMS

Under programs, 10 user-defined temperature-time pro-
files can be created� A program can consist of up to 10 
segments� 
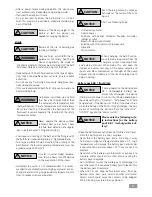
Once a program has been selected, the following options 
are available:

Start:

Starts the program upon request of loop mode�

Infinite loop: 

Upon completion of the last segment, the 

program continues with the first segment until you end 
the program by stopping a device function�

Loop Count:


Indicates the total number of loop cycles 

until program end�

Note: 

At the end of the program all device functions are 

switched off�

Edit:

Edit/change program parameters�

Seg No�: Segment number�

Ctrl� Sensor (int/ext):


Determines whether control is 

through the internal (int) or external (ext) temperature 
sensor�

Temp�:


Target temperature�

Ctrl�Mode (Time / +/- x�x K):


In "Ctrl�Mode Time" the tar-

get values and settings of the segment are valid for the 
duration indicated in the column "Time hh:mm"� 
Afterwards, the next program segment is automatically 
executed�
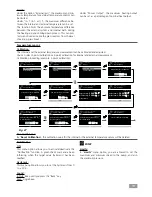
In "Ctrl�Mode +/- x�xx K", the hysteresis (tolerance) of the 
actual temperature to the target temperature is set (e�g� 
+/- 0�1 K)� The target values and settings of the segment 
are valid until the actual temperature reaches the target 
tempe/- hysteresis for the first time� 
Afterwards, the next program segment is automatically 
executed�

Pump rpm: Target speed of pump�

M1 (ON/OFF): MODULES M1-Valve: 

OFF:

 M1 valve in initial state

ON:

 M1 valve in inverted initial state�

Note:

  The initial state of the M1 valve is defined in 

“MODULES M1-Valve” in “Default Status” as “Open” or 
“Closed”�

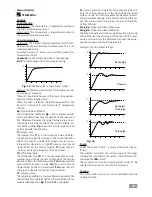
 GRAPH

In this menu, you can set the options for the time-tem-
perature diagram�

Automatic:

The scaling of the temperature axis (Y-axis) is automati-
cally determined, depending on the target temperature 
and the actual internal and external temperature�
The time axis (X-axis)  is permanently scaled to 30 minutes�

 DISPLAY

Main Screen:

In the “Main Screen“ menu option, you can specify what 
information will be displayed on the screen�

Device Number:

In the “Device number“ menu option, you are allowed to 
edit the device number from 0 to 99 that will be shown 
on the main screen�
When using multiple units, it may be helpful to identify 
WiCo and station�

Note: 

Labeling device number to the station�

 MODE

Operating Mode A:

After power-on/power failure no automatic restart of 
functions�

Operating Mode B:

After power-on/power failure automatic restart of func-
tions, depending on previous settings�

Operating mode C:

Set values (set in A or B) cannot be changed�
After power-on/power failure automatic restart of func-
tions, depending on previous settings�

Operating mode D:

Confirmation request for set value changes, if functions 
are active� After power-on/power failure no automatic 
restart of functions�

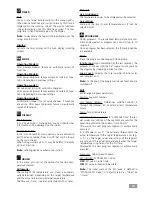
 TIMER

Set:

You can set a target time (duration) in this menu option�
When device functions are started normally, this time is 
displayed on the working screen� The device functions 
stop automatically once this time has expired� The run-
ning time is then displayed again on the display�

Note: 

To deactivate the target time specification, set the 

target time to 00:00�

Display:

Activate the timer display on the main display (working 
screen)�

Manual:

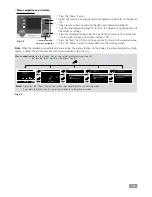
Axis Assignment:

The temperature values to be displayed can be selected�

Axis scaling:

Scaling of the time (X) and temperature axis (Y) can be 
selected or set�

Содержание CBC 5 control

Страница 1: ...20000013222 IKA CBC 5 control CBC 5 basic_112016 Operating instructions EN ...

Страница 2: ... grid 6 Mains switch 7 Power socket 8 Cable clip 9 Pump connection IN 10 Pump connection OUT 11 RS 232 interface 12 USB interface 13 External temperature sensor socket 14 Multifunction interface Device setup Fig 1 11 RS 232 13 ext Pt 100 12 Micro USB 1 2 3 5 4 4 6 11 12 13 14 7 9 10 4 8 14 Multi I O 5 ...

Страница 3: ...Mounting the WiCo to the station 9 Filling and draining 9 Fluid Standard information for IKA fluid 10 Moving the device 11 Charging the Battery Pack RB 1 rechargeable battery 11 Changing battery to WiCo 11 WiCo holder WH 10 11 Operator panel and display 12 station 12 WiCo 12 Setting the safety temperature 13 Commissioning 13 Useful information 14 Working with WiCo 15 Working screen at the time of ...

Страница 4: ...equipment generates uses and can radiate radio frequency energy and if not installed and used in accordance with the instruction manual may cause harmful interference to radio communications Operation of this equipment in a resi dential area is likely to cause harmful interference in which case the user will be required to correct the interference at his own expense Note for Canada IC This device ...

Страница 5: ... For exam ple users can implement measures that inhibit fire or ex plosions or comprehensive monitoring equipment Process pathogenic material only in closed vessels under a suitable fume hood Please contact IKA application sup port if you have any question If the mains switch is not within reach when device is operating an EMERGENCY STOP switch that can be easily accessed must be installed in the ...

Страница 6: ...uorides bromides iodides or sulfur Bleach Sodium Hypochlorite Solution with chromates or chromium salts Glycerine Ferrous water When changing the bath fluid re move the remaining water from the complete system including hoses and external devices When doing this also open the stopper and union nuts caps of the pump outputs and inputs and blow compressed air through all the pump outputs and inputs ...

Страница 7: ...the battery pack is removed for an extended period of time store it in a sealed plastic bag to prevent short circu iting due to moisture or contact with metal components The operating temperature range of the battery pack is from 0 C to 45 C Note that the battery pack capacity will be reduced at temperatures below 20 C Only the rechargeable battery types recommended in the technical data may be us...

Страница 8: ...of the heat from device radiates to the environment Do not set up the device in the immediate vicinity of heat sources and do not expose to sun light Cooling machine pump motor and electronics produce intrinsic heat that is dissipated via the venting grids 5 Never cover these venting grids Note After setting up the device wait at least one hour be fore starting the operation to avoid the damage to...

Страница 9: ...Fluid level in section Working with WiCo Low level High level Warning Do not empty the bath while it is still hot cold there is a risk of burning freezing To drain the fluid from the bath connect a hose to the drain port and turn the drain valve in counter clockwise direction with a straight screwdriver Inserting battery into the WiCo Model WiCo CBC 5 LPS IP 40 Model WiCo CBC 5 LPS IP 40 Model WiC...

Страница 10: ...ive Temperature 4 Viscosiy Viscosiy at 25 C for Heating Fluid HF Viscosity at 20 C for Cooling Fluid CF Viscosity at 25 C for Universal Fluid UF Dynamic viscosity mPa s is a product of kinematic viscosity mm s and density kg m of the fluid divided by 1000 5 Additional information A Oil Additives LV Low Viscosity Note for open bath application Note Tap water may be unsuitable for operation because ...

Страница 11: ...lamp H 38 Holding rod IKA CBC 5control IKA CBC 5 control IKA CBC 5control max 10 Moving the device Empty all fluid in the bath before moving device from one place to other place The device must be lifted by two persons with the upper handles For this purpose take off the front cover 3 It can also be moved on flat surface by lifting and pushing the front of the device It is easy to move the device ...

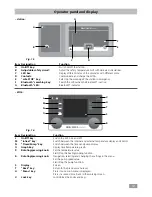
Страница 12: ... Stop the pump function S Display Screen T Back key Return to the previous menu level U Menu key Press it once main menu is displayed Press it a second time back to the working screen V Lock key Lock Unlock the knobs and keys Item Designation Function A On Off key Switch on off the station B Adjustable safety circuit Adjust the safety temperature limit with delivered screwdriver C LED bar Display ...

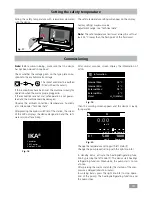
Страница 13: ...ature humidity etc listed under Technical Data After pressing the mains switch 6 of the station the screen of the WiCo displays the device designation and the soft ware version after a beep IKA Circulator CBC Control Version 1 2 005 Fig 18 After several seconds screen display the information of WiCo Information Internal Max 95 C Internal Min 5 C External Max 95 C External Min 5 C Fluid H2O Water F...

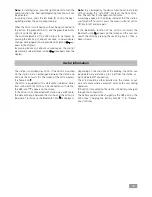
Страница 14: ...ected with station the USB icon appears on the screen If the WiCo is not connected with station via a USB cable the data exchange between the station and the WiCo via Bluetooth In this case the Bluetooth icon is displayed Depending on the structure of the building the WiCo can be operated at a distance up to 15 m from the station us ing the Bluetooth connection The WiCo could be either installed o...

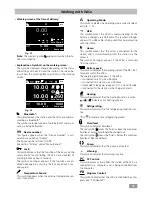
Страница 15: ...ctivated Warning This symbol indicates that warning is active PC PC Control This symbol means that either the station or the WiCo is connected to a computer and is being controlled from the computer PR Program Control This symbol indicates that the WiCo is controlled by a pro gram see PROGRAMS Working with WiCo Working screen at the time of delivery A 0 00 int C ext C int 5 00 1000 set C Pump rpm ...

Страница 16: ... Control elements for menu navigation Note If you press the Menu key U the system skips directly back to the working screen If you press the Back key T the system skips back to the previous screen Menu Menu navigation Press the Menu key U and rotate rotating pressing knob R Press the Back key T or the Menu key U A 0 00 int C ext C int 5 00 1000 set C Pump rpm Safe Temp C TEMPERING Tempering Contro...

Страница 17: ...Set Temperature Actual Internal Temp Actual External Temp X Axis Y Axis 15 min 30 min 60 min 120 min Axis Scaling Maximum Minimum activated activated activated activated activated 95 ºC 5 ºC PROGRAMS Program 1 Program 10 MODULES M1 Valve M2 Output M3 Input Ext Standby Alarm Switch Error Warning ON ON Default Status Default Status Default Status Open Open Open Closed Closed Closed ON Default Status...

Страница 18: ...coefficient Kp is the controller amplifi cation and determines how strongly the control deviation the difference between the target temperature and ac tual temperature directly affects the control variable on time of the cooling Kp values that are too large can lead to the controller overshooting Ti Integral time The integral time Ti s is the correction time and deter mines how strongly the durati...

Страница 19: ...Beep until you press the Back key Beep Single beep Under Power Output the maximum heating output can be set as a percentage of nominal heat output PUMP Limits In Limits menu option you are allowed to set the maximum and minimum speed to the pump and also the maximum pressure Tempering Temperature Sensor Calibration Reset Calibration Temperature Sensor Calibration Internal External Calibration Inte...

Страница 20: ...set the options for the time tem perature diagram Automatic The scaling of the temperature axis Y axis is automati cally determined depending on the target temperature and the actual internal and external temperature The time axis X axis is permanently scaled to 30 minutes DISPLAY Main Screen In the Main Screen menu option you can specify what information will be displayed on the screen Device Num...

Страница 21: ...the buoyage The Refill menu option has higher priority than the pro gram M1 segment settings Temperature int Temperature dependent control of the M1 valve By entering the boundaries of Higher and Low the temperature range is set in which the M1 valve can be opened If you activate a rule Int ext Set Temperature is an automatic control of the M1 valve dependence on the target temperature By the Hyst...

Страница 22: ...eset time value has expired Following that the station runs using the preset safety temperature and safety speed Note The initial time out is 30 seconds and you can de fine up to 60 minutes for this time limit Speed In the Speed menu option you can specify a appropri ate and safe speed for specified temperature Note The factory setting of the safe speed is 1000 rpm and is activated after the time ...

Страница 23: ... 9600 bit s Data flow control none Access procedure data transfer from the stirrer machine to the computer takes place only at the computer s request Command syntax and format The following applies to the command set Commands are generally sent from the computer Master to the device Slave The device sends only at the computer s request Even fault indications cannot be sent spontaneously from the d...

Страница 24: ...TMODE_0 Set to Internal temperature control OUT_TMODE_1 Set to External temperature control OUT_WD1 n Start the watchdog mode 1 and set the time for the watchdog to n 20 1500 seconds Echo of the Watchdog time During a WD1 event the heating and pump functions are switched off This command needs to be send within the watchdog time OUT_WD2 n Start the watchdog mode 2 and set the watchdog time to n 20...

Страница 25: ... 0V only for Standby 7 reserved for later use do not connect 8 reserved for later use do not connect 1 2 3 4 5 6 7 8 Fig 31 Multifunction interface USB micro B USB micro B USB micro A USB micro A USB cable Fig 29 RS 232 cable USB cable A USB micro B USB micro B USB micro B USB micro B USB A USB A USB A 9 pin RS 232 9 pin RS 232 or A USB micro B USB A USB cable A USB micro B USB A 9 pin RS 232 9 pi...

Страница 26: ...tenside isopropyl alcohol Cosmetics Water containing tenside isopropyl alcohol Foodstuffs Water containing tenside Fuel Water containing tenside For materials which are not listed please request information from IKA application support Wear protective gloves while cleaning the devices Electrical devices may not be placed in the cleansing agent for the purpose of cleaning Do not allow moisture to g...

Страница 27: ...refrigerating off Too high voltage Check the mains power Error 08 Pump off Heating refrigerating off Too low voltage Check the mains power Error 09 Pump off Heating refrigerating off Device internal temperature is too high Check the ambient temperature and let the device cool down Check the fan and clean the grids at the rear side Error 10 Pump off Heating refrigerating off PC communication failur...

Страница 28: ...luid level warning Warning message and high level icon appear Too high fluid level Check the fluid level and buoyage Drain excess fluid from bath Low fluid level warning Warning message and low level icon appear Too low fluid level Check the fluid level and buoyage Add more fluid to bath Note When the heating function is not activated the screen show only these warning information if fluid level i...

Страница 29: ...12876 1 Class III FL suitable for flammable and non flammable fluids Safety circuit adjustable C 0 260 Safety temperature display TFT LCD on WiCo Heating capacity W 2500 230 V 1250 115 V Cooling capacity according to DIN 12876 at 4600 rpm 20 C 10 C 0 C 10 C 20 C W 350 400 W at 3200 rpm 320 370 W at 3200 rpm 270 320 W at 3200 rpm 190 240 W at 3200 rpm 80 130 W at 3200 rpm Refrigerant R134a Refriger...

Страница 30: ...ss according to EN 60529 IP 40 Interface USB RB 1 Battery pack Voltage V 5 Charging capacity mAh 2000 Charging time h 4 5 Working time h 15 Battery type Lithium polymer Note Refrigerant must be disposed of in accordance with local and national regulations Note Complies to EN61000 3 11 subject to conditional connection Zmax 0 13 Ω If necessary consult your electricity supplier Subject to technical ...

Страница 31: ...e for freight costs The warranty does not cover worn out parts nor does it apply to faults resulting from improper use insufficient care or maintenance not carried out in accordance with the in structions in this operating manual Pump performance curve Pump performance curve measured with water Measurements done according DIN 12876 2 with water at 20 C pump in a closed loop circuit Fig 32 Q l min ...

Страница 32: ...IKA Werke GmbH Co KG Janke Kunkel Str 10 D 79219 Staufen Tel 49 7633 831 0 Fax 49 7633 831 98 sales ika de www ika com ...

Отзывы: