background image

24

Concord CX 

- Installation

SERVICING

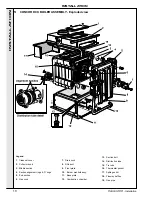
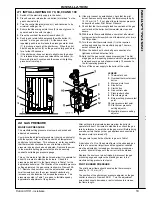
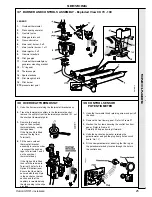
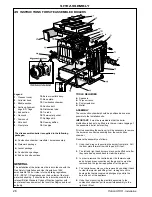
LEGEND

1.

Overheat thermostat

2.

Piezo spark generator

3.

Gas inlet union

4.

Main gas inlet cock

5.

Gas control valve

6.

Main (end) burner, 2 off

7.

Main (centre) burner, 1 off

8.

Main injector, 3 off

9.

Gas inlet manifold

10.

Pilot gas pipe

11.

Overeat thermostat/piezo
generator mounting bracket

12.

'O' ring seal

13.

Thermocouple

14.

Spark electrode

15.

Pilot draught shield

16.

Pilot burner

PTP

pressure test point

SER

VICING

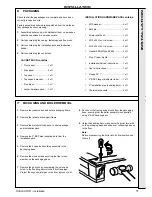
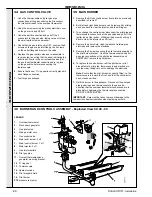
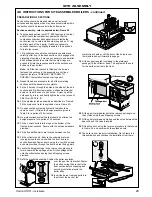
34 GAS CONTROL VALVE

1.

Undo the thermocouple and pilot gas pipe
connections at the gas control valve. Disconnect
the interrupter leads to the overheat thermostat.

2.

Undo the screw securing the plastic electrical cover
on the gas valve and lift it off.

3.

Undo the earth connection and pull off the 2
connectors to the gas valve, taking care not to lose
the small earth screw and washer.

4.

Check that the gas inlet cock is OFF, unscrew the 4
screws on the gas valve inlet flange, the 4 screws
on the outlet flange and remove the valve.

5.

Replace the gas control valve and re-assemble in
reverse order, ensuring that the arrow indicating the
direction of flow is in the correct position and that
the overheat thermostat connections are in place
on the gas valve before reconnecting the
thermocouple.

6.

Ensure that a new ‘O’ ring seal is correctly placed in
each flange connection.

7.

Test for gas soundness.

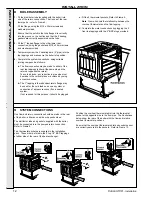
35 MAIN BURNER

1.

Remove the NOx duct and burner front plate, as previously
described in Frame 27.

2.

Both left and right hand burners can be removed by sliding
each one back to clear the injector, and then lifting out.

3.

To exchange the centre burner disconnect the pilot pipe and
thermocouple connections at the gas valve and pull off the
igniter lead at the igniter.  Withdraw the burner by sliding it
back to clear the injector then lift it out.

4.

Remove the pilot shield. Undo the backnut retaining the
electrode and remove the electrode.

5.

Remove the 2 screws securing the pilot burner assembly to
the pilot burner bracket.  Undo the thermocouple and pilot
gas pipe connections at the pilot burner assembly and
CAREFULLY remove the pilot burner.

6.

To replace the centre burner; refit the pilot burner, pilot
draught shield, pilot pipe, thermocouple and electrode in
reverse order, taking care not to damage the electrode.

Note.


Ensure that the pilot burner is correctly fitted, i.e. the

thermocouple is toward the front, and that the pilot injector
has not been omitted.

7.

Refit the burner to the appliance.  Reconnect the pilot gas
pipe igniter lead and thermocouple to the gas valve,
ensuring that the overheat thermostat connections are in
place before tightening the thermocouple connection.
DO NOT OVERTIGHTEN.

IMPORTANT. 

 Care must be taken to prevent damage to the

combustion chamber insulation when replacing burners.

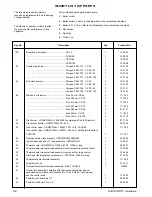
36 BURNER AND CONTROLS ASSEMBLY - Exploded View CX 40 - 60

Содержание Concord CX40

Страница 1: ......

Страница 2: ...2 Concord CX Installation CAUTION To avoid the possibility of injury during the installation servicing or cleaning of this appliance care should be taken when handling edges of sheet steel components...

Страница 3: ...the law is complied with The Concord CX40 100 range of boilers has been tested and certified by British Gas to prEN656 for use with Natural gas only Multiple boiler installations The Concord CX range...

Страница 4: ...in BSP 2 x 2 at rear Return tappings Rc in BSP 2 x 2 at rear Maximum static head metres feet 45 7 150 Maximum pressure bar p s i 4 5 65 Gas inlet connection Rc in BSP 3 4 3 4 1 1 Minimum dynamic mbar...

Страница 5: ...auge kit In addition to the above control kit an optional pressure gauge is also available for the range of boilers Details for fitting are included with the pressure gauge Downdraught thermostat kit...

Страница 6: ...learance should be given at the rear of the boiler for connection of gas and water pipework Additional clearance is required for access at either end of the installation 2 CLEARANCES DIMENSIONS Boiler...

Страница 7: ...n will depend upon the particular characteristics of the system Pumping over of water into the expansion cistern must be avoided achieved either by provision of an adequate bypass circuit or by ensuri...

Страница 8: ...setting Other British Standards applicable to commercial sealed systems are BS 6880 Part 2 BS 1212 BS 6281 Part 1 BS 6282 Part 1 BS 6283 Part 4 Working pressure 4 5 bar maximum Particular reference s...

Страница 9: ...em which may be common or individual in the case of twin or multiple boiler installations must be capable of the complete evacuation of combustion products at all times The effective height of the chi...

Страница 10: ...ngs 5 End section 6 Gas cock 13 Section bolt 14 Distribution tube 15 Tie rods 16 Thermostat pocket 17 Spillage skirt 18 Flueway baffles 19 Gas pipe 7 Drain cock 8 NOx duct 9 Front plate 10 Burner mani...

Страница 11: ...g 2 BSP handling bars 9 Using the handling bars manoeuvre the boiler forwards on the packaging base and slide over collapsing base on to the floor Note Before manoeuvring the boiler into its final pos...

Страница 12: ...er lower rear connection using the gasket and M10 x 25mm screws and washers provided 3 Temporarily screw the 2 handling bars 2 pipe into the top tappings and manoeuvre the boiler into position 4 Compl...

Страница 13: ...e the flue connection 2 The boiler is designed to accept flues to BS 835 and should be sealed with an approved boiler putty 11 GAS CONNECTION 1 Connect the gas supply to the gas inlet pipe at the rear...

Страница 14: ...e temperature sensing probe through the cable clips provided and into the thermostat pocket adjacent to the flow connection Fit the plastic Heyco bush over the sensor lead at the line shown and insert...

Страница 15: ...cal supply such as a double pole switch having a 3mm 1 8 contact separation in both poles or a plug and socket serving only the boiler and system controls The means of isolation must be accessible to...

Страница 16: ...atisfy the conditions in the foregoing paragraph If not all zones can do this then consider other means of control detailed on other sheets Normal operation When any thermostat is satisfied while othe...

Страница 17: ...ls for heat its thermostat will open Zone 1 valve via the normally open contacts of the relay IMPORTANT Terminal L2 may control the appropriate pump s directly provided that the total running or start...

Страница 18: ...groove in square head in line with the pipe 5 Press the overheat thermostat reset button 2 6 Push in and retain fully depressed the grey button 4 on the gas control 5 At the same time repeatedly push...

Страница 19: ...ilitate speedy approximate adjustment of the gas rate After setting to the indicated pressure allow the boiler to operate for about 15 minutes to stabilise then check the gas rate by reference to a wa...

Страница 20: ...the minimum flow rate given in Table 4 when that part of the system intended to be used for dissipation of residual heat only is in operation 26 HANDING OVER ROUTINE OPERATION Full instructions coveri...

Страница 21: ...sitioned 3 The ignition electrode and lead are clean undamaged secure and correctly dimensioned Refer to diagram in Frame 28 4 The thermocouple tip is NOT burned or cracked 5 The thermocouple terminal...

Страница 22: ...front plate fits behind the burner retaining returns when it is replaced Refit the flue baffles cleanout cover NOx duct casing top panel and casing door PILOT BURNER Check that 1 The pilot flame cover...

Страница 23: ...ble in reverse order checking that the spark gap is as shown in Frame 28 SERVICING SERVICING To facilitate the replacement of components remove and replace the lower front panel NOx duct and the burne...

Страница 24: ...ge connection 7 Test for gas soundness 35 MAIN BURNER 1 Remove the NOx duct and burner front plate as previously described in Frame 27 2 Both left and right hand burners can be removed by sliding each...

Страница 25: ...in injector 3 off 9 Gas inlet manifold 10 Pilot gas pipe 11 Overheat thermostat piezo generator mounting bracket 12 O ring seal 13 Thermocouple 14 Spark electrode 15 Pilot draught shield 16 Pilot burn...

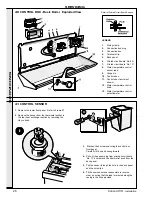
Страница 26: ...ing in the clips provided Detail of Printed Circuit Board Support SERVICING 40 CONTROL BOX Basic Boiler Exploded View 41 CONTROL SENSOR 1 Remove the lower front panel Refer to Frame 27 2 Remove the se...

Страница 27: ...OMBUSTION CHAMBER INSULATION REPLACEMENT The insulation boards used in the combustion chambers of these products contain man made fibres refractory fillers organic and inorganic binders and as such ar...

Страница 28: ...mocouple and pilot gas pipe connections at the gas valve must be removed and the igniter lead pulled off at the igniter 4 The centre burner may now be removed by pushing it back to clear the injector...

Страница 29: ...oming apart 8 Repeat the above procedure for all of the remaining sections until the assembly is complete 9 Fit the 4 tie rods through the holes in the sides of the end sections and fit a flat steel w...

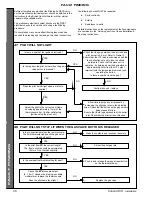
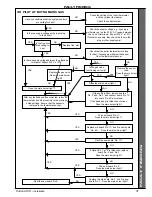
Страница 30: ...ical checks to be carried out during a fault finding procedure On completion of any service fault finding task which has required the breaking and remaking of electrical connections Check that the gap...

Страница 31: ...ling for heat if necessary withdraw the sensor from the thermostat pocket NO NO 49 PILOT LIT BUT NO MAINS GAS NO NO Have you confirmed that the system controls are calling for heat YES FAULT FINDING Y...

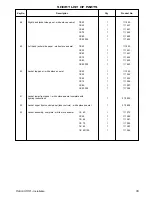
Страница 32: ...racket VERNITRON 60080 002 1 003 939 32 Ignition electrode and H T lead assembly VERNITRON 1 130 947 33 Thermocouple HONEYWELL Q 309 A 2762 1200mm long 1 002 937 34 Thermocouple interrupter lead assem...

Страница 33: ...1 111 651 CX 70 1 111 652 CX 80 1 111 652 CX 90 100 1 111 653 50 Jacket top panel white stove enamel CX 40 1 111 293 CX 50 1 111 294 CX 60 1 111 295 CX 70 1 111 296 CX 80 1 111 297 CX 90 100 1 111 298...

Страница 34: ...ursues a policy of continuing improvement in the design and performance of its products The right is therefore reserved to vary specification without notice Technical Training The Caradon Plumbing Lim...

Страница 35: ...giving away a free boiler for the five best ideas every year to be selected by our Technical Director Please complete this form using extra sheets if required and post it or fax it to us on 01482 498...

Страница 36: ...lease arrange for me to join an Ideal factory tour Range guides required The Ideal Guide a specifier s and installer s introduction to the Ideal domestic boiler range The Ideal Householders Guide to a...

Отзывы: