background image

19

Classic LX, RS - 

Installation

29 SCHEDULE

SERVICING

SER

VICING

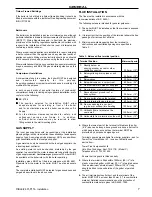
To ensure the continued safe and efficient operation of the
appliance, it is recommended that it is checked at regular
intervals and serviced as necessary. The frequency of servicing
will depend upon the installation condition and usage but should
be carried out at least annually .

It is the law that any service work must be carried out by a CORGI
registered installer.

a.

Light the boiler and carry out a pre-service check, noting
any operational faults.

b.

Clean the main burner.

c.

Clean the heat exchanger.

d.

Clean the main and pilot injectors.

e.

 Remove any debris from  inside the base of the casing.

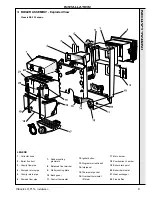
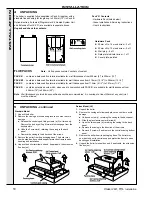
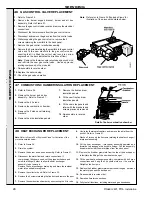
30 BOILER CASING REMOVAL

f.

Check that the flue terminal is unobstructed and that the flue
system is sealed correctly.

g.

If the appliance has been installed in a compartment, check
that the ventilation areas are clear.

The servicing procedures are covered more fully in Frames 30
to 35 and MUST be carried out in sequence.

WARNING.


Disconnect the electrical supply.

IMPORTANT.

 After completing the servicing or exchange of

components always test for gas soundness and carry out
functional checks as appropriate.

When work is complete the casing MUST be correctly refitted,
ensuring that a good seal is made.

The boiler must NOT be operated if the casing is not fitted.

Note.


In order to carry out either servicing or replacement of

components, the boiler casing must  be removed (Frame 30).

Deluxe model (LX)

Standard model

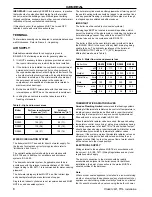
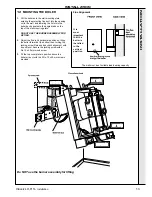
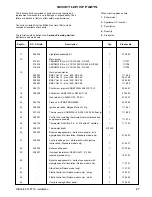
31 BURNER AND AIR BOX REMOVAL

1.

Remove the screw retaining the burner support bracket to the
combustion chamber.

2.

Remove the M5 pozi screw situated at the left hand, bottom rear
of the burner and pull the burner downwards in order to
disengage the retention tab. Remove burner to a safe place for
inspection and cleaning.

3.

Unscrew the thermocouple connection at the gas control.

4.

Remove the 4 screws retaining the air box / pilot assembly to the
vertical manifold.

5.

Remove the control box fixing screw and pull the box forward and
downward to disengage.

6.

Pull off the electrode lead at the piezo unit.

7.

Open the clips retaining the thermocouple and HT lead. Remove
the air box assembly to a safe place for inspection and cleaning.

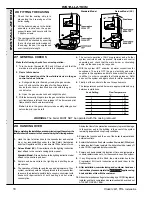
1.

If the 

Classic Sealed System Unit

 (standard models

only) is fitted lift off the casing to expose the boiler
casing top fixing screw.

2. Deluxe Model (LX)

 - Release the top captive casing

screw.  Lift the glass fascia and pull the sliding catch
out, to retain the glass in the upper position.  Release
the lower 2 captive casing screws.  Lift the casing off
the boiler and retain in a safe place.

Standard Model

 - Open the controls pod door and

release the 3 captive screws at the top and bottom of
the casing.  Lift the casing off the boiler and retain in a
safe place.

3.

Release the 3 captive screws at the top and bottom of
the casing. Lift the casing off the boiler and retain in a
safe place .

4.

Isolate the gas supply at the service cock. Refer to
Frame 36.

Содержание Classic LXRS 230

Страница 1: ......

Страница 2: ...Classic LX RS Installation CAUTION To avoid the possibility of injury during the installation servicing or cleaning of this appliance care should be taken when handling edges of sheet steel component...

Страница 3: ...INIMUM mbar in w g 4 0 1 6 8 7 3 5 9 7 3 9 12 0 4 8 pressure HOT MID mbar in w g 8 5 3 4 12 0 4 8 12 1 4 9 14 0 5 6 MAXIMUM mbar in w g 14 5 5 8 15 0 6 0 15 0 6 0 16 5 6 6 Seasonal Efficiency SEDBUK 7...

Страница 4: ...ymbols IE Ireland GB United Kingdom Countries of destination PMS Maximum operating pressure of water C12 A room sealed appliance designed for connection via ducts to a horizontal terminal which admits...

Страница 5: ...ated input not exceeding 60 kW BS 5449 Forced circulation hot water systems BS 5546 Installation of gas hot water supplies for domestic purposes 2nd Family Gases BS 5440 Part 1 Flues for gas appliance...

Страница 6: ...nds of the gravity flow and return pipes and fit a 22 mm to 28 mm copper connection at the boiler gravity flow and return connections in order to run the gravity circuits in 28 mm pipe Front clearance...

Страница 7: ...GAS SUPPLY The local gas supplier should be consulted at the installation planning stage in order to establish the availability of an adequate supply of gas An existing service pipe must NOT be used...

Страница 8: ...m thermostat controlling the temperature in a space served by radiators not fitted with such a valve as stated in BS 5449 When thermostatic radiator valves are used the space heating temperature contr...

Страница 9: ...ermostat 12 Igniter button 13 Programmer optional 14 Interpanel 15 Thermostat pocket 16 Overheat thermostat if fitted 17 Main burner 18 Combustion chamber 19 Boiler drain point 20 Boiler thermostat 21...

Страница 10: ...e painted 5 UNPACKING continued Standard Model 1 Unpack the boiler 2 Remove the casing as follows and place to one side to avoid damage a Release the controls pod fixing screws a 3 full turns only Rem...

Страница 11: ...ements to avoid cavitation Should these conditions not apply either lower the pump position or raise the cistern above the minimum requirement specified by Caradon Plumbing Limited Note A cold water f...

Страница 12: ...cover plate screw holes 7mm 9 32 and insert the plastic plugs 4 Remove the template from the wall IMPORTANT The wall must be of suitable load bearing capacity 1 Cut the appropriate hole in the wall fo...

Страница 13: ...boiler back panel onto the angled tabs on the top of the wall mounting plate DO NOT USE THE BURNER ASSEMBLY FOR LIFTING 2 Adjust the flue to its horizontal position by tilting the boiler forward at t...

Страница 14: ...emaining sachet of sealant provided 7 Fasten the terminal grille to the flue and air ducts using the 2 securing screws 6 provided 5 Terminal grille 6 Terminal grille securing screws Legend 1 Boiler ai...

Страница 15: ...separation in both poles or a plug and socket serving only the boiler and system controls The means of isolation must be accessible to the user after installation Note If the optional Programmer Kit i...

Страница 16: ...torage heater and can normally be left at least 24 hrs without frost damage However if parts of the pipework run outside the house or if the boiler will be left off for more than a day or so then a fr...

Страница 17: ...point E and connect a gas pressure gauge via a flexible tube 4 Turn the gas control knob clockwise until resistance is felt and then release WAIT FOR 3 MINUTES 5 Push in and retain fully depressed the...

Страница 18: ...ing bottom panel Standard Model Draw attention to the lighting instruction label affixed to the controls pod door 3 Explain and demonstrate the lighting and shutting down procedures 4 The operation of...

Страница 19: ...placement of components the boiler casing must be removed Frame 30 Deluxe model LX Standard model 31 BURNER AND AIR BOX REMOVAL 1 Remove the screw retaining the burner support bracket to the combustio...

Страница 20: ...ush the sliding catch in and lower the glass fascia to the closed position Standard Model Close the controls pod door 34 RE ASSEMBLY 33 CLEANING THE BURNER AND PILOT ASSEMBLY Refer to Frame 31 for ill...

Страница 21: ...e piezo unit Refit the new unit and re assemble in reverse order 6 Refit the control box assembly 7 Replace the boiler casing 8 Check the operation of the new piezo unit SERVICING When replacing any c...

Страница 22: ...on of the control thermostat 41 CONTROL THERMOSTAT REPLACEMENT 1 Refer to Frame 36 2 Unclip the thermostat capillary from the clips situated on the back panel 3 Remove the thermostat phial from the po...

Страница 23: ...hield is refitted 7 Replace the boiler casing 8 Check the operation of the thermocouple SERVICING 42 OVERHEAT THERMOSTAT REPLACEMENT 1 Refer to Frame 36 2 Slacken the screw at the thermostat pocket an...

Страница 24: ...e the keyhole fixings Pull the assembly downwards to clear the water pipes from the back panel 11 Remove the 4 rubber grommets from the top of the back panel to facilitate the fitting of the new heat...

Страница 25: ...er casing 7 Set the programmer to the desired programme and check the operation of the boiler 1 Refer to Frame 36 2 Remove the old seal from the casing surround 3 Thoroughly clean the casing surfaces...

Страница 26: ...require resetting Does the pilot now stay alight YES NO Clean the contacts and reconnect securely Replace the overheat thermostat NO NO Replace the gas valve NO Have you confirmed that the system con...

Страница 27: ...lary 1 113 193 27 308 012 Thermostat knob1 013 909 30 308 523 Boiler casing assembly white stove enamel with sightglass and foil insulation Standard model only 1 079 932 31 308 524 Controls casing doo...

Страница 28: ...END Numbers up to 44 relate to the B G spares list 28 Thermostat pocket 32 Wall mounting plate 33 Back panel 35 Balanced flue terminal 37 Programmer optional 39 Overheat thermostat if fitted 100 Boile...

Страница 29: ...29 Classic LX RS Installation SHORT LIST OF PARTS 57 BOILER CASING ASSEMBLY 56 SHORT PARTS Standard Model Deluxe Model...

Страница 30: ...01482 492 251 Fax 01482 448 858 Registration No London 322 137 Registered Office National Avenue Kingston upon Hull HU5 4JN A subsidiary of Caradon p l c Technical Training The Caradon Plumbing Limit...

Страница 31: ...be giving away a free boiler for the five best ideas every year to be selected by our Technical Director Please complete this form using extra sheets if required and post it or fax it to us on 01482...

Страница 32: ...ease arrange for me to join an Ideal factory tour Range guides required The Ideal Guide a specifier s and installer s introduction to the Ideal domestic boiler range The Ideal Householders Guide to as...

Отзывы: