13
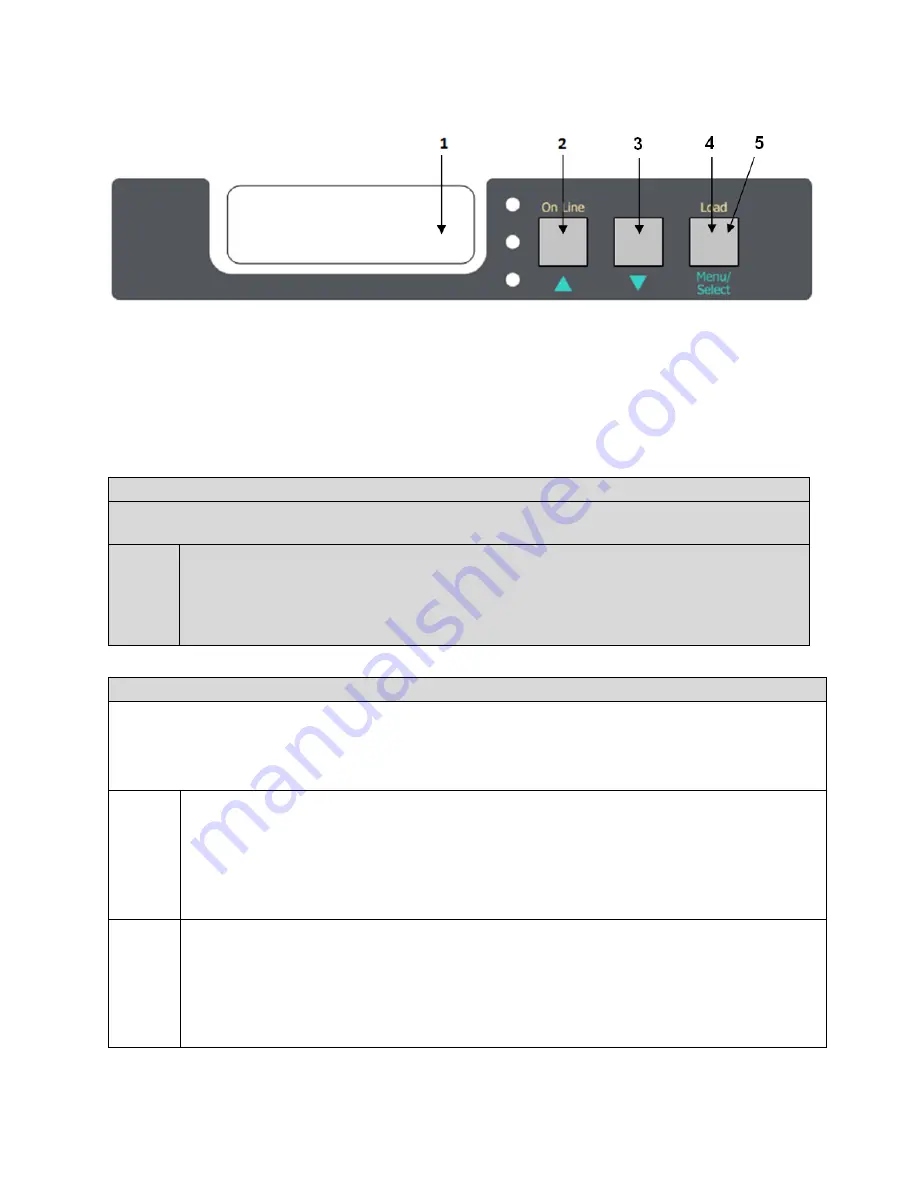
1.8 Feeder Display Menu Functions
1.
Display
– Displays the feeder status and any error messages
2.
On Line/UP –
Toggles between Online and Offline, and also serves as an “UP” selection button
3.
DOWN
– Serves as an “DOWN” selection button
4.
Load Button
– Press to complete loading paper
5.
Menu/Select
- Accesses the three menus: Feeder Configuration, Feeder Calibration and Network Settings
To access the feeder menu items, press the
On Line
button to toggle online or offline and gain access to your Menu
system. There are three main menu items:
Feeder Configurations, Feeder Calibrations
and
Network Settings.
M1: Feeder Configurations – NOT AVAILABLE
To access the feeder configuration menu, select
On Line
to turn the feeder offline. Press the
Menu
key once for
the M1: Feeder Config menu to appear. The following item is under Feeder Config:
I1:
Media
Type
To access the I1: Media Type menu, select the
On Line
button to take the feeder offline.
To change the media type, hold down the
Menu
key until the * disappears. Use the
UP
and
DOWN
arrow keys to select the required media. To save the selection, hold down the
Menu
key again until the
*
appears. The media type is now set. To exit press the
Menu
button. Select
On Line
button to take the
feeder back online.
M2: Calibrations
Under the Calibrations menu items, it is possible to configure both the Top and Bottom Load Sensors, the Sensor Gap,
Cut on the Fly parameters and Auto Calibration menus.
To access the M2: Calibrations menu, select
On Line
to turn the feeder offline. Press the
Menu
key twice for the M2:
Calibrations menu to appear. The following items are under Calibrations:
I1: Bot
Load
Sensor
This item configures the parameters for the bottom load sensor. To access the I1: Bot Load Sensor menu,
select the
UP
arrow until I1: Bot Load Sensor is shown on the display.
To change the settings, hold down the
Menu
key for about one full second until the
*
disappears. Use the
UP
and
DOWN
arrow keys to set the required values. To save the values, press
Menu
. When all values
have been set, press and hold the
Menu
key for about one full second, until the * appears. The bottom
load sensor values are now set. To exit press the
Menu
button. Select
On Line
button to take the feeder
back online.
I2: Top
Load
Sensor
This item configures the parameters for the top load sensor. To access the I2: Top Load Sensor menu,
select the
UP
arrow until I2: Top Load Sensor is shown on the display.
To change the settings, hold down the
Menu
key for about one full second until the
*
disappears. Use the
UP
and
DOWN
arrow keys to set the required values. To save the values, press
Menu
. When all values
have been set, press and hold the
Menu
key for about one full second, until the * appears. The top load
sensor values are now set. To exit press the
Menu
button. Select
On Line
button to take the feeder back
online.
Содержание 700
Страница 7: ...7 1 3 Roll Specifications ...
Страница 26: ...26 STEP 4 of 4 Wait until the Done button turns to green Click it to finish the installation ...
Страница 37: ...37 3 Before Printing 3 1 EDGE2Print User Interface STEP 1 of 1 This is the interface of EDGE2Print software ...
Страница 74: ...74 Using Spot White ...
Страница 75: ...75 ...
Страница 93: ...93 STEP 4 of 4 This is the same PDF as the one above with TrimBox ...
Страница 96: ...96 STEP 3 of 3 For variable data printing you can select the above to generate cost report after printing ...
Страница 108: ...108 STEP 5 of 5 Place the drums back into the printer and replace the lid ...


