• The orientation of the connector must match the orientation of the port before you push the connector
into the port. The cable connector and socket are keyed, and it is important that you have proper
alignment of the keys when the cable is inserted.
Note: On Storwize V5100 control enclosures, node canister 1 is inverted from node canister 2. Because
the orientation of the ports differ, you must ensure that the orientation of the SAS cables is also correct
for each canister.
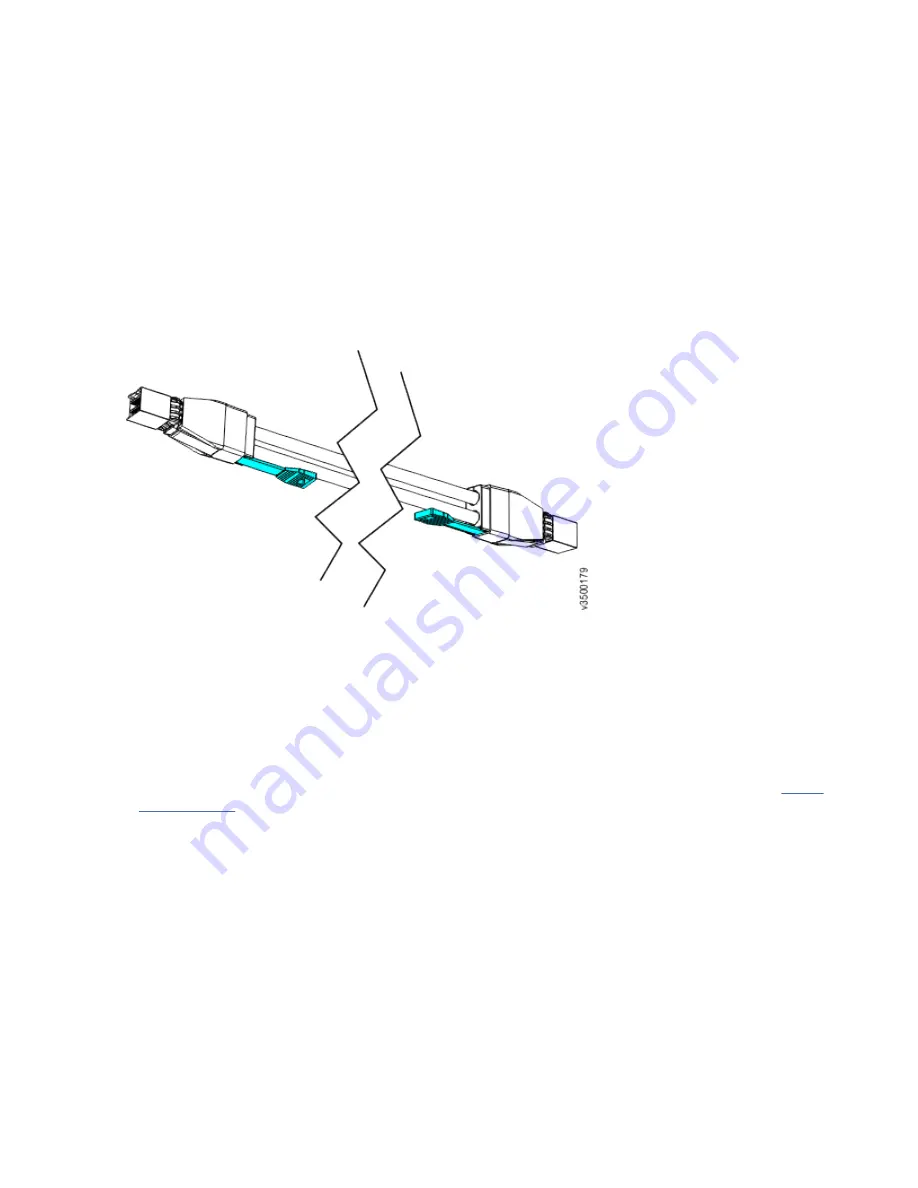
• For ports in the upper canister (canister 1), the blue pull tab must be above the connector. For ports in
the lower canister (canister 2), the blue pull tab must be below the connector.
• Insert the connector gently until it clicks into place. If you feel resistance, the connector is probably
oriented the wrong way. Do not force it.
• When inserted correctly, the connector can only be removed by pulling the tab.
• When both ends of a SAS cable are inserted correctly, the green link LEDs next to the connected SAS
ports are lit.
Figure 73. SAS cable connectors
Guidelines
Be aware of the following guidelines when you connect a 2077-424 control enclosure to the SAS ports in
2U and 5U expansion enclosures.
• 2077-424 systems support 4-port SAS interface adapters.
• No more than ten 2U expansion enclosures can be chained to SAS port 1 of a node canister. The
• No cable can be connected between a port on a left expansion canister and a port on a right expansion
canister.
• A cable must not be connected between ports in the same enclosure.
• A connected port on the node canister must connect to a single port on an expansion canister. Cables
that split the connector out into separate physical connections are not supported.
• Attach cables serially between enclosures; do not skip an enclosure.
• The last expansion enclosure in a chain must not have cables in port 1 of canister 1 or port 1 of canister
2.
• Ensure that cables are installed in an orderly way to reduce the risk of cable damage when replaceable
units are removed or inserted.
74 Storwize V5100 : Quick Installation Guide for MTM 2078-424, 2078-12F, 2078-24F, 2078-92F, and 2078-
U5B
Содержание Storwize V5100 MTM 2078-12F
Страница 12: ...xii Storwize V5100 Quick Installation Guide for MTM 2078 424 2078 12F 2078 24F 2078 92F and 2078 U5B...
Страница 20: ...xx Storwize V5100 Quick Installation Guide for MTM 2078 424 2078 12F 2078 24F 2078 92F and 2078 U5B...
Страница 24: ...xxiv Storwize V5100 Quick Installation Guide for MTM 2078 424 2078 12F 2078 24F 2078 92F and 2078 U5B...
Страница 110: ...86 Storwize V5100 Quick Installation Guide for MTM 2078 424 2078 12F 2078 24F 2078 92F and 2078 U5B...
Страница 112: ...88 Storwize V5100 Quick Installation Guide for MTM 2078 424 2078 12F 2078 24F 2078 92F and 2078 U5B...
Страница 114: ...90 Storwize V5100 Quick Installation Guide for MTM 2078 424 2078 12F 2078 24F 2078 92F and 2078 U5B...
Страница 116: ...92 Storwize V5100 Quick Installation Guide for MTM 2078 424 2078 12F 2078 24F 2078 92F and 2078 U5B...
Страница 118: ...94 Storwize V5100 Quick Installation Guide for MTM 2078 424 2078 12F 2078 24F 2078 92F and 2078 U5B...
Страница 124: ...100 Storwize V5100 Quick Installation Guide for MTM 2078 424 2078 12F 2078 24F 2078 92F and 2078 U5B...
Страница 143: ......
Страница 144: ...IBM Part Number 02YC382 1P P N 02YC382...


