background image

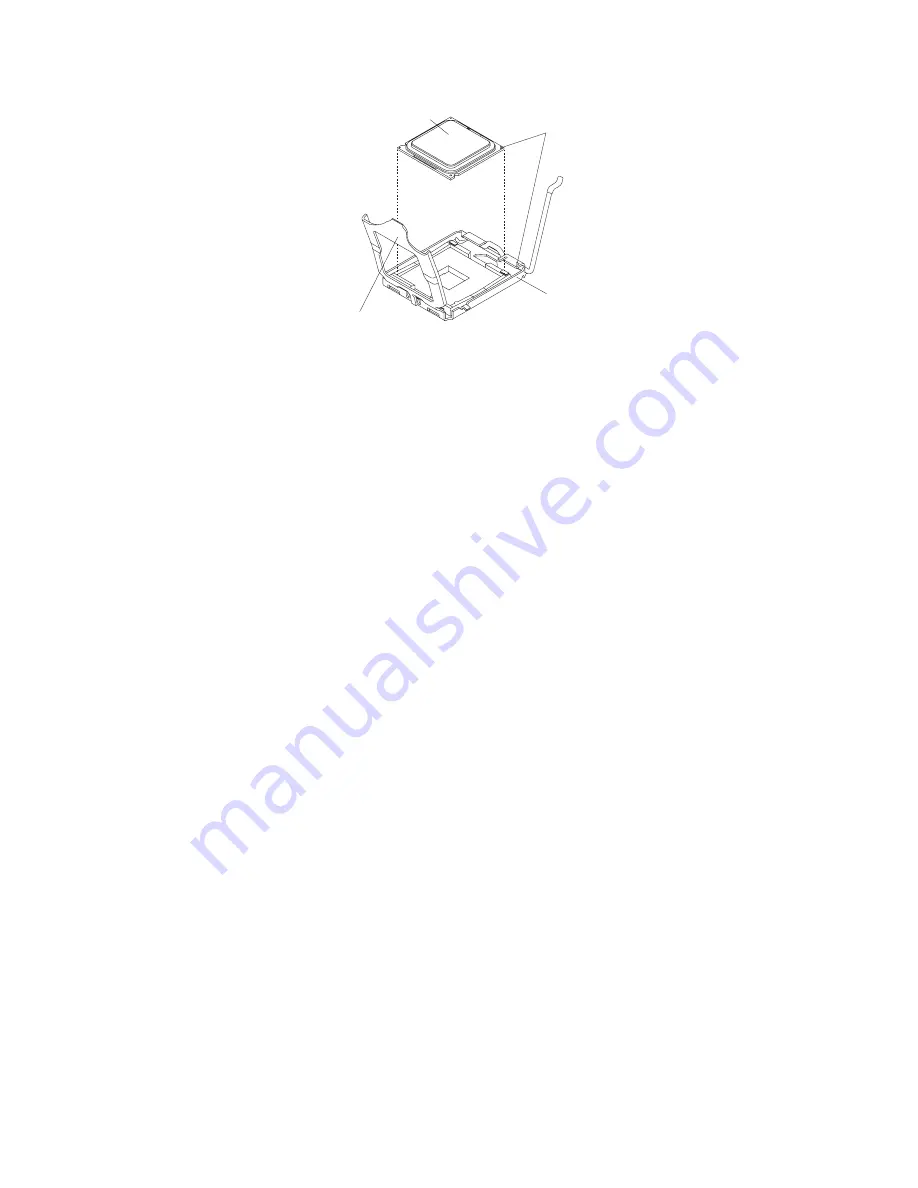
Microprocessor

Microprocessor
socket

Alignment marks

Microprocessor retainer

f.

Orient the triangle painted on the corner of the microprocessor with the
triangle on the microprocessor socket.

g.

Carefully place the microprocessor into the microprocessor socket, using
the alignment tabs on the microprocessor with the alignment notches in
the microprocessor socket as a guide.

Attention:

v

Do not press the microprocessor into the socket.

v

Make sure that the microprocessor is oriented and aligned correctly in
the socket before you try to close the microprocessor retainer.

v

Do not touch the thermal material on the bottom of the heat sink or on
top of the microprocessor. Touching the thermal material will
contaminate it. If the thermal material on the microprocessor or heat
sink becomes contaminated, contact your service technician.

h.

Carefully close the microprocessor retainer.

i.

Rotate the locking lever on the microprocessor socket to the closed and
locked position. Make sure that the lever is secured in the locked position
by pressing the tab on the microprocessor socket.

11.

If you are installing a new microprocessor and heat sink, complete the
following steps:

Attention:

v

Do not set down the heat sink after you remove the plastic cover.

v

Do not touch the thermal material on the bottom of the heat sink. Touching
the thermal material will contaminate it. If the thermal material on the
microprocessor or heat sink becomes contaminated, contact your service
technician.

a.

Remove the plastic protective cover from the bottom of the heat sink.

b.

Align and place the heat sink on top of the microprocessor in the retention
bracket, thermal material side down. Press firmly on the heat sink.

c.

Align the three screws on the heat sink with the holes on the heat-sink
retention module.

d.

Press firmly on the captive screws and tighten them with a screwdriver,
alternating among the screws until they are tight. If possible, each screw
should be rotated two full rotations at a time. Repeat until the screws are
tight. Do not overtighten the screws by using excessive force. If you are
using a torque wrench, tighten the screws to 8.5 Newton-meters (Nm) to
13 Nm (6.3 foot-pounds to 9.6 foot-pounds).

12.

Reinstall the memory module closest to the microprocessor you installed.

48

BladeCenter HS22V Type 7871 and 1949: Installation and User's Guide

Содержание BladeCenter HS22V

Страница 1: ...BladeCenter HS22V Type 7871 and 1949 Installation and User s Guide...

Страница 2: ......

Страница 3: ...BladeCenter HS22V Type 7871 and 1949 Installation and User s Guide...

Страница 4: ...ty Information document the IBM Safety Information and IBM Systems Environmental Notices and User Guide documents on the IBM Documentation CD Fourth Edition September 2010 Copyright IBM Corporation 20...

Страница 5: ...49 Closing the blade server cover 50 Installing the blade server in a BladeCenter unit 51 Updating the blade server configuration 53 Input output connectors and devices 53 Chapter 4 Configuring the bl...

Страница 6: ...tive conformance statement 83 Germany Class A statement 83 Japan VCCI Class A statement 84 Korea Communications Commission KCC statement 85 Russia Electromagnetic Interference EMI Class A statement 85...

Страница 7: ...dukt Lees voordat u dit product installeert eerst de veiligheidsvoorschriften Ennen kuin asennat t m n tuotteen lue turvaohjeet kohdasta Safety Information Avant d installer ce produit lisez les consi...

Страница 8: ...oduktet Antes de instalar este produto leia as Informa es sobre Seguran a Antes de instalar este producto lea la informaci n de seguridad L s s kerhetsinformationen innan du installerar den h r produk...

Страница 9: ...with translated versions of the caution or danger statement in the Safety Information document For example if a caution statement is labeled Statement 1 translations for that caution statement are in...

Страница 10: ...of fire water or structural damage v Disconnect the attached power cords telecommunications systems networks and modems before you open the device covers unless instructed otherwise in the installati...

Страница 11: ...module containing a lithium battery replace it only with the same module type made by the same manufacturer The battery contains lithium and can explode if not properly used handled or disposed of Do...

Страница 12: ...r adjustments or performance of procedures other than those specified herein might result in hazardous radiation exposure DANGER Some laser products contain an embedded Class 3A or Class 3B laser diod...

Страница 13: ...oltage current and energy levels are present inside any component that has this label attached There are no serviceable parts inside these components If you suspect a problem with one of these parts c...

Страница 14: ...ments do not exceed branch circuit protection requirements Refer to the information that is provided with your device for electrical specifications Statement 21 CAUTION Hazardous energy is present whe...

Страница 15: ...the device The device also might have more than one power cord To remove all electrical current from the device ensure that all power cords are disconnected from the power source Rack Safety Informat...

Страница 16: ...atus is approved under approval number NS G 1234 J 100003 for indirect connection to public telecommunication systems in the United Kingdom xiv BladeCenter HS22V Type 7871 and 1949 Installation and Us...

Страница 17: ...g system To download the latest device drivers complete the following steps Note Changes are made periodically to the IBM Web site The actual procedure might vary slightly from what is described in th...

Страница 18: ...the front of the blade server and on a label on the side of the blade server that is visible when the blade server is not in the BladeCenter unit Note The illustrations in this document might differ...

Страница 19: ...ions of the IMM installed in an IBM server The IMM works with IBM System x Server Firmware to provide systems management capability for System x and BladeCenter servers v Advanced Management Module Me...

Страница 20: ...for the blade server The IBM Documentation CD requires the following minimum hardware and software v Microsoft Windows XP Windows 2000 or Red Hat Enterprise Linux 5 Server v 100 MHz microprocessor v 3...

Страница 21: ...function within the document Click Help for detailed information about using the Documentation Browser Notices and statements in this document Use this information to understand the most common docume...

Страница 22: ...advanced system management are provided by the BladeCenter unit 2 The operating system in the blade server must provide USB support for the blade server to recognize and use USB media drives and devic...

Страница 23: ...server on 10 C to 32 C 50 F to 89 6 F Altitude 914 4 m to 2133 6 m 3000 ft to 7000 ft Blade server off 10 C to 43 C 50 F to 109 4 F Altitude 914 4 m to 2133 6 m 3000 ft to 7000 ft Blade server storag...

Страница 24: ...Blade server oversubscription Blower speed control CPU throttling Memory throttling Integrated keyboard video mouse cKVM v Hard disk drive support The blade server supports up to two SSD storage drive...

Страница 25: ...rver serverproven compat us v Light path diagnostics Light path diagnostics provides light emitting diodes LEDs to help you diagnose problems For more information see the Problem Determination and Ser...

Страница 26: ...erver restart ASR v Built in monitoring for temperature voltage and hard disk drives v Customer support center 24 hours per day 7 days a week 1 v Customer upgradeable Unified Extensible Firmware Inter...

Страница 27: ...ble Document Format PDF at http www ibm com systems management director resources It is updated every 6 to 8 weeks v Support for IBM and non IBM servers desktop computers workstations and notebook com...

Страница 28: ...the blade server The major components of the blade server include Field Replaceable Units FRUs Customer Replaceable Units CRUs and optional devices The following illustration shows the major component...

Страница 29: ...is button to associate the shared BladeCenter unit keyboard port video port and mouse port with the blade server The LED on this button flashes while the request is being processed and then is lit whe...

Страница 30: ...server to recognize and use the removable media drives and front panel USB ports 2 If you install a supported Microsoft Windows operating system on the blade server while it is not the current owner o...

Страница 31: ...ugh the Advanced Management Module the BladeCenter unit does not have enough power to turn on the blade server or the service processor IMM on the blade server is not communicating with the Advanced M...

Страница 32: ...roximately two minutes after the blade server has been installed 2 While the blade server is starting the power on LED on the front of the blade server is lit and does not flash See Blade server contr...

Страница 33: ...system The blade server can be turned off in any of the following ways v You can press the power control button on the blade server see Blade server controls and LEDs on page 13 This starts an orderly...

Страница 34: ...ystem board components and connectors for optional devices The following illustration shows the system board components including connectors for user installable optional devices in the blade server 1...

Страница 35: ...ks click Software and device drivers 4 Click BladeCenter HS22V to display the matrix of downloadable files for the blade server v Observe good housekeeping in the area where you are working Place remo...

Страница 36: ...ce the possibility of damage from electrostatic discharge observe the following precautions v When you work on a BladeCenter unit that has an electrostatic discharge ESD connector use a wrist strap es...

Страница 37: ...Some configuration information and update options are established according to blade server bay number if you reinstall the blade server into a different bay you might have to reconfigure the blade se...

Страница 38: ...moving the blade server from the BladeCenter unit on page 21 for instructions 3 Carefully lay the blade server on a flat static protective surface with the cover side up 4 Press the blade server cover...

Страница 39: ...lation guidelines on page 19 2 If the blade server is installed in a BladeCenter unit remove it see Removing the blade server from the BladeCenter unit on page 21 for instructions 3 Remove the blade s...

Страница 40: ...the BladeCenter unit on page 21 for instructions 3 Carefully lay the blade server on a flat static protective surface with the cover side up 4 Remove the blade server cover if one is installed see Re...

Страница 41: ...e Removing the blade server cover on page 22 4 If an expansion unit is installed remove the expansion unit see Removing an optional expansion unit on page 24 5 Remove the front bezel from the blade se...

Страница 42: ...from the blade server see Removing the blade server cover on page 22 4 If an expansion unit is installed remove the expansion unit see Removing an optional expansion unit on page 24 5 Remove the front...

Страница 43: ...static protective surface 4 Open the blade server cover see Removing the blade server cover on page 22 for instructions 5 If an optional expansion unit is installed remove it see Removing an optional...

Страница 44: ...s installed remove it see Removing an optional expansion unit on page 24 5 Carefully lay the blade server on a flat static protective surface 6 Press the bezel assembly release on each side of the bla...

Страница 45: ...e Setup utility the blade server can support a minimum of 1 GB and a maximum of 144 GB of system memory on the system board in a blade server with one processor If two microprocessors are installed th...

Страница 46: ...X X 8 DIMMs X X X X X X X X 9 DIMMs X X X X X X X X X 10 DIMMs X X X X X X X X X X 11 DIMMs X X X X X X X X X X X 12 DIMMs X X X X X X X X X X X X 13 DIMMs X X X X X X X X X X X X X 14 DIMMs X X X X...

Страница 47: ...ory DIMMs are installed to use a mirrored channel mode Table 4 System memory configuration for mirrored channel mode 1 microprocessor Installed memory DIMM socket 1 2 3 4 5 6 7 8 9 10 11 12 13 14 15 1...

Страница 48: ...an Intel Xeon 5600 series microprocessor Use the Setup utility to view the system summary and verify the type of microprocessor installed in your blade server see Using the Setup utility on page 56 Th...

Страница 49: ...nectors remove them see Removing a memory module on page 34 Note A DIMM or DIMM filler must occupy each DIMM socket before the blade server is turned on 10 To install the DIMMs repeat the following st...

Страница 50: ...r from the BladeCenter unit on page 21 3 Remove the blade server cover see Removing the blade server cover on page 22 4 If an optional expansion unit is installed remove the expansion unit see Removin...

Страница 51: ...xpansion card is installed remove the expansion card see Removing a CIOv form factor expansion card on page 40 8 Locate the USB connector on the blade server see Blade server connectors on page 18 9 T...

Страница 52: ...the I O expansion card is mapped support the network interface type of the I O expansion card For example if you add an Ethernet expansion card to a blade server the I O modules in I O module bays 3...

Страница 53: ...ove it see Removing the blade server from the BladeCenter unit on page 21 for instructions 3 Carefully lay the blade server on a flat static protective surface 4 Open the blade server cover see Removi...

Страница 54: ...eps 1 Before you begin read Safety on page v and Installation guidelines on page 19 2 If the blade server is installed in a BladeCenter unit remove it see Removing the blade server from the BladeCente...

Страница 55: ...protective surface 4 Open the blade server cover see Removing the blade server cover on page 22 for instructions 5 If an expansion unit is installed and you are installing DIMMs on the system board re...

Страница 56: ...remove a vertical combination I O CIOv expansion card Expansion card To remove a CIOv expansion card complete the following steps 1 Before you begin read Safety on page v and Installation guidelines...

Страница 57: ...to install a ServeRAID MR10ie controller into the CIOv expansion connector of the blade server The illustrations and installation instructions are similar for other CIOv storage interface cards Note...

Страница 58: ...stalled on the storage interface card remove it a If the interposer has a pull strap move the pull strap away from the storage interface card If the pull strap surrounds the storage interface card the...

Страница 59: ...nsion card see the documentation that comes with the storage interface card 11 Install the backup battery for the storage interface card into DIMM connector ten see Blade server connectors on page 18...

Страница 60: ...are similar for other CIOv storage interface cards ServeRAID controller Cable B To remove a storage interface card complete the following steps 1 Before you begin read Safety on page v and Installati...

Страница 61: ...chpoint 6 To remove the backup battery cable complete the following steps a Remove the cable from the storage interface card by holding the blue touchpoint on the cable then pull the cable away from t...

Страница 62: ...u install a new microprocessor download and install the most current level of BIOS code see Firmware updates on page 62 v The microprocessors terminate themselves therefore no terminator card is requi...

Страница 63: ...on page 28 7 Locate microprocessor socket 2 see Blade server connectors on page 18 8 If there is a DIMM installed in DIMM connector 10 remove it see Removing a memory module on page 34 9 Loosen the fo...

Страница 64: ...essor socket 11 If you are installing a new microprocessor and heat sink complete the following steps Attention v Do not set down the heat sink after you remove the plastic cover v Do not touch the th...

Страница 65: ...page 27 2 Reinstall the optional expansion unit if you removed one to install other devices see Installing an optional expansion unit on page 23 for information on installing the expansion unit 3 Clo...

Страница 66: ...ns on page Safety on page v and Installation guidelines on page 19 2 If you removed an expansion unit from the blade server install it now see Installing an optional expansion unit on page 23 3 Lower...

Страница 67: ...de server or device is in blade bay 7 through 14 power modules must be installed in all four power module bays For additional information see the Installation and User s Guide that comes with the Blad...

Страница 68: ...d place the label on the BladeCenter unit bezel See the documentation for your BladeCenter unit for information about the label placement Important Do not place the label on the blade server or in any...

Страница 69: ...the operating system on page 69 and your operating system documentation for additional information Input output connectors and devices Use this information to locate the input output connectors and d...

Страница 70: ...54 BladeCenter HS22V Type 7871 and 1949 Installation and User s Guide...

Страница 71: ...IBM ServerGuide Setup and Installation CD The ServerGuide program provides software setup tools and installation tools that are designed for the blade server Use this CD during the installation of the...

Страница 72: ...figure blade server configuration data and settings The following menu items are on the Setup utility main menu Depending on the version of the Unified Extensible Firmware Interface UEFI some menu ite...

Страница 73: ...ct this choice to enable or disable devices from taking control of the boot process The default is Disable Legacy Thunk Support Select this choice to enable or disable UEFI to interact with PCI mass s...

Страница 74: ...apter This choice is on the full UEFI Setup Utility menu only v Boot Manager Select this choice to view add delete or change the device boot priority boot from a file select a one time boot or reset t...

Страница 75: ...of your password in a secure place If you forget the power on password you can regain access to the blade server either by removing the blade server battery and then reinstalling it or by using the p...

Страница 76: ...and time v Detects installed optional hardware devices and provides updated device drivers for most adapters and devices v Provides diskette free installation for supported Windows operating systems...

Страница 77: ...ection and the installed hard disk drives 4 The ServerGuide program prompts you to insert your operating system CD and restart the blade server At this point the installation program for the operating...

Страница 78: ...de server and the BladeCenter unit Before you install the blade server in a BladeCenter unit go to http www ibm com systems support to download the latest firmware for the BladeCenter unit and the bla...

Страница 79: ...might vary slightly from what is described in this document 1 Go to http www ibm com support 2 Under Select product or service type for support select BladeCenter 3 Under Popular links click Software...

Страница 80: ...f you select SAS Topology or Advanced Adapter Properties additional screens are displayed Using LAN over USB to interface the IMM Unlike the BMC the IMM does not require IPMI device drivers or USB dae...

Страница 81: ...tion to resolve LAN over USB conflicts with network configurations and applications There are several actions that resolve LAN over USB conflicts with network configurations and applications 1 For con...

Страница 82: ...ll blades in the chassis which are capable of enabling and disabling the LAN over USB interface d Select the check boxes next to the blade or blades that you want to enable or disable e Click the Disa...

Страница 83: ...s_server_os inf file by right clicking on the file and selecting Install This generates a PNF file of the same name in WINDOWS inf For Windows 2008 Go to Computer Management then Device Manager and fi...

Страница 84: ...nfiguration For information about configuring LAN over USB on specific Linux distributions see the IBM white paper Transitioning to UEFI and IMM on the IBM web site see Related documentation on page 3...

Страница 85: ...unication with these devices Using the ServerGuide Setup and Installation CD to install the operating system Use these instructions for using the ServerGuide Setup and Installation CD to install the b...

Страница 86: ...ns to download the operating system installation instructions To download operating system installation instructions complete the following steps Note Changes are made periodically to the IBM Web site...

Страница 87: ...solve hardware related problems The following tools are available to help you diagnose and solve hardware related problems v POST codes error messages and error logs The POST error codes indicate the...

Страница 88: ...ed into a file that you can send to IBM service and support Additionally you can view the information locally through a generated text report file You can also copy the log to removable media and view...

Страница 89: ...a list of supported operating system versions The operating system cannot be installed the option is not available Make sure that the operating system is supported on the blade server If the operating...

Страница 90: ...74 BladeCenter HS22V Type 7871 and 1949 Installation and User s Guide...

Страница 91: ...You can obtain the latest downloads for your IBM product from http www ibm com systems support supportsite wss docdisplay brandind 5000008 lndocid MIGR 63017 v If you have installed new hardware or s...

Страница 92: ...from the World Wide Web On the World Wide Web up to date information about IBM systems optional devices services and support is available at http www ibm com systems support You can find the most up t...

Страница 93: ...available Monday through Friday from 9 a m to 6 p m IBM Taiwan product service Use this information to contact IBM Taiwan product service IBM Taiwan product service contact information v IBM Taiwan Co...

Страница 94: ...78 BladeCenter HS22V Type 7871 and 1949 Installation and User s Guide...

Страница 95: ...A PARTICULAR PURPOSE Some states do not allow disclaimer of express or implied warranties in certain transactions therefore this statement may not apply to you This information could include technical...

Страница 96: ...product or service names may be trademarks or service marks of others Important notes Processor speed indicates the internal clock speed of the microprocessor other factors also affect application per...

Страница 97: ...imits because numerous other factors such as temperature or moisture content of the air can influence the impact of particulates or environmental corrosives and gaseous contaminant transfer In the abs...

Страница 98: ...title When you send information to IBM you grant IBM a nonexclusive right to use or distribute the information in any way it believes appropriate without incurring any obligation to you Electronic emi...

Страница 99: ...M cannot accept responsibility for any failure to satisfy the protection requirements resulting from a nonrecommended modification of the product including the fitting of non IBM option cards Attentio...

Страница 100: ...en EMVG Dies ist die Umsetzung der EU Richtlinie 2004 108 EG in der Bundesrepublik Deutschland Zulassungsbescheinigung laut dem Deutschen Gesetz ber die elektromagnetische Vertr glichkeit von Ger ten...

Страница 101: ...corrective actions Korea Communications Commission KCC statement Please note that this equipment has obtained EMC registration for commercial use In the event that it has been mistakenly sold or purch...

Страница 102: ...86 BladeCenter HS22V Type 7871 and 1949 Installation and User s Guide...

Страница 103: ...Management Module AMM 66 from IMM 66 documentation using 76 Documentation Browser using 4 documentation CD 4 documentation format 82 documentation related 3 drive connectors 18 option SSD 25 E electr...

Страница 104: ...stem install using RDM 70 installing 69 option installing 19 optional expansion unit installing 23 order of installation for memory modules 29 P particulate contamination 81 password power on 59 PCI b...

Страница 105: ...summary information 56 system board components location of 12 system board connectors 18 systems management 11 T Taiwan Class A compliance statement 85 thermal material heat sink 46 trademarks 80 tro...

Страница 106: ...90 BladeCenter HS22V Type 7871 and 1949 Installation and User s Guide...

Страница 107: ......

Страница 108: ...Part Number 60Y1598 Printed in USA 1P P N 60Y1598...

Отзывы: