


Notes:
1.
Read
the
documentation
that
comes
with
the
microprocessor
to
determine
whether
you
must
update
the
basic
input/output
system
(BIOS)
code.
The
most
current
level
of
BIOS
code
for
the
server
is
available
at
http://www.ibm.com/pc/support/.
2.
A
new
microprocessor
comes
in
a
kit
with
a
VRM,
a
cooling
fan,
and
a
heat
sink.
3.
To
use
SMP,
obtain
an
SMP-capable
operating
system
(optional).
For
a
list
of
supported
operating
systems,
go
to
http://www.ibm.com/pc/us/compat/.
Attention:
To
avoid
damage
and
to
help
ensure
proper
server
operation,
review
the
following
information
before
you
install
a
microprocessor:
v
Make
sure
that
the
microprocessors
are
the
same
type,
have
the
same
cache
size,
and
have
the
same
clock
speed.
v
Make
sure
that
the
microprocessor
internal
and
external
clock
frequencies
are
identical.
v
See
the
ServerProven
list
at
http://www.ibm.com/pc/compat/
for
a
list
of
microprocessors
that
the
server
supports.
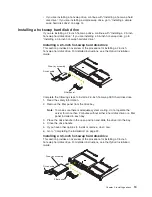
This
section
provides
an
overview
of
the
procedure
for
installing
an
additional
microprocessor.
For
detailed
instructions,
see
the
Option
Installation
Guide
.
Complete
the
following
steps
to
install
a
microprocessor:
1.
Read
the
safety
information
beginning
on
page
v
and
“Installation
guidelines”
on
page
7.
2.
Turn
off
the
server
and
peripheral
devices,
and
disconnect
the
power
cords
and
all
external
cables.
3.
Remove
the
server
cover.
Attention:
When
you
handle
static-sensitive
devices,
take
precautions
to
avoid
damage
from
static
electricity.
For
details
about
handling
these
devices,
see
“Handling
static-sensitive
devices”
on
page
8.
4.
Touch
the
static-protective
package
that
contains
the
new
microprocessor
to
any
unpainted
metal
surface
on
the
server;
then,
remove
the
microprocessor
from
the
package.
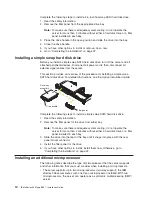
5.
If
you
are
installing
a
microprocessor
in
the
microprocessor
2
socket,
first
install
a
VRM
in
the
microprocessor
2
VRM
slot
(J-25)
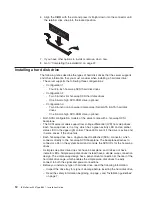
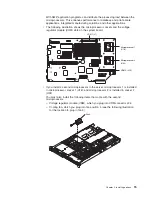
6.
Install
the
microprocessor:
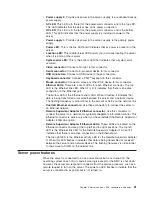
a.
Rotate
the
locking
lever
on
the
microprocessor
socket
from
its
closed
and
locked
position
until
it
stops
or
clicks
in
the
fully
open
position
(approximately
135°
angle).
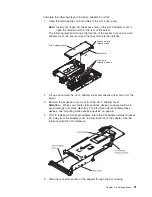
Lever closed
Lever fully
open
16
IBM
xSeries
336
Type
8837:
Installation
Guide
Содержание 883725U
Страница 3: ...IBM xSeries 336 Type 8837 Installation Guide ERserver...
Страница 18: ...6 IBM xSeries 336 Type 8837 Installation Guide...
Страница 38: ...26 IBM xSeries 336 Type 8837 Installation Guide...
Страница 46: ...34 IBM xSeries 336 Type 8837 Installation Guide...
Страница 64: ...52 IBM xSeries 336 Type 8837 Installation Guide...
Страница 66: ...54 IBM xSeries 336 Type 8837 Installation Guide...
Страница 112: ...100 IBM xSeries 336 Type 8837 Installation Guide...
Страница 113: ......
Страница 114: ...Part Number 25R4613 Printed in USA 1P P N 25R4613...


