background image


15 


    Sharpening the planer blades: 

-


Use the sharpening holder 

(an optional accessory) 

to remove 

nicks and produce a fine edge. 

-


First, loosen the wing nut on the holder and insert the blades 
so that they contact the sides. Then tighten the wing nuts. 

-


Hold the holder so that the both blades contact the dressing 
stone 

(silicon carbide or any other abrasive stone) 

for better & 

simultaneous sharpening at the same angle. 

(Immerse the stone in water for 2 or 3 min before sharpening) 


Inspecting the supply cord

; Do not pull or carry the planer by 

the electric cord or allow its contact with edges, sharp elements, 
rough surfaces, oil or chemicals that may damage its flexible and 
insulating properties.  


Inspecting carbon brushes; 

The motor employs carbon brushes 

which are consumable parts. Keep the brushes clean so that they 
move freely on the support.      
Remove and check the carbon brushes 
quite often.


Replace when they wear 

down to an extended limit since an 
excessively worn carbon brush results 
in motor trouble. Use only identical 
carbon brushes.  

    Both carbon brushes should be   
    replaced at the same time.  


This product does not contain any parts that can be repaired 
by the consumer.

 Contact an authorised service centre or a 

similarly qualified person to have it checked and repaired. 

            IBL EP82-58 


NOTE:


The accessories or attachments included with the tool are 

recommended only for use with this product. The use of any other 

accessories or attachments might present a risk of injury to 
persons. Only use accessory or attachment for its stated purpose. 


Содержание EP82-58

Страница 1: ...ELECTRIC PLANER EP82 58 ...

Страница 2: ...1 ...

Страница 3: ...PRODUCT SPECIFICATIONS ___________________________ 4 PRODUCT OVERVIEW _________________________________ 5 PRODUCT FUNCTIONS AND ASSEMBLY________________ 6 GENERAL OPERATION ________________________________ 7 TROUBLESHOOTING __________________________________ TABLE OF CONTENTS IBL EP82 58 3 5 7 8 9 12 16 ...

Страница 4: ...body is earthed or grounded Do not expose power tools to rain or wet conditions Water entering a power tool will increase the risk of electric shock Do not abuse the cord Never use the cord for carrying pulling or unplugging the power tool Keep it away from heat oil sharp edges or moving parts When operating a power tool outdoors use an extension cord suitable for outdoor use Use of a cord suitabl...

Страница 5: ...e power tool may result in personal injury Do not overreach Keep proper footing and balance at all times This enables better control of the power tool in unexpected situations Dress properly say no to loose clothing or jewellery Keep your hair clothing away from moving parts Loose clothes jewellery or long hair can be caught in moving parts If devices are provided for the connection of dust extrac...

Страница 6: ...oses that are different from what indicated in this manual might lead to hazardous situations Wait for the blade to come to a complete stop there is a period of inertial movement before the tool stops after turned OFF The use of this tool create and or spread dust that may cause serious and permanent respiratory injuries To reduce the exposure to these substances work in well ventilated places and...

Страница 7: ...ing the tool can cause uneven cuts loss of accuracy and possible kickback Push the tool forward at a speed so that the blade cuts without slowing When operating the planer keep the cord away from the cutting area and position it so that it will not be caught on the work piece during the cutting operation Blade depth and adjusting locking knob must be tight and secure before making cut If blade adj...

Страница 8: ...up to a maximum depth cut of 2 mm Applications of the planer includes Doors to take off a little bit from the edge of the door Straightening out Frames Cutting Rabbets Rabbets can come in handy and are typically used in making doors cabinets and some furniture Using the guide available with the planer is the best way to go and will give you a much better and straighter end result Chamfering Edges ...

Страница 9: ... only partly assembled or assembled with damaged parts PRODUCT OVERVIEW 1 Trigger Switch 2 Lock ON Button 3 Depth Adjustment Knob 4 Wing Nut for Edge Fence 2 IBL EP82 58 3 7 4 5 1 6 5 Rabbeting Depth Guide Port 6 Front Base Movable Shoe 7 Rear Base Stationary Shoe 8 Blade Driver Belt Inside 8 ...

Страница 10: ...ation press the lock on button 2 as well Release the trigger switch to stop ON OFF TRIGGER SWITCH LOCK BUTTON 1 2 ADJUSTING THE CUTTING DEPTH The depth cut setting range can be read from the gauge Turn the planing depth adjustment knob to the required depth of cut Rotate the knob until the indicator arrow aligns with the desired cutting depth on the gauge 3 I II 2 mm 1 5mm 0 mm NOTE Always ensure ...

Страница 11: ...o install the blades loosely attach the adjusting plate to the set plate with the screws and set the planer blade on the gauge base so that the cutting edge of the blade is perfectly flush with the inside flank of the gauge plate Refer the illustrations provided on the next page Set the adjusting plate set plate on the gauge base so that the planer blade locating lugs on the set plate rest in the ...

Страница 12: ...hree bolts so that a gap exists between the drum and the set plate to slide the mini planer blade into position The blade will be positioned by the planer blade locating lugs on the set plate The blade s lengthwise adjustment will need to be manually positioned so that the blade ends are clear equidistant from the housing on one side and the metal bracket on the other Tighten the three bolts with ...

Страница 13: ...lades to reach full speed Make sure the blades reached full speed before you start planing IBL EP82 58 Hold the planer firmly with both hands Rest the front shoe flat on the work piece surface ensuring that the blades do not make contact with the work Move the planer gently forward along the grain of the wood Apply pressure on the front of the planer at the beginning of the stroke and at the rear ...

Страница 14: ...the fence until it comes in contact with the side of the work piece then secure it by tightening the wing nut 4 When planing move the tool with the edge fence flush with the side of the work piece Maximum rabbeting depth is 10 mm RABBETING A chamfer is an angled cut made across the corner of a material The V groove in the front shoe allow you to create a sloping edge along the corner of your work ...

Страница 15: ... or attachments for wear and damage Inspecting planer blade Check the cutting blade carefully for cracks or dull damage before and after each use Continuing to use a dull blade may cause a dangerous kickback and or motor overload Dressing could be suitable or replace with a new blade as soon as it no longer cuts effectively CLEANING AND STORAGE MAINTENANCE AND REPAIR NOTE Always switch the product...

Страница 16: ...ulating properties Inspecting carbon brushes The motor employs carbon brushes which are consumable parts Keep the brushes clean so that they move freely on the support Remove and check the carbon brushes quite often Replace when they wear down to an extended limit since an excessively worn carbon brush results in motor trouble Use only identical carbon brushes Both carbon brushes should be replace...

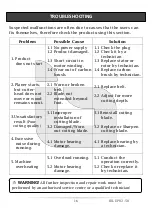
Страница 17: ...ut 2 1 Worn or broken belt 2 2 Blade not extended beyond foot 2 1 Replace belt 2 2 Adjust for more cutting depth 3 Unsatisfactory result Poor cutting quality 3 1 Improper installation of cutting blade 3 2 Damaged Worn out cutting blade 3 1 Reinstall cutting blade 3 2 Replace or Sharpen cutting blade 4 Excessive noise during running 4 1 Motor bearing damage 4 1 Replace bearing by a technician 5 Mac...

Страница 18: ...d appliances you make an important contribution in protecting our environment Waste electrical products should not be disposed of with household waste Please recycle where facilities exist Check with your Local Authority or local store for recycling advice CONTACT US HiTech Machineries Equipments IV 540E Thottumugham P O Aluva Ernakulam Dist Kerala India 683105 Toll Free 1800 103 4090 Whatsapp 91 ...

Отзывы: