


65
CAUTION
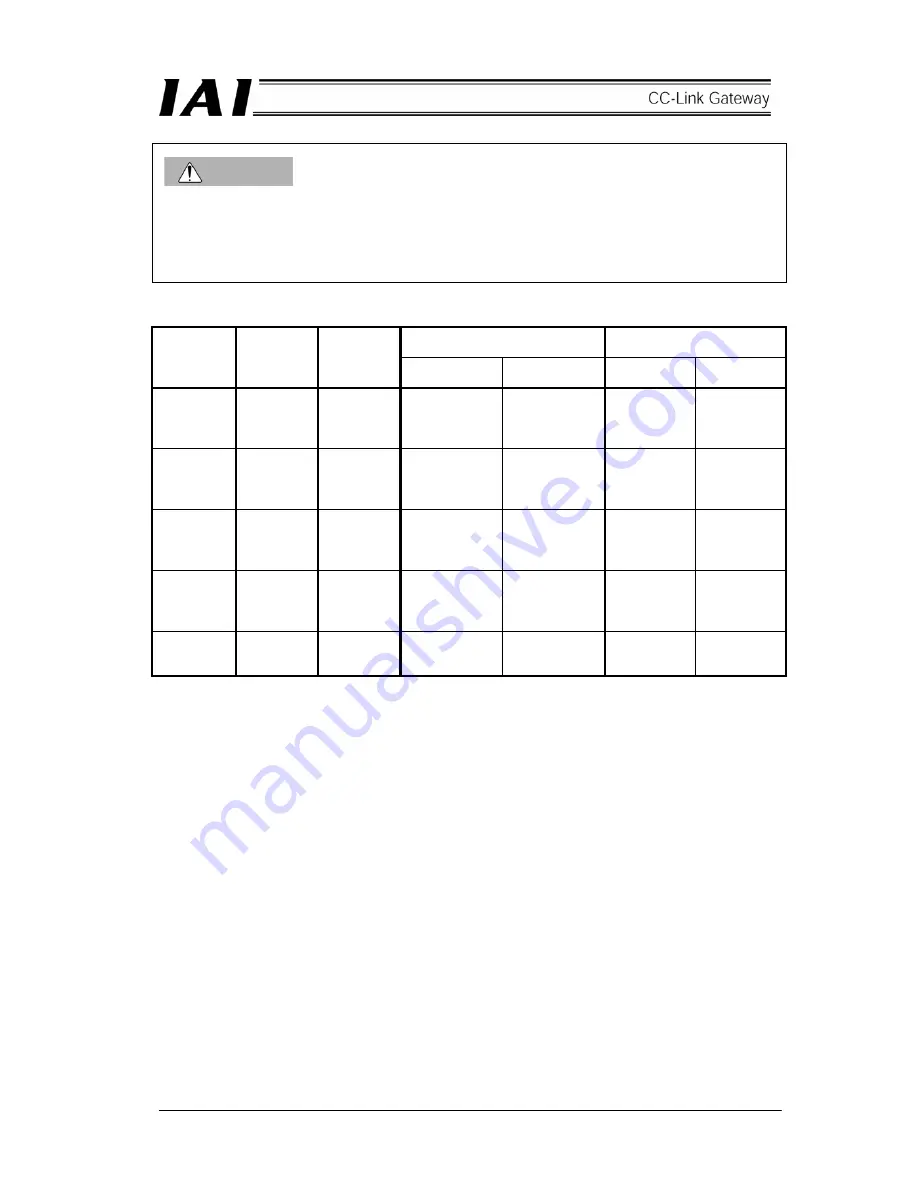
Setting of the “Parameter initial value” is not applied to the movement data which must be directly
designated in numeric value from the PLC. Therefore, note that if it is not designated in numeric value,
operation is not performed or alarm occurs.
The following summarizes how to designate movement data for each operation mode.
Position data designation
Simple/Position No.
designation
Designated
data
Position
data limit
designation
Position No.
designation
Normal Push
Simple direct
value
Position No.
designation
Position PLC
numeric
value
designation
Position
table
PLC numeric
value
designation
PLC numeric
value
designation
PLC numeric
value
designation
Position table
Speed Parameter
Position
table
(Parameter)
PLC numeric
value
designation
(
×
Parameter)
PLC numeric
value
designation
(
×
Parameter)
Position table
(Parameter)
Position table
(Parameter)
Acceleration
and
deceleration
speed
Parameter
Position
table
(Parameter)
PLC numeric
value
designation
(
×
Parameter)
PLC numeric
value
designation
(
×
Parameter)
Position table
(Parameter)
Position table
(Parameter)
Positioning
width
Parameter
Position
table
(Parameter)
Parameter
PLC numeric
value
designation
(
×
Parameter)
Position table
(Parameter)
Position table
(Parameter)
Push
current limit
value
×
Position
table
×
PLC numeric
value
designation
Position table Position table
Содержание RCM-GW-CC
Страница 1: ...IAI America Inc CC Link RCM GW CC Gateway Unit Operation ManualFirst Edition...
Страница 4: ......
Страница 10: ...6 1 5 How to identify model RCM GW CC Basic model For CC Link Gateway unit...
Страница 12: ...8 2 2 External dimension drawing Mounting dimension...
Страница 78: ...74...
Страница 82: ...78 Position data measurement value Present position 1 2 3 4 4 5 6 7...
Страница 84: ...80 Speed acceleration and deceleration set value Actuator speed Speed n2 Speed n3 1 2 3...
Страница 88: ...84 Command position No Completion position No 1 2 3 4 5 6...
Страница 91: ...87...
Страница 93: ...89...
Страница 115: ...111 Command P No 1 to axes 0 1 Set CSTR to 1 Set CSTR to 0 Positioning completed One second timer 2 1...
Страница 125: ...121 No 3 Axis 1 pause No 3 Axis 1 pause lamp No 3 Axis 1 STP...
Страница 130: ...126...
Страница 131: ......


