5-12
OPERATION
HT4001 Instruction Manual
20. Set the initial height to OFF.
21. Angle the workpiece on the work table (with one end higher than the other) to
check the auto height (torch height control) mode. Position the torch at the
highest point on the workpiece. Program a square cut pattern into the controller.
(See controller instruction manual.)
22. Set the auto height to ON.
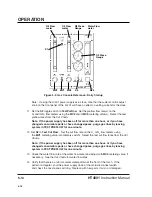
23. Manually lower the torch to approximately .25 inches (6 mm) above the
workpiece.
24. Start the arc transfer from the controller.
25. When the arc transfers and the machine delay time passes, the arc will pierce
the workpiece and machine motion will start. As the torch travels from a higher
point to a lower point, verify that the torch stand-off distance from the workpiece
remains constant, and the DOWN indicator lights on the DR V/C module.
As the torch travels from a low point to a high point, verify that the torch stand-off
distance from the workpiece remains constant, and the UP indicator lights on the
DR V/C module.
As the torch makes a corner cut, the machine motion speed should remain
constant. The UP and DOWN indicators will not light while cornering. Machine
motion and plasma arc will automatically stop when the cut is complete.
The system is now operational. Proceed to
Daily Startup.
If the system does not function as outlined in this procedure, recheck the pre-
installation requirements and installation directions in this manual. If all pre-
installation and installation directives have been followed and you are still
experiencing difficulty with the system, feel free to call Hypertherm's Field Service
group at 1-800-643-9878.
Содержание HT4001
Страница 1: ...Plasma Arc Cutting System Instruction Manual 802000 Revision 15 HT4001 EN50199 EN60974 1 ...
Страница 142: ...PARTS LIST 6 6 HT4001 Instruction Manual Figure 6 2 HT4001 Power Supply Inside Front Panel 1a 1b 1c 1d 2 99 2 ...
Страница 148: ...PARTS LIST 6 12 HT4001 Instruction Manual Figure 6 5 HT4001 Power Supply Inside Floor 1 2 3b 3a 3c 3d ...
Страница 152: ...PARTS LIST 6 16 HT4001 Instruction Manual Figure 6 7 HT4001 Power Supply Rear Wall Outside 1 2 6 8 7 4 5 9 3 10 6 95 ...
Страница 239: ...e 2 ...
Страница 240: ...e 3 ...
Страница 241: ...e 4 ...
Страница 242: ...e 5 ...
Страница 244: ...e 7 ...
Страница 245: ...e 8 ...
Страница 246: ...e 9 ...
Страница 247: ...e 10 ...
Страница 257: ...KY ...
Страница 258: ...KY ...
Страница 259: ...KY ...
Страница 260: ...KY ...
Страница 261: ...KY ...
Страница 262: ...KY ...
Страница 263: ...KY ...
Страница 264: ...KY ...
Страница 268: ...KY ...
Страница 269: ...KY ...
Страница 270: ...KY ...

