HT4001 Instruction Manual
4-38
INSTALLATION
MOUNTING THE MACHINE TORCH
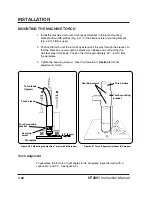
1. Install the machine torch (with torch leads attached) in the torch mounting
bracket without IHS probes (Fig. 4-21) or the alternate torch mounting bracket
(Fig. 4-20) if IHS is used.
2. Position the torch until the torch body extends all the way through the bracket, so
that the bracket is now around the plastic torch sleeve and not touching the
stainless steel torch body. Position the torch approximately .25 " (6 mm) from
the workpiece.
3. Tighten the securing screw(s). See
Pre-Operation in Section 5 for final
adjustment of torch.
Torch leads
(typical)
Torch sleeve
Torch mounting
bracket
Securing
screw
Workpiece
.25" (6mm)
0
°
90
°
Torch sleeve
Torch mounting
bracket
Securing screws
Figure 4-20 Mounting the Machine Torch (with IHS probes)
Figure 4-21 Torch Alignment (without IHS probes)
Torch Alignment
To guarantee the torch is at right angles to the workpiece, align the torch with a
square at 0
°
and 90
°
. See figure 4-21.
Содержание HT4001
Страница 1: ...Plasma Arc Cutting System Instruction Manual 802000 Revision 15 HT4001 EN50199 EN60974 1 ...
Страница 142: ...PARTS LIST 6 6 HT4001 Instruction Manual Figure 6 2 HT4001 Power Supply Inside Front Panel 1a 1b 1c 1d 2 99 2 ...
Страница 148: ...PARTS LIST 6 12 HT4001 Instruction Manual Figure 6 5 HT4001 Power Supply Inside Floor 1 2 3b 3a 3c 3d ...
Страница 152: ...PARTS LIST 6 16 HT4001 Instruction Manual Figure 6 7 HT4001 Power Supply Rear Wall Outside 1 2 6 8 7 4 5 9 3 10 6 95 ...
Страница 239: ...e 2 ...
Страница 240: ...e 3 ...
Страница 241: ...e 4 ...
Страница 242: ...e 5 ...
Страница 244: ...e 7 ...
Страница 245: ...e 8 ...
Страница 246: ...e 9 ...
Страница 247: ...e 10 ...
Страница 257: ...KY ...
Страница 258: ...KY ...
Страница 259: ...KY ...
Страница 260: ...KY ...
Страница 261: ...KY ...
Страница 262: ...KY ...
Страница 263: ...KY ...
Страница 264: ...KY ...
Страница 268: ...KY ...
Страница 269: ...KY ...
Страница 270: ...KY ...


