background image

66 - English 

8. MAINTENANCE

Replacing the battery

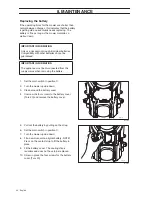
If the operating times for the mower are shorter than 
normal between charges, this indicates that the battery 
is getting old and eventually needs replacing. The 
battery is fine as long as the mower maintains a 
well-cut lawn. 

1. Set the main switch in position 

0

.

2. Turn the mower upside down.

3. Clean around the battery cover.

4. Unscrew the four screws to the battery cover 

(Torx 20) and remove the battery cover.

5. Pull out the battery by pulling on the strap.

6. Set the main switch in position 

0

.

7. Turn the mower upside down.

8. Fit a new Husqvarna original battery. NOTE! 

Press on the contact strip to fit the battery in 
place.

9. Fit the battery cover. The sealing strip is 

reusable and does not have to be replaced.

10. Screw in place the four screws for the battery 

cover (Torx 20).

IMPORTANT INFORMATION

Only use Husqvarna Group AB original batteries. 
Compatibility with other batteries cannot be 
guaranteed. 

IMPORTANT INFORMATION

The appliance must be disconnected from the 
supply mains when removing the battery. 

3020-044

3020-044

3020-045

3020-045

Содержание AUTOMOWER 105

Страница 1: ...HUSQVARNA AUTOMOWER 105 OPERATOR S MANUAL Omslag 105 US indd 1 2016 03 16 15 02 ...

Страница 2: ......

Страница 3: ... battery 37 4 2 Using the timer 38 4 3 Starting 39 4 4 Stopping 39 4 5 Switching off 40 4 6 Adjusting the cutting height 40 5 Control panel 41 5 1 Operation selection 42 5 2 Multi choice buttons 43 5 3 Numbers 43 5 4 Main switch 43 6 Menu functions 44 6 1 Main menu 44 6 2 Menu structure 45 6 3 Timer 46 6 4 Installation 48 6 5 Security 52 6 6 Settings 54 7 Garden examples 56 8 Maintenance 60 8 1 Wi...

Страница 4: ...an be registered as stolen in the central systems at Husqvarna AB It is an important step in theft prevention discouraging interest in the buying and selling of stolen mowers The product s serial number is nine digits and is shown on the product rating plate and the product s packaging www automower com Serial number PIN code Dealer Dealer s telephone number ...

Страница 5: ...Husqvarna AB has a policy of continuous product development and therefore reserves the right to modify the design and appearance and function of products without prior notice The following system is used in the Operator s Manual to make it easier to use Text written in italics is a text that is shown on the robotic lawnmower s display or is a reference to another section in the Operator s Manual W...

Страница 6: ...h the appliance This appliance can be used by children aged from 8 years and above and persons with reduced physical sensory or mental capabilities or lack of experience and knowledge if they have been given supervision or instruction concerning use of the appliance in a safe way and understand the hazards involved Children shall not play with the appliance Cleaning and user maintenance shall not ...

Страница 7: ...ntenance Remain at a safe distance from the robotic lawnmower when it is running Keep your hands and feet away from the rotating blades Never put your hands or feet close to or under the body when the robotic lawnmower is running Do not ride on the robotic lawnmower This product conforms to the applicable EC Directives Noise emission to surroundings The product s emissions are set out in chapter 1...

Страница 8: ...carrying out any inspections and or maintenance Always wear protective gloves when working with the robotic lawnmower s chassis Never use a high pressure washer or even running water to clean the robotic lawnmower A warning box indicates the risk of personal injury especially if the instructions are not followed An information box indicates the risk of material damage especially if the instruction...

Страница 9: ...botic lawnmower It is not permitted to modify the original design of the robotic lawnmower All modifications are made at your own risk Check that there are no stones branches tools toys or other objects on the lawn that can damage the blades and cause the mower to stop Start the robotic lawnmower according to the instructions When the main switch is in position 1 make sure you keep your hands and ...

Страница 10: ...r function see 6 3 Timer on page 46 so the robotic lawnmower and sprinkler never run simultaneously The built in alarm is very loud Be careful especially if the robotic lawnmower is handled indoors Full compatibility cannot be guaranteed between the robotic lawnmower and other types of wireless systems such as remote controls radio transmitters hearing loops buried electric animal fencing or simil...

Страница 11: ...d replace any damaged or worn parts Check especially that the blades and blade disc are not damaged Check also that the blades can pivot freely Replace all blades and screws at the same time if necessary so that the rotating parts are kept balanced See 8 7 Blades on page 64 IMPORTANT INFORMATION Do not lift the robotic lawnmower when it is parked in the charging station This may damage the chargin...

Страница 12: ... charging station and a 100 240 V wall socket The power supply is connected to the wall socket and to the charging station using a 10 m long low voltage cable The low voltage cable must not be shortened or extended A longer low voltage cable is available as optional accessory Please contact your dealer for more information The appearance of the power supply may differ depending on market Loop wire...

Страница 13: ...7 Loop wire for boundary loop and guide wire 18 Connector for connecting the loop wire to the charging station 19 Pegs 20 Coupler for the loop wire 21 Screws for securing the charging station 22 Extra blades 23 Operator s Manual and Quick Guide 24 Measurement gauge for help when installing the boundary wire the measurement gauge is broken loose from the box 25 Power supply the appearance of the po...

Страница 14: ...mower package contains the following details Automower 105 Robotic mower Charging station Power supply Low voltage cable Charging station screws 3 pcs Allen key Measurement gauge Cable markers Operator s Manual and Quick Guide Extra blades 9 pcs Alarm decal ...

Страница 15: ...ime can vary depending on among other factors the ambient temperature Mowing technique The Husqvarna mowing system is based on an efficient and energy saving principle Unlike many standard lawnmowers the robotic lawnmower cuts the grass instead of knocking it off We recommend you allow the robotic lawnmower to mainly mow in dry weather to obtain the best possible result The robotic lawnmower can a...

Страница 16: ...exit sector In order to ensure an even cut even in parts of the garden that are hard to reach there are a number of manual settings for how the robotic lawnmower is to leave the charging station See 6 4 Installation When the robotic lawnmower body hits an obstacle the robotic lawnmower reverses and selects a new direction Two sensors one on the front and one on the back of the robotic lawnmower wi...

Страница 17: ...nt pattern The movement pattern of the robotic lawnmower is random and is determined by the robotic lawnmower itself and depends on how the lawn looks The mower will not always drive in straight lines and a movement pattern is never repeated With this cutting system the lawn is mown very evenly without any straight mowing lines from the robotic lawnmower Locating the charging station The robotic l...

Страница 18: ...wer com for further descriptions and tips regarding installation Carry out the installation in the following steps 3 1 Preparations 3 2 Installation of the charging station 3 3 Charging the battery 3 4 Installation of the boundary wire 3 5 Connecting the boundary wire 3 6 Installation of the guide wire 3 7 Checking the installation 3 8 First start up and calibration 3 9 Test docking with the charg...

Страница 19: ...n of the charging station Ideal position for the charging station Take the following aspects into consideration when identifying the best location for the charging station Allow for 3 metres of free space in front of the charging station It must be possible to lay at least 1 5 metres of boundary wire straight out to the right and left of the charging station It must be close to a wall socket The s...

Страница 20: ...station The wire must be laid straight out from the rear end of the charging station Any other locations can mean that the robotic lawnmower enters the charging station sideways and will have difficulty docking Do not put the charging station in a corner in the working area The charging station must be positioned on relatively level ground The front end of the charging station must be a maximum of...

Страница 21: ...of the boundary wire chapter Connecting the power supply Take the following into consideration when planning where to place the power supply Close to the charging station Protection from rain Protection from direct sunlight If the power supply is connected to an electrical socket outdoors this must be approved for outdoor use The low voltage cable for the power supply is 10 metres long and may not...

Страница 22: ...o direct sunlight The power supply must be placed under a roof It is recommended to use an earth fault breaker when connecting the power supply to the wall socket Do not under any circumstances mount the power supply at a height where there is a risk it can be submerged in water at least 30 cm from the ground It is not permitted to place the power supply on the ground Never connect the power suppl...

Страница 23: ...ng the battery As soon as the charging station is connected it is possible to charge the robotic lawnmower Set the main switch to position 1 Place the robotic lawnmower in the charging station to charge the battery while the boundary and guide wires are being laid If the battery is flat it takes around 80 to 100 minutes to fully charge it IMPORTANT INFORMATION It is not permitted to make new holes...

Страница 24: ...to lay the boundary wire at least 1 cm and a maximum of 20 cm in the ground Plan where to lay the boundary wire The boundary wire must be laid so that A loop is formed around the working area for the robotic lawnmower Only original boundary wire must be used It is specially designed to resist dampness from the soil that could otherwise easily damage the wires The robotic lawnmower is never more th...

Страница 25: ...over the path The boundary wire should then be laid 5 cm from the edge of the path All the grass along the side of the paving stone path will be cut When the working area is divided by a paving stone path which is level with the lawn it is possible to allow the robotic lawnmower to run over the path It can be an advantage to lay the boundary wire under the paving stones The boundary wire can also ...

Страница 26: ... consists of two areas which the robotic lawnmower has difficulty travelling between it is recommended to set up a secondary area Instances of this are 25 slopes or a passage that is narrower than 60 cm Lay the boundary wire then around the secondary area so that it forms an island outside of the main area The robotic lawnmower must be moved manually between the main and secondary area when the la...

Страница 27: ...the wheels can slip on the wet grass However the boundary wire can be laid across a slope steeper than 15 if there is an obstacle that the robotic lawnmower is allowed to collide with for example a fence or a dense hedge The robotic lawnmower can mow lawns that slope up to 25 cm every metre 25 inside the working area Areas that slope more must be demarcated by the boundary wire When a part of the ...

Страница 28: ...e is to be buried Make sure to lay the boundary wire at least 1 cm and a maximum of 20 cm in the ground The wire can be buried for instance using an edge cutter or a straight spade Use the supplied measurement gauge as a guide when you lay out the boundary wire This helps you to easily set the correct distance between the boundary wire and the boundary obstacle The measurement gauge is broken loos...

Страница 29: ...is not long enough and needs to be spliced It is waterproof and gives a reliable electrical connection Insert both wire ends in the coupler Check that the wires are fully inserted into the coupler so that the ends are visible through the transparent area on the other side of the coupler Now press down the button on top of the coupler fully Use a polygrip to completely press down the button on the ...

Страница 30: ...e each connector 4 Press the connector onto the contact pin marked AL left and AR right on the charging station IMPORTANT INFORMATION The boundary wire must not be crossed when connecting it to the charging station The right hand wire end must be connected to the right hand pin on the charging station and the left hand wire end to the left pin IMPORTANT INFORMATION The right hand connector must be...

Страница 31: ...m the charging station See 6 4 Installation on page 48 The robotic lawnmower runs at varying distances from the guide wire to reduce the risk of tracks forming when the robotic lawnmower follows the guide wire to and from the charging station The area beside the wire which the robotic lawnmower then uses is called the Corridor The robotic lawnmower always runs to the left of the guide wire as seen...

Страница 32: ...onnect it to the contact pin on the charging station that is labelled Guide 3 Run the wire at least 2 metres straight out from the front edge of the plate If the guide wire must be laid in a passage The robotic lawnmower follows the guide wire on the same side of the wire to and from the charging station This means that the robotic lawnmower always runs on the left hand side of the guide wire as s...

Страница 33: ...e to lay the wire at an angle to the slope This makes it easier for the robotic lawnmower to follow the guide wire on the slope Avoid laying the wire at sharp angles This can make it difficult for the robotic lawnmower to follow the guide wire 4 Run the guide wire to the point on the boundary loop where you wish to make the connection 5 Lift up the boundary wire Cut the boundary wire using for ins...

Страница 34: ...d to connect each wire 7 Staple down bury the connector in the lawn 3 7 Checking the installation Check the loop signal by inspecting the indicator lamp on the charging station See 9 2 Indicator lamp in the charging station on page 71 if the lamp does not indicate a solid green light IMPORTANT INFORMATION The function of the guide wire varies depending on the layout of the working area This is why...

Страница 35: ...rovided on a special document received by the retailer at purchase Language Country Date Time Selection and confirmation of personal PIN code All combinations except 0000 are permitted 3 Place the robotic lawnmower in the charging station as requested in the display The robotic lawnmower will now start the guide calibration by leaving the charging station and following the guide wire to the point ...

Страница 36: ...ire all the way to the charging station and that it docks with the charging station The test is approved only if the robotic lawnmower is able to follow the guide wire the entire distance to the charging station and docks at the first attempt If the robotic lawnmower is unable to dock on the first attempt it will automatically try again The installation is not approved if the robotic lawnmower nee...

Страница 37: ... the robotic lawnmower in as far as possible to ensure proper contact between the robotic lawnmower and the charging station 3 The display shows a message that charging is in progress WARNING Read the safety instructions before you start your robotic lawnmower WARNING Keep your hands and feet away from the rotating blades Never put your hands or feet close to or under the body when the motor is ru...

Страница 38: ...day In addition the grass benefits from resting completely during at least a three day period once a month Standby The robotic lawnmower has an inbuilt standby period of about 10 hours a day The standby period provides a good opportunity for example to water or play games on the lawn Example 1 Work period 1 07 00 23 00 Work days All days The factory setting ensures that the robotic lawnmower begin...

Страница 39: ...h the Start button 5 Shut the cover within 10 seconds If the robotic lawnmower is parked in the charging station it will only leave the charging station when the battery is fully charged and if the timer is set to allow the mower to operate Before the blade disc starts 5 beeps are heard for 2 seconds 4 4 Stopping 1 Press the STOP button The robotic lawnmower stops the blade motor stops and the con...

Страница 40: ...s is long allow the robotic lawnmower to start mowing at the MAX cutting height Once the grass is shorter you can gradually lower the cutting height To adjust the cutting height 1 Press the STOP button to stop the robotic lawnmower and open the cover 2 Turn the height adjustment knob to the required position The selected position is indicated by the orange column that can be seen by the knob throu...

Страница 41: ...ndicates the number of hours since the day of manufacture that the robotic lawnmower has been in operation The time that the robotic lawnmower has spent mowing or looking for the charging station is counted as operating time AUTO MAN or HOME show which mode of operation is selected See Chapter 5 1 Operation selection The battery status shows the remaining battery charge ECO is displayed if the rob...

Страница 42: ...harging station on page 36 2 AUTO The standard automatic operation mode where the robotic lawnmower mows and charges automatically 3 MAN When mowing secondary areas see 3 4 Installation of the boundary wire on page 24 the MAN setting must be used If MAN is selected and the robotic lawnmower starts when it is out on the lawn it will mow until the battery runs out It will then stop and the Needs man...

Страница 43: ... middle button confirms any selections and the right button helps you to scroll the menu 5 3 Numbers The number keys are used for instance to enter the PIN code or time settings 5 4 Main switch Set the main switch in the 1 position to start the robotic lawnmower Set the main switch in the 0 position when the robotic lawnmower is not in use or work is being carried out on the blade disc When the ma...

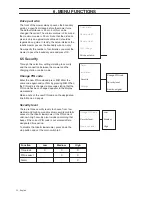
Страница 44: ...sing the number keys and confirm each selection with the multi choice button marked OK Press the multi choice button with the return arrow to go up a step in the menu or keep the HOME button pressed in for 2 seconds to go directly back to the main menu Submenus Certain submenus contain options that are ticked off to the left This means that these options are selected Check or uncheck the box by pr...

Страница 45: ...de width Remote start 1 Test settings Language Time Date Reset user settings Medium Wide Proportion Distance Test in Test out Low Medium High Set date Date format Set time Time format Narrow Reset timer Drive past wire Remote start 2 Proportion Distance Remote start 1 Remote start 2 Never Rarely Medium Often Always Never Rarely Medium Often Always ECO mode Country About ...

Страница 46: ...ower mows about 43 m2 per hour and day The table below provides suggestions for different timer settings depending on garden size The table can be used to set the operating time The times should be seen as indicative they may need to be adjusted to suit the garden Use the table as follows 1 Find a work area that closest matches the garden s area 2 Select an appropriate amount of work days per week...

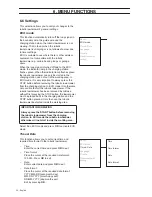
Страница 47: ...at are ticked off Reset timer reset values to the factory settings To inactivate Work hours 1 or Work hours 2 enter the time 00 00 00 00 to reset the timer to A clock symbol is displayed on the start page when the timer settings are set The clock symbol is black when the robotic lawnmower is not allowed to mow due to a timer setting and it is white when the mower is allowed to mow The mower has an...

Страница 48: ...s of garden settings Guide width The guide width is a measure of how far from the guide wire the mower is allowed to travel when it follows this to and from the charging station The area beside the wire which the mower then uses is called the Corridor The robotic lawnmower has a default setting for medium wide corridors To further reduce the risk of tracks forming it is recommended to select a wid...

Страница 49: ...creases the risk for tracks forming along the guide wire Remote start 1 One important function with the guide wire is the capacity to steer the mower to remote garden areas when required This function is very useful in gardens where for instance the front and back are joined by a narrow passage With this function activated any option other than Never is selected the mower will at times follow the ...

Страница 50: ...n the mower display Remote start 2 If the working area contains two remote areas the guide wire should be installed so that it reaches both areas Remote start 1 and Remote start 2 can then be combined to steer the robotic lawnmower to each area The settings for Proportion and Distance are carried out in the same way as for Remote start 1 The default setting is Never Take into account that the tota...

Страница 51: ...e that can be entered is 100 metres Dock the robotic lawnmower in the charging station and select Test OUT The robotic lawnmower will immediately leave the charging station The distance stated in metres will be shown in the mower display as the mower operates Stop the robotic lawnmower at the required position and note the distance Enter the displayed number of metres in the Distance field for the...

Страница 52: ...nd press OK Enter the same code again and confirm by pressing OK When the PIN code is changed a message stating that the PIN code has been changed appears in the display momentarily Make a note of the new PIN code on the designated line in Memo on page 4 Security level There are three security levels to choose from low medium and high Low and medium security prohibits access to the robotic lawnmow...

Страница 53: ...ed for a time The blockage time is extended for every new incorrect attempt Alarm This function means that an alarm sounds if the PIN code is not entered within 10 seconds after the STOP button has been pressed or the mower has been lifted up for any reason A ticking noise indicates that the PIN code must be entered to prevent triggering the alarm The alarm can be turned off at any time by enterin...

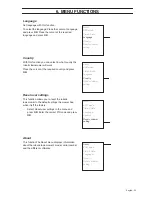
Страница 54: ...se not possible to start the robotic lawnmower If the robotic lawnmower has been removed by mistake without first pressing the STOP button the lawnmower must be placed back in the charging station and the STOP button pressed Only then can the robotic lawnmower be started inside the working area Select Run ECO mode and press OK to activate ECO mode Time Date This function allows you to set current ...

Страница 55: ... to reset the robotic lawnmower to the default settings the mower had when it left the factory Select Reset user settings in the menu and press OK Enter the correct PIN code and press OK About This functionThe About menu displays information about the robotic lawnmower s model serial number and the different softwares About ECO mode Time Date Language Country Reset customer setting About ECO mode ...

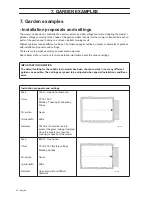
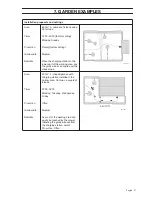
Страница 56: ...com See chapter 6 Menu functions for more detailed information about the various settings IMPORTANT INFORMATION The default setting for the robotic lawn mower has been chosen to work in as many different gardens as possible The settings only need to be adjusted when special installation conditions exist Installation proposals and settings Area Timer Proportion Guide width Remarks 150 m2 Open and l...

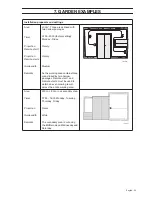
Страница 57: ...the guide wire at an angle over the steep slope Area Timer Proportion Guide width Remarks 200 m2 L shaped garden with charging station installed in the narrow area Contains a couple of islands 07 00 16 00 Monday Tuesday Wednesday Friday Often Medium As most of the working area can easily be reached by the mower following the guide wire out from the charging station select Proportion Often Installa...

Страница 58: ...eft hand area is nearly half of the total area Medium Area Timer Proportion Guide width Remarks 150 m2 Unsymmetrical working area with a narrow passage and a number of islands 07 00 14 00 Monday Tuesday Wednesday Friday Rarely factory setting Medium The guide wire must be placed along the narrow passage to ensure the mower can with ease locate the charging station from the right hand side of the w...

Страница 59: ...the working area contains three areas linked by two narrow passages Remote start 1 and Remote start 2 must be used to obtain an even mowing result across the entire working area Area Timer Proportion Guide width Remarks 200 m2 50 m2 in a secondary area 07 00 16 00 Monday Tuesday Thursday Friday Never Wide The secondary area is cut using the MAN mode on Wednesday and Saturday Installation proposals...

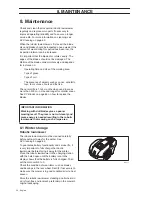
Страница 60: ...and longer for smaller areas See 8 7 Blades on page 64 on how to replace the blades 8 1 Winter storage Robotic lawnmower The robotic lawnmower must be cleaned carefully before putting it away for the winter See 8 4 Cleaning on page 62 To guarantee battery functionality and service life it is very important to fully charge the robotic lawnmower before storing it away for the winter Place the roboti...

Страница 61: ...dy the chassis the blade disc and all other moving parts Testing of the mower s function and components Checking and if required replacement of wear items such as blades and bearings Testing the mower s battery capacity as well as a recommendation to replace battery if necessary If necessary the dealer can also load the robotic lawnmower with new software including new features where applicable 8 ...

Страница 62: ...grass or other objects find their way in these may impede the blade disc Even a slight braking effect leads to a higher consumption of energy and longer mowing times and at the worst will prevent the mower from being able to mow a large lawn The blade disk must be removed to carry out a more thorough cleaning If necessary contact your dealer IMPORTANT INFORMATION Never use a high pressure washer o...

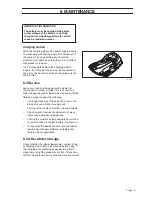
Страница 63: ...rding agents special requirement on packaging and labeling must be observed For preparation of the item being shipped consulting an expert for hazardous material is required Please also observe possibly more detailed national regulations Tape or mask off open contacts and pack up the battery in such a manner that it cannot move around in the packaging 8 6 In the event of a thunderstorm To reduce t...

Страница 64: ...awnmower upside down 4 Rotate the skid plate so that its holes align with the screw for the blade 5 Remove the 3 screws Use a straight slot or cross tip screwdriver 6 Remove the blade and the screw 7 Screw on the new blade and the new screw 8 Check also that the blade can pivot freely WARNING Always use original blades and screws when replacing Only replacing the blades and reusing the screw can r...

Страница 65: ...re regulary Only charge the battery in the included charging station Always use the original power supply unit Incorrect use may result in electric shock overheating or leaking of corrosive liquid from the battery In the event of leakage of electrolyte flush with water neutralizing agent seek medical help if it comes in contact with the eyes IMPORTANT INFORMATION Fully charge the battery at the en...

Страница 66: ...attery cover 5 Pull out the battery by pulling on the strap 6 Set the main switch in position 0 7 Turn the mower upside down 8 Fit a new Husqvarna original battery NOTE Press on the contact strip to fit the battery in place 9 Fit the battery cover The sealing strip is reusable and does not have to be replaced 10 Screw in place the four screws for the battery cover Torx 20 IMPORTANT INFORMATION Onl...

Страница 67: ...sc and remove the grass or other object The blade disc lies in a pool of water Move the mower and if possible prevent the collection of water in the working area No loop signal The power supply is not connected Check the wall socket connection and whether an earth fault breaker has tripped Check that the low voltage cable is connected to the charging station The boundary wire is not connected to t...

Страница 68: ... reinforcement steel or buried cables close by Try moving the boundary wire The robotic lawnmower finds it hard to distinguish the signal from another robotic lawnmower installation close by Place the robotic lawnmower in the charging station and generate a new loop signal via Security New loop signal Low battery Empty battery The robotic lawnmower cannot find the charging station Check that the c...

Страница 69: ...n and check that the charging strips and contact strips make good contact An object is obstructing the robotic lawnmower Remove the object Stuck in charging station There is an object in the way of the robotic lawnmower preventing it from leaving the charging station Remove the object Upside down The robotic lawnmower is leaning too much or has turned over Turn the mower the right way up Needs man...

Страница 70: ...r stopped The alarm was activated because the mower was stopped Adjust the mower security level in the Security menu Alarm Mower lifted The alarm was activated because the mower was lifted Adjust the mower security level in the Security menu Alarm Mower tilted The alarm was activated because the mower was tilted Adjust the mower security level in the Security menu Temporary battery problem Tempora...

Страница 71: ...ing the boundary wire on page 30 Break in the boundary wire Find out where the break is Replace the damaged section of the boundary wire with a new loop wire and splice using an original coupler Yellow flashing light The guide wire is not connected to the charging station Check that the guide wire connector is properly connected to the charging station See 3 6 Installation of the guide wire on pag...

Страница 72: ...station on page 19 Uneven mowing results The robotic lawnmower works too few hours per day Increase the mowing time See 6 3 Timer on page46 The proportion setting is incorrect in relation to the layout of the working area Check that the correct Proportion value is selected See 6 4 Installation on page 48 The shape of the working area requires the use of both Remote start 1 and Remote start 2 for t...

Страница 73: ...r the charging station The robotic lawnmower mows for shorter periods than usual between charges Grass or other foreign object blocks the blade disc Remove and clean the blade disc See 8 4 Cleaning on page 62 Both the mowing and charging times are shorter than usual The battery is spent Replace the battery See 8 8 Battery on page 65 The robotic lawnmower is parked for hours in the charging station...

Страница 74: ... reached A defective splicing of the loop wire can also lead to disruptions first several weeks after the splice was done A faulty splice can for example be the result of the original coupler not being pressed together hard enough with a pair of pliers or a coupler of lower quality than original coupler has been used Please first check all known splices before further troubleshooting is done A bre...

Страница 75: ...s somewhere on the boundary wire between AL and the point where the guide wire is connected to the boundary wire thick black line in the illustration b Put AL and Guide back in their original positions Then switch AR and Guide If the indicator lamp flashes yellow then the break is somewhere on the boundary wire between AR and the point where the guide wire is connected to the boundary wire thick b...

Страница 76: ...ed end to the point where the new wire is connected thick black line in the illustration below In that case move the connection for the new wire closer to the disconnected end roughly at the middle of the suspected wire section and check again if the indicator lamp is green or flashes yellow Continue until only a very short section of the wire remains which is the difference between a flashing blu...

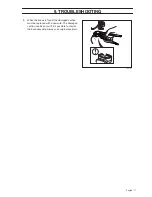
Страница 77: ...TROUBLESHOOTING 5 When the break is found the damaged section must be replaced with a new wire The damaged section can be cut out if it is possible to shorten the boundary wire Always use original couplers 3018 1323 ...

Страница 78: ...6 7 kg Electrical system Battery Lithium Ion battery 18 V 2 1 Ah Art No 586 57 62 01 Power supply 100 240 V 28 V DC Low voltage cable length 10 m Mean energy consumption at maximum use 5 kWh month for a 600 m2 working area Charge current 1 3 A DC Average mowing time 70 min Average charging time 50 min Noise emissions measured in the environment as sound power Measured sound power noise level 58 dB...

Страница 79: ...eath the robotic lawnmower This damage is normally caused by laundry or irrigation systems or holes hollows in the working area when pools of water are formed when it rains Damage caused by shortened low voltage cable Damage caused by lightning Damage caused by incorrect battery storage or handling Damage caused by using a battery that is not an original battery Damage caused by not using Husqvarn...

Страница 80: ...emove the battery The battery must be removed from the lawnmower before the mower is scrapped The battery must also be disposed of safely By ensuring that this product is taken care of correctly you can help to counteract the potential negative impact on the environment and people that can otherwise result through the incorrect waste management of this product For more detailed information about r...

Страница 81: ...zardous substances 2011 65 EU Directive relating to noise emissions from outdoor equipment 2000 14 EC See also the Technical Data chapter for information regarding noise emissions and the cutting width The registered body 0404 SMP Svensk Maskinprovning AB Box 7035 SE 754 50 Uppsala Sweden has issued a report regarding the assessment of conformity according to annex VI to the Council s Directive of...

Страница 82: ......

Страница 83: ......

Страница 84: ...www automower com 115 78 68 26 ORIGINAL INSTRUCTIONS AUTOMOWER is a trademark owned by Husqvarna AB Copyright 2016 HUSQVARNA All rights reserved Omslag 105 2016 indd 1 2016 01 29 09 21 ...

Отзывы: