background image

18

Adjust the Map Display Settings

Change the Highlight Color

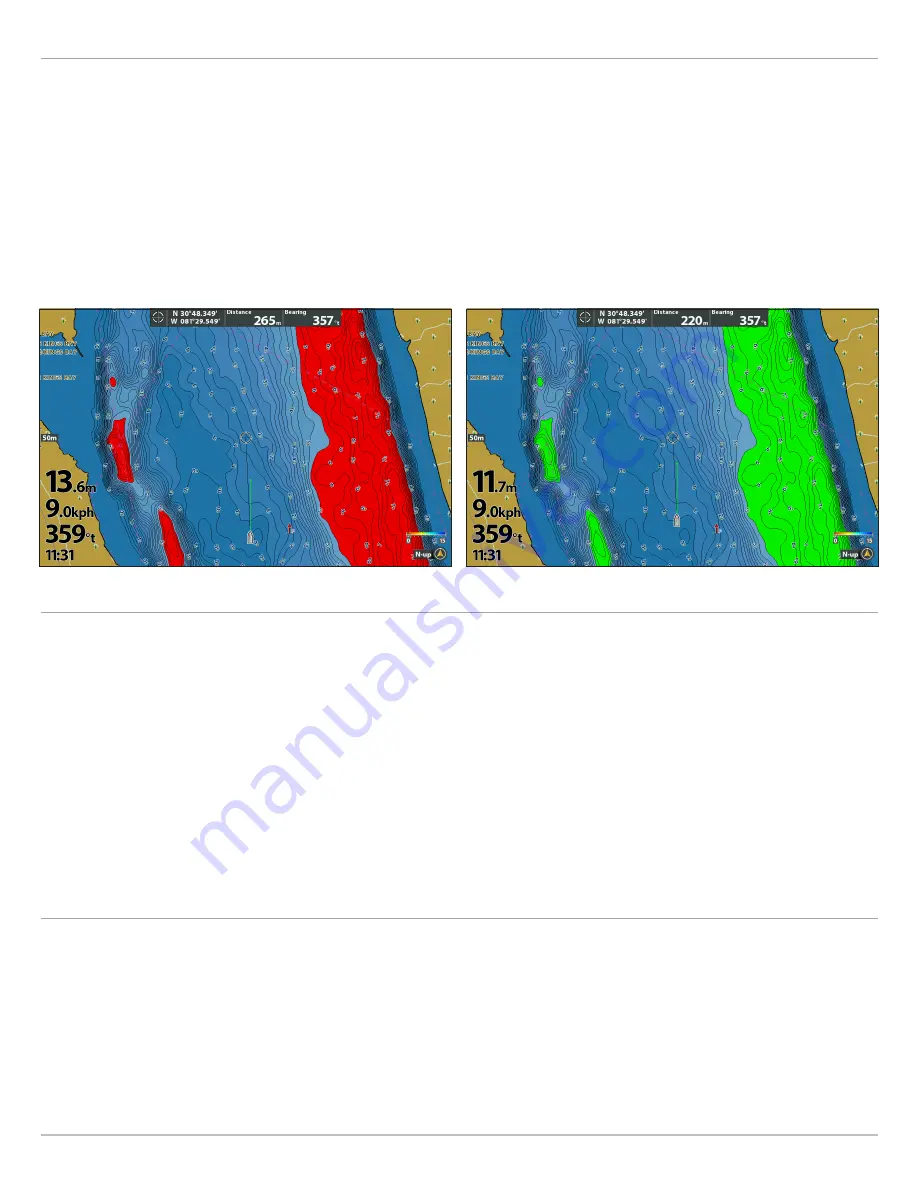
If you’ve set Depth Highlights and they’re not easy to see with the color palette you’ve selected, you can change the Highlight Color . 

SOLIX

HELIX

1 .  From the 

Depth Highlights 

Menu, select the 

Color

 you 

wish to change . 

2 .  Tap, or use the Joystick and Enter key, to select a new 

color .

3 .  Repeat these steps for each additional highlight you wish 

to change .

1 .  From the 

Depth Highlights

 Menu, select the 

Highlight 

Color

 you wish to change .

2 .  Press the RIGHT or LEFT Cursor keys to select a new color .
3 .  Repeat these steps for each additional highlight you wish 

to change .

Red Depth Highlights (HELIX)

Green Depth Highlights (HELIX)

Highlight Shallow Water

The Shallow Water Highlight identifies shallow waters when the depth is equal to or less than the level you set . Depth Highlights 
must be turned on to enable this feature .

SOLIX

HELIX

1 .  From the 

Depth Highlights Menu

, select 

Shallow Water 

Highlight

 . 

2 .  Tap the on/off button, or press the ENTER key, to show or 

hide shallow water highlights .

3 .  Press and hold the slider, or press and hold the ENTER 

key, to adjust the highlighted depth level . 

1 .  From the 

Depth Highlights

 Menu, select the first 

Shallow 

Water Highlight 

menu


option . 

2 .  Press the CHECK/INFO key or the RIGHT Cursor key to 

show or hide shallow water highlights . (check mark = 
visible, blank = hidden)

3 .  To adjust the highlighted depth level, select the second 

Shallow Water Highlight

 menu option .  

4 .  Press the RIGHT or LEFT Cursor keys to adjust the setting .

Change the Shallow Color

If you’ve set Shallow Water Highlights and they’re not easy to see with the color palette you’ve selected, you can change the Shallow 
Water Highlight Color . 

SOLIX

HELIX

1 .  From the 

Depth Highlights 

Menu, select the Shallow 

Water Highlight 

Color

 . 

2 .  Tap, or use the Joystick and Enter key, to select a new 

color .

1 .  From the 

Depth Highlights

 Menu, select 

Shallow Water 

Highlight Color

 .

2 .  Press the RIGHT or LEFT Cursor keys to select a new color .

Содержание CoastMaster Chart Cards

Страница 1: ...Set up the Control Head 5 Set up for the Day 7 What s on the Map 9 Adjust the Map Display Settings 12 Follow the Contour 22 Save and Export Navigation Data 26 Contact Humminbird 27 532749 1EN_B User M...

Страница 2: ...modification of the serial number or attempt to repair the original equipment or accessories by unauthorized individuals will void the warranty WARNING This product contains chemicals known to the Sta...

Страница 3: ...hose applications can be considered excluded from the WEEE Directive requirement This symbol WEEE wheelie bin on product indicates the product must not be disposed of with other household refuse It mu...

Страница 4: ...4...

Страница 5: ...2 Press the HOME key 3 Select Settings 4 Select Network 5 Select System Info Read the Software Version number You must have software version 3 660 and later installed on your control head 1 Power On...

Страница 6: ...For microSD compatible control heads remove the microSD card from the adapter and insert it into the control head card slot 3 The control head will recognize the new software and run through a series...

Страница 7: ...Card Installed SOLIX Chart View with CoastMaster Chart Card Installed HELIX Automatic Display The map displayed on the Chart View is based on your latitude longitude position and the chart card instal...

Страница 8: ...key once to open the Chart X Press Menu 4 Adjust the Water Level Offset It is important to note if the water level is higher or lower than usual For example if you know the tide is 5 feet higher than...

Страница 9: ...the CoastMaster Map SOLIX contour lines spot sounding label land depth highlight 1 depth label depth of contour chart object wreck depth palette colors shallow water highlight chart object landmark d...

Страница 10: ...Up Course Up etc SOLIX HELIX 1 From the Chart X Press Menu select Chart Options 2 Select General Orientation 3 Select an orientation to apply to the chart QUICK TIP You can also change this setting by...

Страница 11: ...tracks 1 From the Chart X Press Menu select Info 2 Select Find Nearest 3 Select an item from the displayed list Using the Status Bar SOLIX Only The status bar is located at the top of the screen It c...

Страница 12: ...of the menu system so that you can access them quickly No matter where you make the change the control head will update the setting across the system NOTE With a few exceptions that are noted in this...

Страница 13: ...isplayed on the map You can set the density to High Medium or Low Contour lines must be turned on to adjust this feature NOTE Contour density can only be customized in the Fishing and User presets Nav...

Страница 14: ...pth area colors in the Chart Views Off or On SOLIX HELIX 1 From the Depths Contours Menu select Depth Palette 2 Tap the on off button or press the ENTER key to show or hide depth colors QUICK TIP You...

Страница 15: ...sor key to adjust the setting Change the Color Palette The Color Palette menu changes the colors used to display the map SOLIX HELIX 1 From the Depths Contours Menu select Color Palette 2 Select a col...

Страница 16: ...r features NOTE Changing these settings will affect all presets not just the active preset Open the Depth Highlights Menu SOLIX HELIX 1 From the Chart X Press Menu select Chart Options 2 Select Depth...

Страница 17: ...R key 4 Repeat Step 2 with Depth Highlight 2 to adjust the depth range 5 Repeat Steps 3 4 for each additional depth highlight up to four 1 From the Depth Highlights Menu select Depth Highlights Press...

Страница 18: ...LIX 1 From the Depth Highlights Menu select Shallow Water Highlight 2 Tap the on off button or press the ENTER key to show or hide shallow water highlights 3 Press and hold the slider or press and hol...

Страница 19: ...ab 3 Select Chart Objects 4 Use the RIGHT Cursor key to select one of the following tabs Chart Objects Menu SOLIX Chart Objects Menu HELIX Navigation shows navaids and labels light sectors and descrip...

Страница 20: ...Water tab 2 Select Rocks 3 Press the CHECK INFO key or the RIGHT Cursor key to show or hide rocks check mark visible blank hidden 4 To hide only the rocks below a depth you set press the DOWN Cursor...

Страница 21: ...e Depth feature to set the minimum depth level for your vessel and to turn on highlights for hazards shallower than that level NOTE Changing these settings will affect all presets not just the active...

Страница 22: ...lines 1 Main Menu Press the MENU key twice 2 Select the HB Chart tab Depth Contours Contour Lines 3 Press the CHECK INFO key or the RIGHT Cursor key to show or hide contour lines check mark visible b...

Страница 23: ...recorded SOLIX HELIX 1 Press and hold a position on the contour line you plan to follow OR Use the Joystick to move the cursor to select a contour line 2 Select Go To Follow the Contour 3 Select a nav...

Страница 24: ...reviewed in purple navigation option 2 purple navigation option 1 orange navigation option 1 previewed in orange Starting Follow the Contour Navigation HELIX submenu navigation option 2 previewed in b...

Страница 25: ...IGHT or LEFT Cursor keys to adjust the offset 4 To remove the offset set it to 0 zero Reverse Direction SOLIX HELIX 1 Tap Chart in the status bar 2 Select Go To Reverse 1 Press the MENU key once 2 Sel...

Страница 26: ...navigation data will be exported to the selected location 7 See your control head operations manual or Waypoint Management Guide for more information These manuals are available on the CD provided wit...

Страница 27: ...d com Telephone 1 800 633 1468 Direct Shipping Humminbird Service Department 678 Humminbird Lane Eufaula AL 36027 USA Hours of Operation Monday Friday 8 00 a m to 4 30 p m Central Standard Time Social...

Отзывы: