Hultafors HDL 100 Скачать руководство пользователя страница 20

20

measurement is reset to the measurement unit 
that was last used.

7.2.15 TILT SENSOR

  1. Switch on the laser instrument.
  2. Use the touch display to access the menu. 

Choose inclinometer icon.

The display shows a tilt sensor that displays the 
degrees in both axial directions.

7.2.16 BLUETOOTH

  1. Switch on the laser instrument.
  2. Use the touch display to access the menu. 

Select Bluetooth icon.

Bluetooth can be activated and deactivated by 
pressing the icon.
Bluetooth M is for manual connection, Bluetooth 
A is for automatic connection.
Fast and efficient data transfer of measured 
values can be made directly to a smartphone via 
Bluetooth.

NOTE

To pair with a smartphone, launch 
the HDL 100 Measure & Sketch app 
and connect using one of the function 
options.

7.2.17 TURN DISPLAY

  1. Switch on the laser instrument.
  2. Use the touch display to access the menu. 

Choose turn display icon.

The turn display function can be activated and 
deactivated by pressing the icon.

7.2.18 CAMERA

  1. Switch on the laser instrument.
  2. Direct the laser point at the target.
  3. Press ‘camera button’.
The display shows an image of the surroundings. 
By pressing the ‘camera button’ again, you can 
toggle between 2 and 4 x zoom. The cross hairs 
in the centre of the display can help find the laser 
point.
  4. Press ‘measure button’.
The result will appear in the bottom line of the 
display.

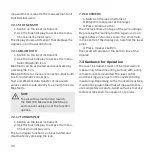
7.3 Guidance for Operation

The laser instrument must not be moved while 
measuring. A fixed mounting surface with a stop 
is therefore recommended. The laser outlet 
and receiving area must not be covered during 
measuring. Depending on the measured surface, 
it cannot be guaranteed that all measurements 
are completely accurate. Avoid surfaces that are 
textured, reflective, transparent, or porous.

Содержание HDL 100

Страница 1: ...HDL 100 Operating instructions EN...

Страница 2: ...2 SCOPE OF DELIVERY FOR HDL 100 S 1 Laser distance measurement instrument 2 Belt pouch 3 1 2 V Ni Mh battery 4 Charging data cable 5 Tripod B 10 4 3 5 2 1...

Страница 3: ...3 2 1 Function Buttons 3 2 3 6 1 1 4 5 2 2 2 Display...

Страница 4: ...ve the following instructions Please read these operating manual before starting to use the device Always keep the operating manual near the device Only hand over the device to other persons together...

Страница 5: ...slight injury or property damage NOTE For application notes and other useful information 1 2 Pictograms and other information 1 2 1 WARNING SIGNS Warning of dangers in general 1 General information 1...

Страница 6: ...trument is designed to measure distances and angles The measured value setting tilt and instrument status can be viewed on the display A laser beam is emitted and then sent back to the laser distance...

Страница 7: ...2 V Ni Mh battery 3 x 850 mAh Operating temperature 0 40 C Storage temperature 10 60 C Dimensions H x W x L 115 x 50 x 25 mm Weight with batteries 110 g when measuring a target with 100 reflectivity...

Страница 8: ...measurement Volume measurement Indirect 2 point measurement Indirect 3 point measurement Automatic distance measurement Indirect measurement via angle Indirect distance measurement Additon Subtractio...

Страница 9: ...t the product is not utilized any further if defects become evident and he will have the product repaired professionally 4 2 Improper Use Use of the device and the accessories without instruction Use...

Страница 10: ...not use damaged equipment Repairs have to be exclusively performed by Hultafors 4 4 2 BATTERIES DANGER Mechanical damage can lead to a leakage fire or explosion of the batteries or trigger the release...

Страница 11: ...t may not be disposed of together with household waste Dispose of the device and accessories properly see Chapter 12 Disposal Protect the product at all times from access by unauthorized persons and e...

Страница 12: ...rectives and standards Hultafors can not entirely exclude the possibility that intense electromagnetic radiation in the immediate vicinity of radio transmitters two way radios diesel generators etc ca...

Страница 13: ...the eye is protected by the blink reflex or aversion reaction in case of a random and short term exposure WARNING Looking directly into the beam with optical aids e g binoculars telescopes can be dan...

Страница 14: ...es into the instrument observing the correct polarity 3 Close battery compartment by sliding the cover back into place Remove the batteries if the instrument is not used over a longer period of time 6...

Страница 15: ...ad and back of the instrument The selection is indicated by an arrow on the display The back of the instrument is set as the measurement edge by default Each time the instrument is restarted the back...

Страница 16: ...measurement is complete the area is automatically calculated and shown on the bottom line of the display The individual measured values are shown in measured value lines 1 and 2 The perimeter is also...

Страница 17: ...d value lines 1 and 2 CAUTION The two points measured must be in line and the second measurement must be taken at a right angle to the measured surface otherwise measured values may be incorrect 7 2 7...

Страница 18: ...ed must be in line otherwise the measured values may be incorrect 7 2 9 INDIRECT MEASUREMENT VIA ANGLE 1 Switching on the laser instrument 2 Choose the indirect measurement via angle icon in the funct...

Страница 19: ...shows the result on the bottom line of the display This process can be repeated as many times as required 7 2 12 SUBTRACTION 1 Switch on the laser instrument 2 Direct the laser point at the target 3...

Страница 20: ...SPLAY 1 Switch on the laser instrument 2 Use the touch display to access the menu Choose turn display icon The turn display function can be activated and deactivated by pressing the icon 7 2 18 CAMERA...

Страница 21: ...orage check the accuracy of the measuring device before using it 8 2 2 BATTERIES For storage remove the batteries from the device or from the charging station The storage should preferably be in a dry...

Страница 22: ...nts of HDL 100 S 1 Laser distance measurement instrument 3 1 2 V Ni Mh batteries 1 Belt pouch 1 Charging data cable 1 B 10 Tripod 9 2 ACCESSORIES optional LB laser goggles TP target plate Further info...

Страница 23: ...ol to the specified temperature 253 Temperature too low Allow instrument to warm up to the specified temperature 255 Reception signal too weak Increase reflectivity of target 256 Reception signal too...

Страница 24: ...The product as well as the accessories especially the batteries and rechargeable batteries must not be disposed of with household waste Dispose of the device and the accessories properly Only dispose...

Страница 25: ...ked if the device is submitted along with the guarantee card completely filled out by the dealer dated and provided with the company stamp If the guarantee claim is justified the manufacturer shall be...

Страница 26: ...ity We Hultafors Group AB Hultaforsv gen 21 Hultafors declare under our sole responsibility that the Product s HDL 100 to which this declarations relates is in conformity with the following standards...

Страница 27: ...MARCH 2018 v 1...

Отзывы: