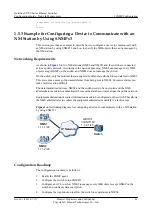
l
SNMP version
l
Community name
l
ACL number
l
IP address of the NM station
l
Equipment administrator's contact information
Procedure
Step 1
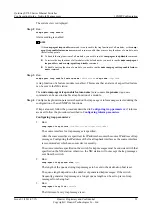
Configure available routes between the switch and the NM stations. Details for the configuration
procedure are not provided here.
Step 2
Enable the SNMP agent.
<Quidway>
system-view
[Quidway]
snmp-agent
Step 3
Configure the switch to run SNMPv1.
[Quidway]
snmp-agent sys-info version v1
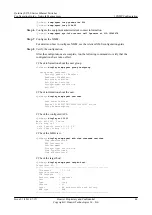
# Check the configured SNMP version.
[Quidway]
display snmp-agent sys-info version
SNMP version running in the system:
SNMPv1 SNMPv3
Step 4
Configure the NM stations' access rights.
# Configure an ACL to allow NMS2 to manage and disallow NMS1 from managing the
switch.
[Quidway]
acl 2001
[Quidway-acl-basic-2001]
rule 5 permit source 1.1.1.2 0.0.0.0
[Quidway-acl-basic-2001]
rule 6 deny source 1.1.1.1 0.0.0.0
[Quidway-acl-basic-2001]
quit
# Configure a MIB view and allow NMS2 to manage every MIB object except HGMP on the
switch.
[Quidway]
snmp-agent mib-view excluded allexthgmp 1.3.6.1.4.1.2011.6.7
# Configure a community name to allow NMS2 to manage the objects in the MIB view.
[Quidway]
snmp-agent community write adminnms2 mib-view allexthgmp acl 2001
Step 5
Configure the trap function.
[Quidway]
snmp-agent target-host trap address udp-domain 1.1.1.2 params
securityname 1.1.3.1
[Quidway]
snmp-agent trap source Loopback0
[Quidway]
snmp-agent trap queue-size 200
[Quidway]
snmp-agent trap life 60
Step 6
Configure the equipment administrator's contact information.
[Quidway]
snmp-agent sys-info contact call Operator at 010-12345678
Step 7
Configure NMS2.
For details on how to configure NMS2, see the relevant NMS configuration guide.
Step 8
Verify the configuration.
After the configurations are complete, run the following commands to verify that the
configurations have taken effect.
Quidway S2700 Series Ethernet Switches
Configuration Guide - Network Management
1 SNMP Configuration
Issue 01 (2011-07-15)
Huawei Proprietary and Confidential
Copyright © Huawei Technologies Co., Ltd.
36

