


VEGA78
EN - 54
Depending on the type and number of errors, the necessary modifications of setting
parameters should be performed. Press
GO/STOP
key again to start recording and verify
the possible residual error on window message.
Confirm with
ENTER
or press “Ok” or “Cancel” keys to close the warning window message
and start the recording by pressing
GO/STOP
key anyway.
As the default value of the integration periods is set at
15min
(see § 10.5.1) the meter will
store data in the temporary memory for this time. Afterwards the meter will process the
results saved in the temporary memory and will save the first series of values in the
definitive memory. Therefore, if an integration period of 15 minutes has been set, the
recording will continue for about 15 minutes before producing a series of recorded values
CAUTION
Let the meter record for
at least
one integration period in order to save a
valid value. If the recording is interrupted before the selected integration
period has completely elapsed the data stored in the temporary memory will
not be processed and the corresponding series of values won’t be
transferred to the definitive memory.
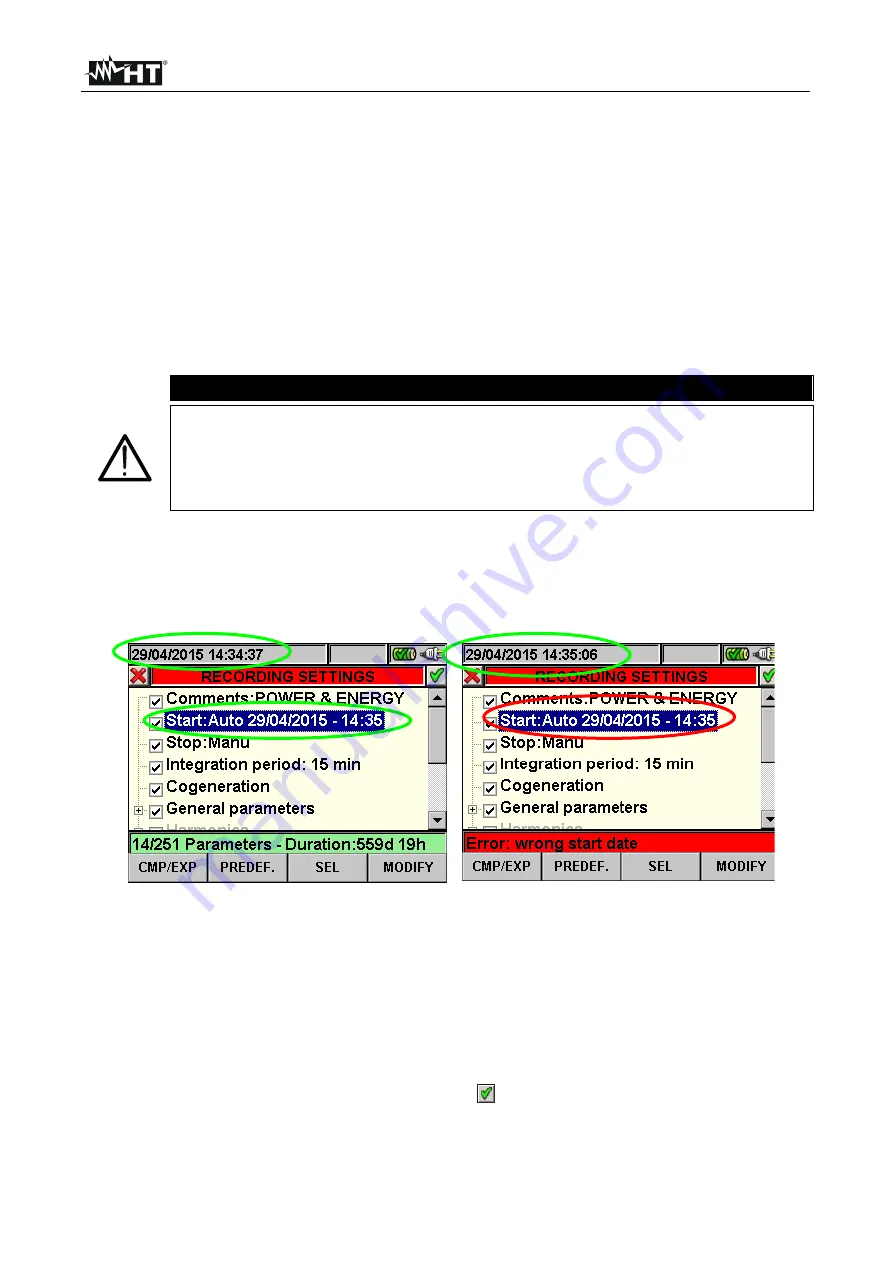
5.4.10.1. Automatic start of recording
To start a recording under automatic mode a preliminary definition of a correct starting
Date/Hour, compatible with system date, is needed inside “Recorder Settings” section (see
§ 5.4). The below screen is shown:
Fig. 82: Correct Date/Hour
Fig. 83: Wrong Date/Hour
1. Move the cursor using arrows keys on field relative to “Start” (and or the “Stop” ),
marked them with blue background.
2. Press
F4
key (alternatively touch the
MODIFY
at display). In the bottom of display a
command bar with “Manu” is shown. Press
F3
key (
MOD(+)
) or
F4
(
MOD(-)
) and select
“
Auto
” .Use left or right arrows keys to move on date and hour fields. Using the up
arrow key or
F3
(
MOD(+)
) key to increase the value and the down arrow key or
F4
(
MOD(-)
) key to decrease the value. Set a correct Date/Hour as shown in Fig. 82.
3. Press
SAVE
or
ENTER
keys (or smart icon
) to saving the settings. The screen of
Fig. 83 is shown if a wrong Date/Hour is set. Under this condition the
SAVE
key does
not have any effect. Repeat the steps 2 and 3 and set corrects values before pressing
SAVE
key again.
Shop for Power Metering products online at:
1.888.610.7664
www.
PowerMeterStore
.com


