


Installation and Configuration
33
SSL1016 Tape Autoloader Reference Guide
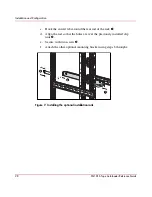
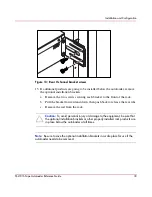
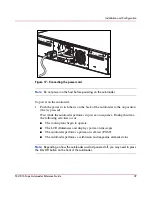
Figure 13: Rear U-channel bracket screws
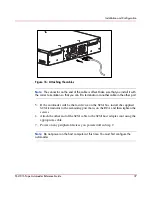
15. If additional products are going to be installed below the autoloader, remove
the optional installation brackets:
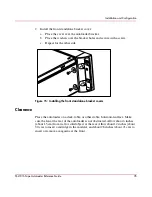
a.
Remove the two screws securing each bracket to the front of the rack.
b.
Pull the bracket forward and down, then push back to release the rear tabs.
c.
Remove the rail from the rack.
Caution:
To avoid personal injury or damage to the equipment, be sure that
the optional installation brackets or other properly installed rack products are
in place below the autoloader at all times.
Note:
Be sure to save the optional installation brackets in a safe place for use if the
autoloader needs to be removed.
Содержание StorageWorks SSL1016
Страница 8: ...Contents 8 SSL1016 Tape Autoloader Reference Guide ...
Страница 14: ...About this Guide 14 SSL1016 Tape Autoloader Reference Guide ...
Страница 22: ...Overview 22 SSL1016 Tape Autoloader Reference Guide ...
Страница 60: ...Installation and Configuration 60 SSL1016 Tape Autoloader Reference Guide ...
Страница 102: ...Autoloader Operation 102 SSL1016 Tape Autoloader Reference Guide Figure 78 Moving tapes using Web Administration ...
Страница 118: ...Autoloader Operation 118 SSL1016 Tape Autoloader Reference Guide ...
Страница 126: ...Tape Drive Cleaning 126 SSL1016 Tape Autoloader Reference Guide ...
Страница 143: ...Regulatory Compliance Notices 143 SSL1016 Tape Autoloader Reference Guide Japanese Notice ...
Страница 144: ...Regulatory Compliance Notices 144 SSL1016 Tape Autoloader Reference Guide ...
Страница 154: ...Upgrading or Replacing the DCA 154 SSL1016 Tape Autoloader Reference Guide Figure 92 Bottom of DCA ...
Страница 156: ...Upgrading or Replacing the DCA 156 SSL1016 Tape Autoloader Reference Guide ...
Страница 160: ...Index 160 SSL1016 Tape Autoloader Reference Guide ...


