


Installation and Configuration
31
SSL1016 Tape Autoloader Reference Guide
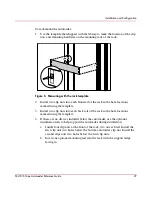
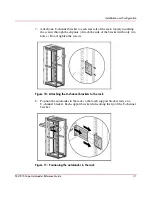
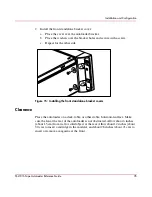
7. Attach one U-channel bracket to each rear rail of the rack, loosely installing
the screws through the clipnuts. (Attach the side of the bracket with only two
holes.) Do not tighten the screws.
Figure 10: Attaching the U-channel brackets to the rack
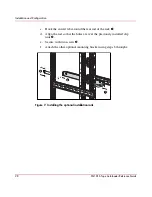
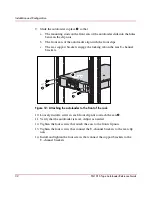
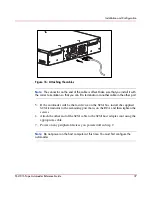
8. Position the autoloader in the rack so that each support bracket rests on a
U-channel bracket. Each support bracket slides along the lip of the U-channel
bracket.
Figure 11: Positioning the autoloader in the rack
Содержание StorageWorks SSL1016
Страница 8: ...Contents 8 SSL1016 Tape Autoloader Reference Guide ...
Страница 14: ...About this Guide 14 SSL1016 Tape Autoloader Reference Guide ...
Страница 22: ...Overview 22 SSL1016 Tape Autoloader Reference Guide ...
Страница 60: ...Installation and Configuration 60 SSL1016 Tape Autoloader Reference Guide ...
Страница 102: ...Autoloader Operation 102 SSL1016 Tape Autoloader Reference Guide Figure 78 Moving tapes using Web Administration ...
Страница 118: ...Autoloader Operation 118 SSL1016 Tape Autoloader Reference Guide ...
Страница 126: ...Tape Drive Cleaning 126 SSL1016 Tape Autoloader Reference Guide ...
Страница 143: ...Regulatory Compliance Notices 143 SSL1016 Tape Autoloader Reference Guide Japanese Notice ...
Страница 144: ...Regulatory Compliance Notices 144 SSL1016 Tape Autoloader Reference Guide ...
Страница 154: ...Upgrading or Replacing the DCA 154 SSL1016 Tape Autoloader Reference Guide Figure 92 Bottom of DCA ...
Страница 156: ...Upgrading or Replacing the DCA 156 SSL1016 Tape Autoloader Reference Guide ...
Страница 160: ...Index 160 SSL1016 Tape Autoloader Reference Guide ...