background image

Installing an Internal DLT80 Tape Drive

27

DLT80 Tape Drive Reference Guide

4. Use the screws that were removed from the drive rails; insert two into the 

threaded mounting holes on each side. 

Note:  

Some servers may not be accessible on both sides. Secure the side(s) that are 

accessible.

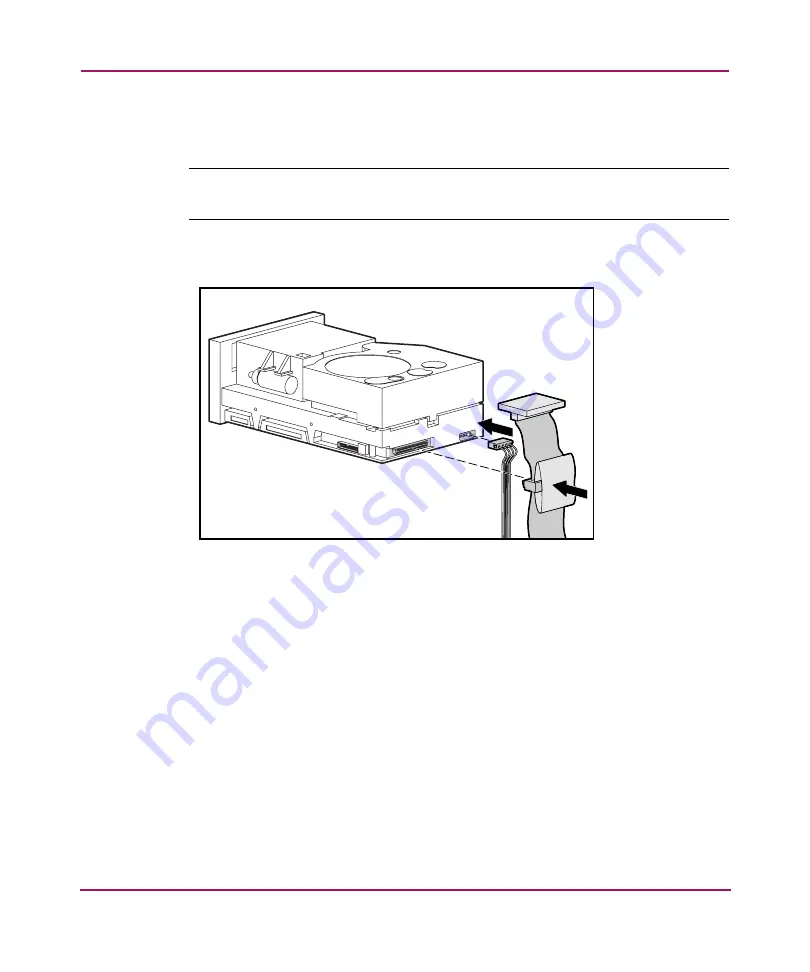
5. Connect an available power cable and the wide SCSI signal cable.

Figure 10:  Connecting power and signal cables

Содержание StorageWorks DLT80

Страница 1: ...StorageWorks DLT80 tape drive Fourth Edition January 2003 Part Number 185292 004 This guide is to be used as step by step instructions for installation and as a reference for operation troubleshooting and future upgrades ...

Страница 2: ...e without notice Microsoft MS DOS Windows and Windows NT are trademarks of Microsoft Corporation in the U S and or other countries Intel and Pentium are trademarks of Intel Corporation in the U S and or other countries UNIX is a trademark of The Open Group in the U S and or other countries All other product names mentioned herein may be trademarks of their respective companies Hewlett Packard Comp...

Страница 3: ...lp 12 HP Technical Support 12 HP Storage Website 12 HP Authorized Reseller 13 1 Overview 15 Software Included 16 System Requirements 16 Data Compression 17 2 Installing an Internal DLT80 Tape Drive 19 Software and Tool Requirements 20 Setting the SCSI ID 21 Terminator Power 23 Preparing the Server 24 Preparing the Tape Drive 24 Installing the DLT80 Tape Drive 25 Reassembling the Server 28 Completi...

Страница 4: ...port 38 HP Tru64 UNIX 39 OpenVMS 39 Example 1 40 Example 2 40 5 Operating the DLT80 Tape Drive 41 Power On Self Test POST 41 Approved Cartridges 42 Operating the DLT80 Drive 43 Loading a Cartridge 43 Unloading a Cartridge 44 Selecting Drive Density 44 Density Select Example 45 Front Panel LEDs and Buttons 46 Write Protecting a Cartridge 49 Cartridge Handling and Storage 50 6 Tape Drive Cleaning 51...

Страница 5: ...r products marked with the FCC logo United States only 60 Canadian Notice Avis Canadien 61 Class A Equipment 61 Class B Equipment 61 European Union Notice 62 China Taiwan Notice 63 Japanese Notice 63 B Electrostatic Discharge 65 Grounding Methods 66 C Specifications 67 Dimensions and Weight 67 Altitude 67 Acoustic Emissions 68 Temperature and Humidity Ranges 68 Power Requirements 69 Air Cooling Re...

Страница 6: ...Contents 6 DLT80 Tape Drive Reference Guide ...

Страница 7: ...provides information to help you Install the DLT80 tape drive Install the software drivers Operate the DLT80 tape drive Troubleshoot the DLT80 tape drive Update the firmware on the DLT80 tape drive About this Guide topics include Overview page 8 Conventions page 9 Rack Stability page 11 Getting Help page 12 ...

Страница 8: ...s intended for use by technicians who are experienced with installing and operating HP tape drives Prerequisites Before you install the DLT80 tape drive make sure you consider the items below Review the installation instructions and gather all required tools Review the installation instructions to be sure your installation location meets the required environmental conditions ...

Страница 9: ...his manner indicates that failure to follow directions in the warning could result in bodily harm or death Table 1 Document Conventions Element Convention Cross reference links Figure 1 Key and field names menu items buttons and dialog box titles Bold File names application names and text emphasis Italics User input command and directory names and system responses output and messages Monospace fon...

Страница 10: ...nce of electrical shock hazards Enclosed area contains no operator serviceable parts WARNING To reduce the risk of personal injury from electrical shock hazards do not open this enclosure Any RJ 45 receptacle marked with these symbols indicates a network interface connection WARNING To reduce the risk of electrical shock fire or damage to the equipment do not plug telephone or telecommunications c...

Страница 11: ...duce the risk of personal injury or damage to the equipment observe local occupational health and safety requirements and guidelines for manually handling material Rack Stability Rack stability protects personal and equipment WARNING To reduce the risk of personal injury or damage to the equipment be sure that The leveling jacks are extended to the floor The full weight of the rack rests on the le...

Страница 12: ...technical support at the nearest location Telephone numbers for worldwide technical support are listed on the HP website under support http www hp com Be sure to have the following information available before calling Technical support registration number if applicable Product serial numbers Product model names and numbers Applicable error messages Operating system type and revision level Detailed...

Страница 13: ...ence Guide 13 HP Authorized Reseller For the name of your nearest HP authorized reseller In the United States call 1 800 345 1518 In Canada call 1 800 263 5868 Elsewhere see the HP website for locations and telephone numbers http www hp com ...

Страница 14: ...About this Guide 14 DLT80 Tape Drive Reference Guide ...

Страница 15: ...rmance streaming tape drive designed for use with HP ProLiant servers and with HP AlphaServers The drive has a multi channel read write head uses a Digital Lempel Ziv DLZ high efficiency data compression algorithm and has a filing system to maximize data while minimizing data access time Figure 1 DLT80 tape drive ...

Страница 16: ...nts HP recommends equipping the server with a Fast Wide SCSI 2 Controller or higher See Table 2 for the recommended controller interfaces that can be used with the DLT80 drive Install and configure the controller before beginning the drive installation using the documentation included with the controller Table 2 shows which controllers support the DLT80 drive and which ones are recommended Table 2...

Страница 17: ...e DLT80 drive ships from the factory with data compression enabled for writing In this mode data is always compressed when writing to the tape but the drive is capable of reading both compressed and uncompressed tapes For the drive to write uncompressed data the data compression setting must be changed through the software To change it consult the backup application software documentation for the ...

Страница 18: ...Overview 18 DLT80 Tape Drive Reference Guide ...

Страница 19: ... ProLiant server Note If installing a DLT80 tape drive on an HP AlphaServer see Chapter 3 Installing the drive involves the following steps 1 Setting the SCSI ID on the DLT80 drive 2 Shutting down the server and all peripheral devices 3 Installing the DLT80 drive 4 Reassembling the server 5 Powering on the peripherals 6 Powering on the server 7 Completing the installation ...

Страница 20: ...ents The following items may be required for DLT drive installations Torx T 15 screwdriver Type 1A Phillips screwdriver SmartStart and Support Software CD ProLiant servers only HP Storage Management Solutions CDs Figure 2 Rear view of an internal DLT80 drive 1 68 pin SCSI connector 2 Power connector 2 1 ...

Страница 21: ...left side of the tape drive see Figure 3 The default SCSI ID is 6 Note SCSI ID 7 is reserved for the SCSI controller Figure 3 SCSI ID and Library Controller jumper blocks on the left side Caution Do not change the settings on the Library Controller block Note If a SCSI ID other than the default is used the Remote ID pin must have a jumper installed on it 1 Remote ID present 4 SCSI Bit 1 2 Reserved...

Страница 22: ...Guide The SCSI ID settings are shown in Figure 4 To set the SCSI ID position the jumpers as shown in Figure 4 Figure 4 Setting the SCSI ID jumpers on an internal DLT80 drive Bit 0 Bit 1 Bit 2 SCSI ID Settings Jumper NOT Installed Jumper Installed Key SCSI ID 0 1 2 3 4 5 6 ...

Страница 23: ...r SCSI termination Note Make sure that the controller provides terminator power If enabled the TERM PWR setting allows the drive in addition to the controller to provide the termination power To enable TERM PWR a jumper must be place on the 3 and 4 pin of the termination block located on the right side of the tape drive The termination power setting is shown in Figure 5 Figure 5 Termination power ...

Страница 24: ...harge for further information 1 Perform a normal system shutdown 2 Turn OFF the server and all peripheral devices 3 Disconnect the AC main power cord from the outlet then from the server and from all peripheral devices 4 Disassemble the system to expose the drive bay Refer to the user manual that came with your server Preparing the Tape Drive Choose the right and left front panel labels from the l...

Страница 25: ...ded with your server To install a DLT80 tape drive with drive rails 1 Adhere the front labels as described in Preparing the Tape Drive 2 Install the tape drive into two adjacent available media bays Figure 7 Installing a DLT80 drive with drive rails 3 Insert two screws in the front plate using a Torx T 15 screwdriver 4 Connect an available power cable and the wide SCSI signal cable SELECT ENTER EJ...

Страница 26: ...al cables To install a DLT80 tape drive without drive rails 1 Adhere the front labels as described in Preparing the Tape Drive 2 Remove screws from drive rails using a Type 1A Phillips screwdriver 3 Slide the tape drive into two adjacent available media bays Figure 9 Installing a DLT80 drive without drive rails ...

Страница 27: ...at were removed from the drive rails insert two into the threaded mounting holes on each side Note Some servers may not be accessible on both sides Secure the side s that are accessible 5 Connect an available power cable and the wide SCSI signal cable Figure 10 Connecting power and signal cables ...

Страница 28: ...e power cord grounding feature This equipment is designed for connection to a grounded earthed power outlet The grounding plug is an important safety feature 3 Plug the AC main power cord into the server then plug the cord into a grounded AC outlet 4 Turn ON all peripheral devices 5 Turn ON the server Completing the Installation Install the device drivers to complete the installation of the DLT80 ...

Страница 29: ...Allow enough space for proper ventilation and easy access to the front and rear of the DLT80 drive Allow at least 3 inches 7 6 cm between the rear of the unit and the wall WARNING Risk of electrical shock Do not attempt to open this product There are no user serviceable parts inside Refer all service to an HP authorized service provider Connecting the drive involves the following steps 1 Setting t...

Страница 30: ... DLT drive installations SmartStart and Support Software CD ProLiant servers only HP Storage Management Solutions CDs Note The CDs are not required when connecting the DLT drive to an AlphaServer Figure 11 Rear view of an external DLT80 drive 1 SCSI connector 4 AC power connector 2 SCSI connector 5 SCSI ID switch 3 Power switch 1 2 3 4 5 ...

Страница 31: ...when assigning it to the DLT drive Use the factory set default SCSI ID 6 To change the SCSI ID press the switch on the rear panel of the drive above or below the number display to set the desired number Note The SCSI ID can be set up to 15 but a SCSI ID above 6 is not recommended Note SCSI ID 7 is reserved for the controller Figure 12 Setting the SCSI ID switch on an external DLT80 drive 6 ...

Страница 32: ...labels from the labels provided in the kit Place them over the existing front panel Figure 13 Adhering the front labels 2 Turn OFF the server and all peripheral devices 3 Locate the external SCSI port on the rear of the server Note Your server may differ from the following illustrations refer to the documentation included with your server DLT ...

Страница 33: ... into place to secure the cable to the connector 6 Attach the terminator not shown to the SCSI connector 3 WARNING To reduce the risk of electric shock or damage to your equipment do not disable the power cord grounding feature This equipment is designed for connection to a grounded earthed power outlet The grounding plug is an important safety feature 7 Plug the drive s AC power cord 4 into the d...

Страница 34: ...ces Together This procedure assumes that one external DLT80 drive is already connected to the server 1 Choose the right and left front panel labels from the labels provided in the kit Place over the existing front panel See Figure 13 2 If the first drive unit has a terminator on the SCSI connector 2 remove it 3 Connect the tape drives by placing a SCSI cable between the SCSI connector 2 of the fir...

Страница 35: ... not shown on the SCSI connector 4 of the second drive 5 Power ON all peripheral devices 6 Power ON the server Completing the Installation Install the device drivers to complete the installation of the DLT80 drive See Chapter 4 Installing Software Drivers for specific driver installation information ...

Страница 36: ...Connecting an External DLT80 Tape Drive 36 DLT80 Tape Drive Reference Guide ...

Страница 37: ...Download the SoftPaq to a directory on your hard drive The SoftPaq file that is downloaded is a self extracting executable with a file name based on the SoftPaq Number above 2 Execute the downloaded file and follow the on screen instructions Press the Space Bar to confirm the unpacking of files into the download directory 3 After the files have been unpacked you may delete the self extracting Soft...

Страница 38: ...ssues if you want to use applications requiring the Advanced SCSI Programming Interface ASPI support For more information see the following section ASPI Support The README COM on the Novell Software Support Diskette NSSD outlines the specific drivers you need to support ASPI tape backup applications If you are using a tape backup application that uses the ASPI such as ARCserve provided by HP or Se...

Страница 39: ... the storage capability for tapes can be effectively doubled when the DLT drive has been instructed to turn on compaction This is known as hardware compaction and should be used instead of the software compaction that is sometimes provided by software products The DLT drive is instructed by the user to turn on hardware compaction through use of the OpenVMS INITIALIZE and MOUNT commands See these t...

Страница 40: ...a tape with data compaction and record blocking enabled and assigns the logical name BOOKS to the tape Example 2 INIT MEDIA_FORMAT NOCOMPACTION MKA400 BOOKS MOUNT MEDIA_FORMAT COMPACTION MKA400 BOOKS This MOUNT command attempts a Files 11 mount of a tape labeled BOOKS with data compaction and record blocking enabled Because the tape was initialized with compaction disabled the MOUNT qualifier MEDI...

Страница 41: ...by the front panel LEDs After you power up the DLT80 drive 1 All left side LEDs illuminate for approximately three seconds then shut off 2 The Operate Handle the Write Protect and the Use Cleaning Tape LEDs turn off 3 The Tape in Use LED blinks while the cartridge drive initializes 4 After initializing if a cartridge is not loaded in the drive the Tape in Use LED turns off and the Operate Handle L...

Страница 42: ...d Cartridges The following describes HP approved cartridges Table 3 Cartridge Types and Formats Cartridge Type Cartridge Formats HP DLT Tape III 10 0 GB HP DLT Tape IIIXT 15 0 GB HP DLT Tape IV 20 0 GB 35 0 GB 40 0 GB Note DLT 2 6 GB and 6 0 GB tape formats are not supported ...

Страница 43: ...ted lift the cartridge insert release handle 1 2 Insert the cartridge 2 3 Push the cartridge completely into the drive 4 Lower the handle 3 to lock the cartridge in place Figure 16 Loading a cartridge sequence Once a cartridge is inserted the cartridge initialization process begins and the Tape in Use LED flashes When the cartridge is at the beginning of tape BOT marker the Tape in Use LED illumin...

Страница 44: ...t button always overrides a host selection Making a programmable host selection through the operating system The Density LED is off indicating automatic or host density selection Allowing the drive to default to the density of the cartridge that has been loaded with the data compression ON assuming the Density Select button or the host selection was not used If a previous written cartridge is inse...

Страница 45: ...tual density when the cartridge is reading and writing The LEDs are illuminated steadily and Density LED is off The Density Select button was pressed and if the actual cartridge density is the same as the density selected The actual density and the Density LEDs are illuminated For example if the actual cartridge density is 20 0 and the selected cartridge density is 20 0 then the 20 0 LED will be i...

Страница 46: ...pe is write enabled Tape in Use Blinking Tape is moving ON Tape is loaded ready for use Use Cleaning Tape ON A cleaning cartridge is requested OFF No cleaning required Operate Handle ON OK to operate the cartridge insert release handle Blinking POST not complete Do not insert cartridge Place handle down OFF Do not operate the cartridge insert release handle DLT 10 0 15 0 W rite Protected Tape In U...

Страница 47: ...density This density is selected for a write from BOT 40 0 ON Tape is recorded in 40 0 format Blinking Tape is recorded in another density This density is selected for a write from BOT Compress ON Compression mode is enabled Compression can be done in all densities OFF Compression mode is disabled Density Override ON Density was selected from the front panel Blinking In density selection mode OFF ...

Страница 48: ...ng the unload sequence If the drive is in an error state all right side and left sided lights are flashing on the front panel pushing the Unload button causes the drive to reset and unload the tape if possible Note The cartridge cannot be manually unloaded if there is no power to the DLT drive Density Select Selects desired density After density is selected pressing this button turns compression o...

Страница 49: ...f the cartridge By moving the switch to the left 1 the cartridge is write protected and by moving the switch to the right 2 the cartridge is write enabled If you move the cartridge write protect switch to the left while the cartridge is in the DLT80 drive the drive illuminates the write protect LED immediately If the drive is writing to the cartridge write protect does not begin until the current ...

Страница 50: ...minals motors and video or X ray equipment Data on the cartridge can be altered Store cartridge in a dust free environment where the relative humidity is between 20 and 80 For longer cartridge life store the cartridge at 20 to 40 relative humidity If the cartridge is dropped or damage is suspected shake the cartridge If it rattles it is damaged Restore the data on the cartridge by another means ot...

Страница 51: ...7 When Use Cleaning Tape LED is Illuminated If Then Action The Use Cleaning Tape LED is illuminated 1 The tape drive needs cleaning 2 The data cartridge is bad Clean the tape drive using a cleaning cartridge After cleaning the drive using a data cartridge causes the Use Cleaning Tape LED to illuminate The data cartridge may be damaged Back up the data from the damaged cartridge to a new cartridge ...

Страница 52: ...may not be compatible with HP tape drives See the section Approved Cartridges in Chapter 5 for a list of HP approved cartridges Cleaning with the Cleaning Cartridge Caution To clean the heads of the DLT drive use only cleaning cartridges compatible with the DLT drive 1 When the Operate Handle LED is illuminated lift the cartridge insert release handle 1 2 Insert the cartridge 2 3 Push the cartridg...

Страница 53: ...ridge has completed the Operate Handle LED illuminates 1 Lift the cartridge insert release handle 1 2 Remove the cartridge 3 Lower the handle 3 4 Record the use of cleaning cartridge by filling the check box on the cartridge label Note Discard the cleaning cartridge after 20 uses ...

Страница 54: ...Tape Drive Cleaning 54 DLT80 Tape Drive Reference Guide ...

Страница 55: ...em does not recognize the DLT80 drive The system might not be configured to see the SCSI ID Configure the system to see the ID The SCSI ID might not be unique Change the SCSI ID and reconfigure the system The new ID is effective at the next power on The parameters for the SCSI adapter might be incorrect Check the SCSI ID adapter installation The SCSI signal cable might be loose Make sure the conne...

Страница 56: ...e system does not recognize the DLT drive continued The SCSI bus might be too long Limit the bus length to the ANSI SCSI standard of 3 meters 9 8 feet for single ended SE Too many devices might be on the bus Limit the number of devices on the bus to eight including the SCSI controller The DLT80 drive does not power up The DLT80 drive has no power With the DLT80 power switch off check the DLT80 pow...

Страница 57: ...r five seconds After the five seconds the top two density LEDs will illuminate Note If the Density Select button is held for less than five seconds the BHC test will not run and the density LEDs return to their original state 2 Release then momentarily hold the Density Select button The top two density LEDs will flash indicating that the BHC test is running The two density LEDs continue to flash w...

Страница 58: ...the BHC test fails hardware failure is likely Contact the HP Technical Support Center for help See the About This Guide section for information on contacting the support center Upgrading Firmware The HP Library and Tape Tool L TT is a tape management and diagnostic tool to help you install and support your HP storage product In addition to the diagnostic and troubleshooting ability of L TT it offe...

Страница 59: ...icating the interference potential of the device as well as additional operating instructions for the user The rating label on the device shows which class A or B the equipment falls into Class B devices have an FCC logo or FCC ID on the label Class A devices do not have an FCC logo or FCC ID on the label Once the class of the device is determined refer to the following corresponding statement Cla...

Страница 60: ...ollowing measures Reorient or relocate the receiving antenna Increase the separation between the equipment and receiver Connect the equipment into an outlet on a circuit different from that to which the receiver is connected Consult the dealer or an experienced radio or television technician for help Modifications The FCC requires the user to be notified that any changes or modifications made to t...

Страница 61: ...uct refer to the Part Series or Model number found on the product Canadian Notice Avis Canadien Class A Equipment This Class A digital apparatus meets all requirements of the Canadian Interference Causing Equipment Regulations Cet appareil numérique de la classe A respecte toutes les exigences du Règlement sur le matériel brouilleur du Canada Class B Equipment This Class B digital apparatus meets ...

Страница 62: ...s product has telecommunication functionality the R TTE Directive 1999 5 EC Compliance with these directives implies conformity to the following European Norms in parentheses are the equivalent international standards and regulations EN 55022 CISPR 22 Electromagnetic Interference EN55024 IEC61000 4 2 3 4 5 6 8 11 Electromagnetic Immunity EN61000 3 2 IEC61000 3 2 Power Line Harmonics EN61000 3 3 IE...

Страница 63: ...Regulatory Compliance Notices 63 DLT80 Tape Drive Reference Guide China Taiwan Notice Japanese Notice ...

Страница 64: ...Regulatory Compliance Notices 64 DLT80 Tape Drive Reference Guide ...

Страница 65: ... This type of damage may reduce the life expectancy of the device To prevent electrostatic damage observe the following precautions Avoid hand contact by transporting and storing products in static safe containers Keep electrostatic sensitive parts in their containers until they arrive at static free workstations Place parts on a grounded surface before removing them from their containers Avoid to...

Страница 66: ...n the ground cords To provide proper grounding wear the strap snug against the skin Use heel straps toe straps or boot straps at standing workstations Wear the straps on both feet when standing on conductive floors or dissipating floor mats Use conductive field service tools Use a portable field service kit with a folding static dissipating work mat If you do not have any of the suggested equipmen...

Страница 67: ...imensions and Weight Dimension Internal Drive without rails External Drive Height 3 40 in 86 3 mm 6 3 in 160 02 mm Width 5 87 in 149 0 mm 6 9 in 175 26 mm Depth 9 60 in 243 8 mm 12 8 in 325 12 mm Weight 6 44 lbs 2 9 kg 14 0 lbs 6 35 kg Table 10 Altitude Action Feet Operating 500 to 40 000 feet ...

Страница 68: ...r position Idle Operate streaming Internal Drive N A 5 7 N A 45 External Drive 5 2 5 5 37 41 Note Current values for specific configurations are available from HP representatives 1 B 10dBA Table 12 Temperature and Humidity Ranges Actions Temperatures Humidity Operating 50º to 104º F 10º to 40º C 20 to 80 RH noncondensing Maximum wet bulb temperature 25º C 77º F Non operating mech 50º to 104º F 10º...

Страница 69: ...ical Maximum 5 V 5 bus 2 8 A 4 35 A 12 V 5 bus 1 2 A 4 5 A Voltage is measured at the power bus connector pins Table 14 Power Requirements External Drive Voltage Maximum Power 100 240V VAC 56 W Table 15 Air Cooling Requirement Ambient Temperature Air flow velocity of 125 linear feet per minute Note Air flow is measured directly in front of the bezel ...

Страница 70: ...Specifications 70 DLT80 Tape Drive Reference Guide ...

Страница 71: ...pacity 17 data compression 17 data transfer rate 17 density select 44 depth 67 DLT80 cleaning 51 connecting multiple drives 34 connecting single drive 32 daisy chaining 34 described 15 front labels 24 front panel buttons 48 front panel LEDs 46 installation location 29 installing external 29 installing internal 19 25 operating 41 rear view internal drive 20 system requirements 16 document conventio...

Страница 72: ... Test POST 41 prerequisites 8 R rack stability warning 11 regulatory compliance notices 59 related documentation 9 required tools internal drive installation 20 S SCSI connector internal drive 20 ID location on external drive 31 ID setting 21 31 ID settings shown 22 server preparing for installation 24 software installing drivers 37 obtaining 16 required for installation 20 requirements external 3...

Страница 73: ...e Guide 73 T technical support HP 12 temperature range 68 terminator power 23 text symbols 9 troubleshooting 55 W warning rack stability 11 symbols on equipment 10 websites HP storage 12 support 58 weight 67 width 67 write protect 49 ...

Страница 74: ...Index 74 DLT80 Tape Drive Reference Guide ...

Отзывы: