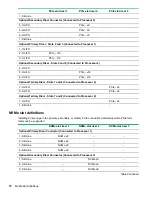


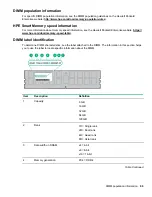


Item
Description
Definition
5
Maximum memory speed
2133 MT/s
2400 MT/s
2666 MT/s
6
CAS latency
P = CAS 15-15-15
T = CAS 17-17-17
U = CAS 20-18-18
V = CAS 19-19-19 (for RDIMM, LRDIMM)
V = CAS 22-19-19 (for 3DS TSVLRDIMM)
7
DIMM type
R = RDIMM (registered)
L = LRDIMM (load reduced)
E = Unbuffered ECC (UDIMM)
For more information about product features, specifications, options, configurations, and compatibility, see the
product QuickSpecs on the Hewlett Packard Enterprise website (
).
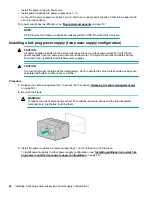
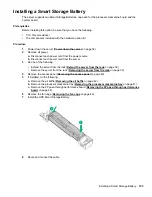
Installing a DIMM
For information about memory support, configurations, or population guidelines, see "
on page 89."
Prerequisites
Before installing this option, be sure that you have the following:
• T-10 Torx screwdriver
• The components included with the hardware option kit
Procedure
1.
on page 38).
2.
Remove all power:
a.
Disconnect each power cord from the power source.
b.
Disconnect each power cord from the server.
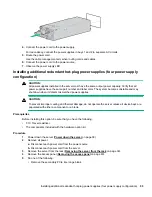
3.
Do one of the following:
• Extend the server from the rack (
Extend the server from the rack
on page 38).
• Remove the server from the rack (
Removing the server from the rack
on page 39).
4.
on page 40).
5.
If installed, do the following:
a.
Remove the air baffle (
b.
Remove the processor mezzanine tray (
Removing the processor mezzanine tray
on page 47).
c.
Remove the 2P pass-through performance board (
Removing the 2P pass-through performance
on page 48).
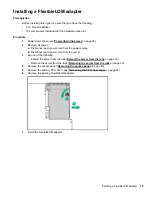
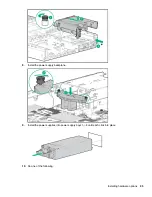
6.
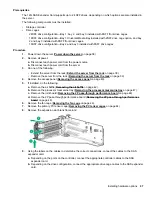
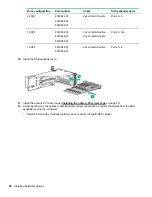
Open the DIMM slot latches.
7.
Install the DIMM.
90
Installing a DIMM
Содержание ProLiant DL560 Gen10
Страница 9: ...Eight bay SFF NVMe drive cage Two bay NVMe Six bay SFF HDD drive cage Component identification 9 ...
Страница 29: ...Item Description 1 x8 Slimline NVMe connector 2 x8 Slimline NVMe connector Component identification 29 ...
Страница 65: ...2 Prepare the drive 3 Install the drive 4 Observe the LED status of the drive Installing hardware options 65 ...
Страница 100: ... 18 SFF backplanes Group C SAS cables 100 Installing hardware options ...
Страница 101: ... 16 SFF backplanes Group C SAS cables Installing hardware options 101 ...
Страница 111: ...Connected to the system board SATA ports 1 and 2 Connected to the HPE P816i a Smart Array controller Cabling 111 ...
Страница 113: ...Connected to the secondary PCIe riser board Connected to the tertiary PCIe riser board Cabling 113 ...
Страница 114: ...Connected to the system board SATA ports 1 and 2 Connected to the Smart Array controller 114 Cabling ...
Страница 115: ...Drive box 3 cabling Connected to the Primary PCIe riser board Connected to the secondary PCIe riser board Cabling 115 ...
Страница 116: ...Connected to the system board SATA ports 1 and 2 Connected to an HPE Smart Array controller 116 Cabling ...
Страница 119: ...Quad slimline riser installed in the secondary PCIe riser cage Tertiary riser Cabling 119 ...


