


Upgrading Library Model 6/140
Reassembling the Upgraded Library
Chapter 4
4-16
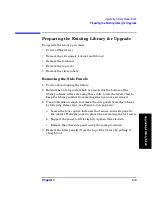
2. Install the filler panel(s) by easing it straight above the top of the
library. The filler panel is spring loaded.
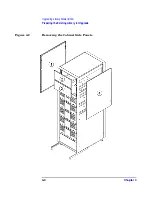
3. Replace the library and cabinet side panels by following these steps:
a. Ease the side panel between the rails on the cabinet and the
library chassis.
b. Install the T-10 screws that secure the side panel to the library
(Figure 4-3 on page 4-5).
c. Tighten the side panels on the cabinet using a 3/16 Allen wrench
(Figure 4-2 on page 4-4).
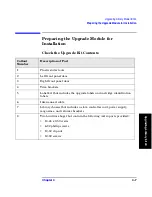
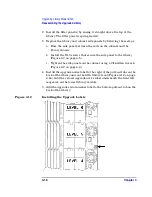
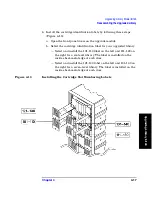
4. Install the upgrade notice label to the right of the pull-out tabs on the
back of the library and on the fifth library level (Figure 4-12 on page
4-16). Add the second upgrade notice label underneath the front left
magazine on the lowest library module.
5. Add the upgrade serial number label to the bottom pull-out tab on the
back of the library.
Figure 4-12
Installing the Upgrade Labels
Содержание ProBook 440
Страница 7: ...Chapter 1 1 1 Preparing for the Upgrade 1 Preparing a 2 20 and 4 40 Library for the Upgrade ...
Страница 17: ...Chapter 2 2 1 Upgrading 20 Slot Libraries 2 Upgrading a 20 Slot Library to 40 or 60 Slots ...
Страница 39: ...Chapter 3 3 1 Upgrading 40 Slot Libraries 3 Upgrading a 40 Slot Library to 60 Slots ...
Страница 56: ...Upgrading a 40 Slot Library to 60 Slots Verifying the Connection Chapter 3 3 18 ...
Страница 57: ...Chapter 4 4 1 Upgrading Library 6 140 4 Upgrading Library Model 6 140 ...


