Upgrading Library Model 6/140
Securing the Upgrade Module to the Cabinet
Chapter 4
4-11
U
pgrad
ing Li
brary 6
/140
Securing the Upgrade Module to the Cabinet
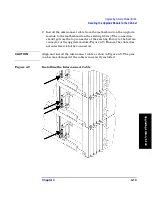
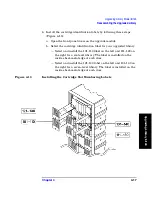
1. Secure the upgrade module to the library and cabinet by following
these steps (see Figure 4-8 on page 4-12):
a. Loosen the four 10-32 screws (front and back) that secure the
mounting rail with the upgrade module to the library cabinet. By
loosening these screws, you can move the rail up and down to
ensure the screw holes align with the upgrade module (see Figure
4-8 on page 4-12).
b. From each side of the library, align the mounting rail on the
cabinet to the holes on each side of the upgrade module. Loosely
install four 10-24 (T-25) screws (two on each end of the mounting
rail) to secure the upgrade module to the cabinet (see Figure 4-8
on page 4-12). See Figure 4-8 on page 4-12.
c. Tighten the four 10-32 screws (front and back) that you loosened
in step 1a, as well as the four 10-24 screws on each side of the
mounting rail from step 1b. See Figure 4-8 on page 4-12.
d. Install one 10-32 (T-25) screw through each retainer bracket,
located behind the two front doors of the upgrade module. See
Figure 4-8 on page 4-12.
Содержание ProBook 440
Страница 7: ...Chapter 1 1 1 Preparing for the Upgrade 1 Preparing a 2 20 and 4 40 Library for the Upgrade ...
Страница 17: ...Chapter 2 2 1 Upgrading 20 Slot Libraries 2 Upgrading a 20 Slot Library to 40 or 60 Slots ...
Страница 39: ...Chapter 3 3 1 Upgrading 40 Slot Libraries 3 Upgrading a 40 Slot Library to 60 Slots ...
Страница 56: ...Upgrading a 40 Slot Library to 60 Slots Verifying the Connection Chapter 3 3 18 ...
Страница 57: ...Chapter 4 4 1 Upgrading Library 6 140 4 Upgrading Library Model 6 140 ...


