background image

16.

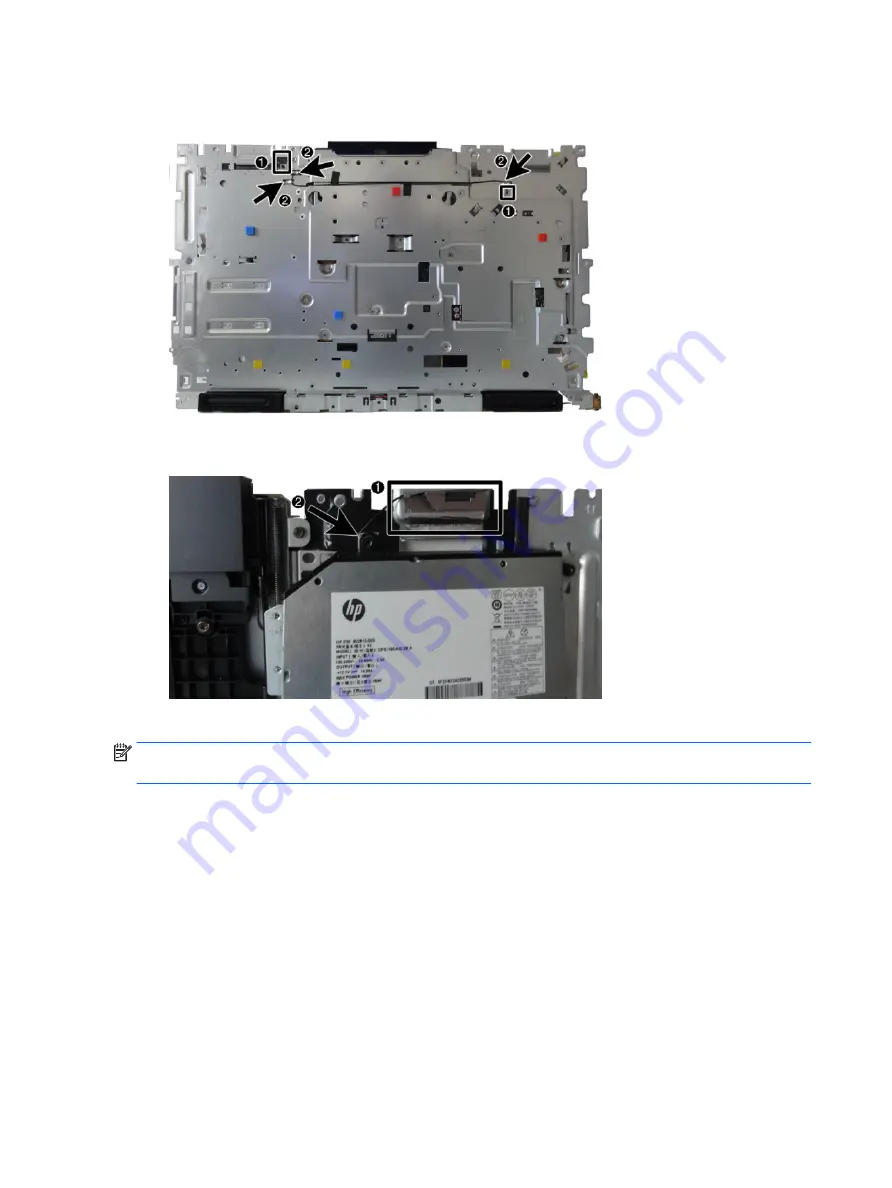
On the rear of the chassis, note the locations the cables route through (1), and the remove the cables 
from the clips built into the chassis (2).

17.

Peel the left antenna from the chassis (1), and then pull the other end of the cable through the hole in 
the chassis (2). Remove the left antenna and cable.

To install the antenna, reverse the removal procedures.

NOTE:

When connecting the antennas cables, be sure to match the numbers on the cable with the same 

number printed on the WLAN module. 

60

Chapter 4   Removal and Replacement Procedures

Содержание EliteOne 800 G3

Страница 1: ...Maintenance Service Guide HP EliteOne 800 G3 All in One Business PC ...

Страница 2: ...ebruary 2017 Document Part Number 913336 001 Product notice This user guide describes features that are common to most models Some features may not be available on your computer Not all features are available in all editions of Windows This computer may require upgraded and or separately purchased hardware drivers and or software to take full advantage of Windows functionality Go to http www micro...

Страница 3: ...ollow directions could result in bodily harm or loss of life CAUTION Text set off in this manner indicates that failure to follow directions could result in damage to equipment or loss of information NOTE Text set off in this manner provides important supplemental information iii ...

Страница 4: ...iv About This Book ...

Страница 5: ...pters 10 Keyboards and mice 11 3 Routine care SATA drive guidelines and disassembly preparation 12 Electrostatic discharge information 12 Generating static 13 Preventing electrostatic damage to equipment 13 Personal grounding methods and equipment 14 Grounding the work area 14 Recommended materials and equipment 14 Operating guidelines 15 Routine care 15 General cleaning safety precautions 15 Clea...

Страница 6: ...al drive 24 M 2 solid state drive 26 Memory 28 Battery 30 WLAN module 31 Power button and fingerprint reader boards 33 Heat sink 35 Processor 38 Webcam module 40 VESA mounting bracket fan assembly 43 Power supply 45 Rear I O cover 47 I O bracket 48 Hard drive cage 49 System board 50 System board callouts 53 Audio board 54 Speakers 55 Display panel 56 Antennas 59 Connecting cables 61 5 Computer Set...

Страница 7: ...e installation problems 91 Solving network problems 92 Solving memory problems 95 Solving CD ROM and DVD problems 96 Solving USB flash drive problems 98 Solving front panel component problems 99 Solving Internet access problems 100 Solving software problems 101 8 Backing up restoring and recovering 102 Backing up restoring and recovering in Windows 10 102 Creating recovery media and backups 102 Cr...

Страница 8: ...d diagnostic front panel LEDs and audible codes 112 POST numeric codes and text messages 112 Interpreting system validation diagnostic front panel LEDs and audible codes 117 10 Password security and resetting CMOS 119 Resetting the password jumper 119 Clearing and resetting the BIOS 121 Appendix A Power cord set requirements 122 General requirements 122 Japanese power cord requirements 122 Country...

Страница 9: ... this product go to http www hp com support Select Find your product and then follow the on screen instructions This product employs electronic labeling for indication of regulatory mark or statement See Labels on page 5 for the operation to display Overview 1 ...

Страница 10: ...s Infrared IR webcam optional Component Component Front View 1 Webcam light 4 IR webcam 2 IR light 5 Rear webcam adjustment wheel 3 Full High Definition FHD webcam Top view 6 Digital microphones Rear view 7 Webcam light 8 FHD webcam 2 Chapter 1 Product features ...

Страница 11: ...Webcam light 2 FHD webcam Top view 3 Digital microphones Side components Component Component 1 Optical disc drive optional 4 Headphone jack 2 Optical disc drive eject button optional 5 Fingerprint reader Touch models only 3 Audio out headphone jack Side components 3 ...

Страница 12: ...A ports 2 3 USB 3 1 Type A ports 2 7 Stereo audio out jack 4 Power connector 8 Security cable slot Bottom components Component Component 1 USB 3 1 Type A port 4 USB 3 1 Type C port 2 USB 3 1 Type A charging port 5 Hard drive activity light 3 SD card reader 6 Power button 4 Chapter 1 Product features ...

Страница 13: ...uthenticity label select models only prior to Windows 8 Contains the Windows Product Key You may need the Product Key to update or troubleshoot the operating system 2 Service label Provides important information to identify your computer When contacting support you will probably be asked for the serial number and possibly for the product number or the model number Locate these numbers before you c...

Страница 14: ...tion on supported parts for your computer go to http partsurfer hp com select your country or region and then follow the on screen instructions System parts Item Description 1 Middle frame Touch models Non touch models 2 Blower Fan 3 Display cable 4 Speakers 5 Adjustment Height Stand 6 Recline Stand Heat sink 7 UMA 8 Discrete 6 Chapter 2 Illustrated parts catalog ...

Страница 15: ...Touch models Non touch models not illustrated Covers Item Description 1 Rear cover main 2 Rear I O cover 3 Rear port cover Card reader cover for use in models without a card reader Optical drive cover for use in models without an optical drive Webcam cover for use in models without a webcam VESA cover for use in models with out a stand not illustrated not illustrated Covers 7 ...

Страница 16: ...ss AC 7265 NV Intel 3168 ac 1x1 Bluetooth 4 2LE M 2 non vPro PCI e USB WW with 2 antennas Intel 8265 ac 2x2 Bluetooth 4 2 M 2 non vPro PCI e USB WW with 2 antennas Intel 8265 ac 2x2 Bluetooth 4 2 M 2 vPro PCI e USB WW with 2 antennas Realtek RTL8723BE bgn 1x1 Bluetooth 4 LE PCIe USB NGFF 2230 M 2 WW not illustrated 8 Chapter 2 Illustrated parts catalog ...

Страница 17: ...drive 2 5 inch 512 GB solid state drive FIPS 140 2 512 GB solid state drive self encrypting SED 256 GB solid state drive self encrypting SED 256 GB solid state drive 256 GB solid state drive FIPS 140 2 128 GB solid state drive M 2 solid state drive 1 TB solid state drive 2280SS NVMe TLC 512 GB solid state drive 2280SS PCIe NVMe TLC 512 GB solid state drive 2280SS NVMe TLC 256 GB solid state drive ...

Страница 18: ...i5 6600 3 3 GHz Intel Core i5 6500 3 2 GHz Intel Core i3 6100 3 7 GHz Intel Pentium G4620 3 7 GHz Intel Pentium G4600 3 6 GHz Intel Pentium G4560 3 5 GHz Intel Celeron G3950 3 0 GHz Intel Celeron G3930 2 9 GHz Memory modules SODIMM DDR4 2400 16 GB 8 GB 4 GB Cables and adapters Description LVDS display cable 289 mm Power button cable 110 mm Combination fingerprint reader power touch cable Side audi...

Страница 19: ...yPort to DVI DisplayPort to HDMI 1 4 DisplayPort to VGA USB to serial port USB C to USB 3 0 Keyboards and mice Description Keyboard USB slim Wireless with mouse USB business slim grey USB business slim antimicrobial Mouse USB washable USB grey USB hardened USB antimicrobial USB optical USB laser Keyboards and mice 11 ...

Страница 20: ...sudden discharge of static electricity from your finger or other conductor can destroy static sensitive devices or microcircuitry Often the spark is neither felt nor heard but damage occurs An electronic device exposed to electrostatic discharge ESD may not appear to be affected at all and can work perfectly throughout a normal cycle The device may function normally for a while but it has been deg...

Страница 21: ...a product Preventing electrostatic damage to equipment Many electronic components are sensitive to ESD Circuitry design and structure determine the degree of sensitivity The following packaging and grounding precautions are necessary to prevent damage to electric components and accessories To avoid hand contact transport products in static safe containers such as tubes bags or boxes Protect all el...

Страница 22: ...properly grounded tools and equipment Use static dissipative mats foot straps or air ionizers to give added protection Handle electrostatic sensitive components parts and assemblies by the case or PCB laminate Handle them only at static free work areas Turn off power and input signals before inserting and removing connectors or test equipment Use fixtures made of static safe materials when fixture...

Страница 23: ...ver operate the computer with the cover or side panel removed Do not stack computers on top of each other or place computers so near each other that they are subject to each other s re circulated or preheated air If the computer is to be operated within a separate enclosure intake and exhaust ventilation must be provided on the enclosure and the same operating guidelines listed above will still ap...

Страница 24: ...ming or shaking Canned pressurized air may be used to clean debris from under the keys Caution should be used as too much air pressure can dislodge lubricants applied under the wide keys If you remove a key use a specially designed key puller to prevent damage to the keys This tool is available through many electronic supply outlets CAUTION Never remove a wide leveled key like the space bar from t...

Страница 25: ...les used throughout the unit are flat flexible cables These cables must be handled with care to avoid damage Apply only the tension required to seat or unseat the cables during insertion or removal from the connector Handle cables by the connector whenever possible In all cases avoid bending or twisting the cables and ensure that the cables are routed in such a way that they cannot be caught or sn...

Страница 26: ...to temperatures higher than 140ºF 60ºC Do not attempt to recharge the battery NOTE Batteries battery packs and accumulators should not be disposed of together with the general household waste In order to forward them to recycling or proper disposal please use the public collection system or return them to HP their authorized partners or their agents Cable management Always follow good cable manage...

Страница 27: ...sconnect all other attached cables from the back of the computer 6 Place the computer face down on a soft flat surface HP recommends that you set down a blanket towel or other soft cloth to protect the screen surface from scratches or other damage WARNING Beware of sharp edges inside the chassis Removing the rear port cover 1 Prepare the computer for disassembly see Preparing to disassemble the co...

Страница 28: ...ing the rear port cover on page 19 3 Press the release latch under the stand 1 4 Lift the stand up 2 and then pull the stand hooks out of the computer 3 Adjustable height stand To remove the stand 1 Prepare the computer for disassembly see Preparing to disassemble the computer on page 19 2 Remove the rear port cover if it is installed For instructions see Removing the rear port cover on page 19 3 ...

Страница 29: ... access panel 1 Prepare the computer for disassembly see Preparing to disassemble the computer on page 19 2 Remove the rear port cover see Removing the rear port cover on page 19 3 Remove the stand see Stands on page 20 4 Pull up the notches 1 of the access panel and then lift the access panel off the computer 2 To replace the access panel reverse the removal procedures Access panel 21 ...

Страница 30: ...drive 2 5 inch 512 GB solid state drive FIPS 140 2 512 GB solid state drive self encrypting SED 256 GB solid state drive self encrypting SED 256 GB solid state drive 256 GB solid state drive FIPS 140 2 128 GB solid state drive M 2 solid state drive 1 TB solid state drive 2280SS NVMe TLC 512 GB solid state drive 2280SS PCIe NVMe TLC 512 GB solid state drive 2280SS NVMe TLC 256 GB solid state drive ...

Страница 31: ...the stand see Stands on page 20 4 Remove the access panel see Access panel on page 21 5 Pull the hard drive latch away from the hard drive to release the drive 1 6 Slide the hard drive toward the edge of the computer and lift the hard drive out of the drive cage 2 7 Remove the four mounting screws from the 2 5 inch hard drive Be sure to keep the screws together with the blue rubber grommets to use...

Страница 32: ... the rear port cover on page 19 3 Remove the stand see Stands on page 20 4 Remove the access panel see Access panel on page 21 5 Remove the hard drive see Hard drive on page 23 6 Push and hold the green tab 1 while pushing in the green latch 2 at the back of the optical disc drive enclosure and slide the drive 3 out of the chassis 7 Pull the green latch off the optical drive Keep this latch to ins...

Страница 33: ...e latch firmly onto the new drive NOTE You must reuse the latch removed from the old optical disc drive 9 Align the new optical drive with the opening in the side of the computer Push the drive in firmly until it snaps into place NOTE The optical drive can be installed in only one way Drives 25 ...

Страница 34: ...the right side of the board fits both 22mm x 80mm and 22mm x 30mm M 2 solid state drives To remove the M 2 solid state drive 1 Prepare the computer for disassembly see Preparing to disassemble the computer on page 19 2 Remove the rear port cover see Removing the rear port cover on page 19 3 Remove the stand see Stands on page 20 4 Remove the access panel see Access panel on page 21 5 Remove the Ph...

Страница 35: ...6 Pull the drive away to remove it from the socket 2 To install the solid state drive reverse the removal procedures Drives 27 ...

Страница 36: ... to avoid compatibility issues with unsupported third party memory The system will automatically operate in single channel mode dual channel mode or flex mode depending on how the memory modules are installed Refer to the following table to identify the memory module channel locations Location System board label Channel Lower Socket SODIMM1 Channel B Upper Socket SODIMM3 Channel A The system will ...

Страница 37: ...n page 19 2 Remove the rear port cover see Removing the rear port cover on page 19 3 Remove the stand see Stands on page 20 4 Remove the access panel see Access panel on page 21 5 To remove a memory module press outward on the two latches on each side of the memory module 1 then pull the memory module out of the slot 2 6 Slide the new memory module into the slot at approximately a 30 angle 1 then ...

Страница 38: ... damage the electronic components of the computer or optional equipment Before beginning these procedures ensure that you are discharged of static electricity by briefly touching a grounded metal object NOTE The lifetime of the lithium battery can be extended by plugging the computer into a live AC wall socket The lithium battery is only used when the computer is NOT connected to AC power HP encou...

Страница 39: ...he WLAN module is secured with one Phillips screw and has two connected antennas NOTE The procedure to replace the WLAN module must be performed by an HP technician NOTE WLAN module appearance may vary To remove the WLAN module 1 Prepare the computer for disassembly see Preparing to disassemble the computer on page 19 2 Remove the rear port cover see Removing the rear port cover on page 19 3 Remov...

Страница 40: ...removal procedures When connecting the antennas cables connect the cable labeled 1 black sticker to the AUX 1 connector on the module and the cable labeled 2 white sticker to the MAIN 2 connector on the module NOTE WLAN modules are designed with a notch to prevent incorrect insertion 32 Chapter 4 Removal and Replacement Procedures ...

Страница 41: ...o remove the power button and fingerprint reader boards 1 Prepare the computer for disassembly see Preparing to disassemble the computer on page 19 2 Remove the rear port cover see Removing the rear port cover on page 19 3 Remove the stand see Stands on page 20 4 Remove the access panel see Access panel on page 21 5 Remove the Torx screw from the power button board bracket 1 and two Phillips screw...

Страница 42: ...the cables from each board 8 If necessary remove the two Phillips screws that secure the power button board to the bracket To install the right trim reverse the removal procedures 34 Chapter 4 Removal and Replacement Procedures ...

Страница 43: ...e access panel see Access panel on page 21 5 UMA models In the order indicated on the heat sink loosen the captive Torx screws 1 from the heat sink component that services the processor CAUTION Remove heat sink retaining screws in diagonally opposite pairs as in an X to even the downward forces on the processor This is especially important as the pins on the socket are very fragile and any damage ...

Страница 44: ...rom the heat sink component that services the main processor CAUTION Remove heat sink retaining screws in diagonally opposite pairs as in an X to even the downward forces on the processor This is especially important as the pins on the socket are very fragile and any damage to them may require replacing the system board 10 Remove the non captive Torx screws 2 from the heat sink component that serv...

Страница 45: ...of the computer CAUTION To reduce a degradation in thermal performance be sure not to touch the thermal grease on the surface of the processor or the heat sink To replace the heat sink reverse the removal procedures Heat sink 37 ...

Страница 46: ...Intel Pentium G4600 3 6 GHz Intel Pentium G4560 3 5 GHz Intel Celeron G3950 3 0 GHz Intel Celeron G3930 2 9 GHz 1 Prepare the computer for disassembly see Preparing to disassemble the computer on page 19 2 Remove the rear port cover see Removing the rear port cover on page 19 3 Remove the stand see Stands on page 20 4 Remove the access panel see Access panel on page 21 5 Remove the heat sink see H...

Страница 47: ...le damage Once pins are damaged it may be necessary to replace the system board The heat sink must be installed within 24 hours of installing the processor to prevent damage to the processor s solder connections NOTE After installing a new processor onto the system board always update the system ROM to ensure that the latest version of the BIOS is being used on the computer The latest system BIOS ...

Страница 48: ...emove the stand see Stands on page 20 4 Remove the access panel see Access panel on page 21 5 Remove the heat sink see Heat sink on page 35 6 To remove the webcam plastic shield remove the three Torx screws 1 that secure the shield to the computer and then pry upward at the left screw boss to disengage the shield 2 7 Remove the webcam shield from the computer 8 Remove the four Phillips screws 1 th...

Страница 49: ...Remove the webcam assembly from the computer 12 If you need to remove the webcam bracket remove the VESA bracket fan assembly VESA mounting bracket fan assembly on page 43 and then remove the four Torx screws that secure the webcam bracket to the computer Webcam module 41 ...

Страница 50: ...13 Remove the webcam bracket from the computer To install the webcam assembly and associated parts reverse the removal procedures 42 Chapter 4 Removal and Replacement Procedures ...

Страница 51: ... to disassemble the computer on page 19 2 Remove the rear port cover see Removing the rear port cover on page 19 3 Remove the stand see Stands on page 20 4 Remove the access panel see Access panel on page 21 5 Remove the five Torx screws that secure the assembly to the computer 6 Disconnect the fan cable from the system board 2 7 Lift the assembly off the computer VESA mounting bracket fan assembl...

Страница 52: ...om the bracket remove the four Torx screws that secure the fan to the bracket 9 Separate the fan from the bracket To replace the VESA mounting bracket fan assembly reverse the removal procedures 44 Chapter 4 Removal and Replacement Procedures ...

Страница 53: ...the rear port cover see Removing the rear port cover on page 19 3 Remove the stand see Stands on page 20 4 Remove the access panel see Access panel on page 21 5 Remove the VESA mounting bracket fan assembly see VESA mounting bracket fan assembly on page 43 6 Remove the three Torx screws 1 that secure the power supply to the computer 7 Disconnect the power supply cable from the system board connect...

Страница 54: ...rom the computer To install the power supply reverse the removal procedures Make note of the foam strips that must be installed under the power supply as shown in the following image 46 Chapter 4 Removal and Replacement Procedures ...

Страница 55: ... 19 2 Remove the rear port cover see Removing the rear port cover on page 19 3 Remove the stand see Stands on page 20 4 Remove the access panel see Access panel on page 21 5 Remove the I O bracket secured to the system board see callout 2 in System board on page 50 6 Remove the two Torx screws that secure the cover to the computer 7 Remove the rear I O cover from the computer To install the bottom...

Страница 56: ...port cover see Removing the rear port cover on page 19 4 Remove the stand see Stands on page 20 5 Remove the access panel see Access panel on page 21 6 Remove the rear I O cover see Rear I O cover on page 47 7 Remove the power connector from its mounting location on the I O bracket see step 3 in Power supply on page 45 8 Remove the five Torx screws that secure the I O bracket to the computer 9 Lif...

Страница 57: ...see Removing the rear port cover on page 19 4 Remove the stand see Stands on page 20 5 Remove the access panel see Access panel on page 21 6 Remove the Torx screw 1 that secures the hard drive cage to the computer 7 Remove the power supply cable from the clips around the hard drive cage 2 8 Slide the hard drive cage away from the system board to disengage it from the clips and then lift the hard d...

Страница 58: ...Remove the WLAN module see WLAN module on page 31 8 Remove the VESA bracket fan assembly see VESA mounting bracket fan assembly on page 43 9 Remove the heat sink see Heat sink on page 35 10 Remove the processor see Processor on page 38 11 Remove the hard drive cage see Hard drive cage on page 49 12 Remove the I O bracket see I O bracket on page 48 13 Remove the rear I O cover see Rear I O cover on...

Страница 59: ... system board reverse the removal procedures Be sure to replace the screws in the order indicated on the system board Note the replacement locations of the thermal pads on the bottom of the system board Updating SMBIOS Information When replacing the system board you must reprogram the SMBIOS information on the affected computer Failure to reprogram the board will result in eventual failure such as...

Страница 60: ...ter the Model name number or marketing name Flexbuild Serial Number Enter the Serial Number of Unit Support SKU Number Enter the SKU or Product Number including Localization Code Support Asset Tag Enter the 18 byte identifier assigned to the computer Support Feature Byte Enter the Feature Byte string The feature byte string is case sensitive The label includes spaces after every four characters Yo...

Страница 61: ...connector SSD2 Black M 2 SSD drive PROCESSOR Silver Processor socket DIMM3 Black Memory module PWR Black Main power connector DIMM1 Black Memory module SATA3 Black Optical drive connector F_PANEL White Front panel SATA1 Black Hard drive connector LVDS Black Display connector SSD1 Black M 2 SSD drive CMOS Yellow Reset CMOS F_AUDIO White Front audio DPCONV White Backlight cable SPKR Black Speaker Sy...

Страница 62: ...ove the rear port cover see Removing the rear port cover on page 19 4 Remove the stand see Stands on page 20 5 Remove the access panel see Access panel on page 21 6 Remove the Torx screw 1 that secures the audio board to the computer 7 Disconnect the cable from the system board 2 8 Remove the cable from the clips built into the chassis 3 9 Lift the audio board out of the computer To replace the au...

Страница 63: ...ands on page 20 4 Remove the access panel see Access panel on page 21 5 Remove the rear I O cover see Rear I O cover on page 47 6 Disconnect the speaker cable from the system board 1 7 Remove two Torx screws 2 that secure each speaker to the computer 8 Remove speaker cable from the clips and routing path built into the chassis 3 9 Remove the speakers from the computer To install the speakers rever...

Страница 64: ... 19 2 Remove the rear port cover see Removing the rear port cover on page 19 3 Remove the stand see Stands on page 20 4 Remove the access panel see Access panel on page 21 5 Remove the heat sink see Heat sink on page 35 6 Remove the webcam plastic cover see Webcam module on page 40 7 Remove the power button board and disconnect the cable from the fingerprint reader board see Power button and finge...

Страница 65: ... 3 from the system board and then route both cables through the holes in the plate 14 Lift the frame from the display 15 From the rear of the display panel remove the Mylar tape 1 that secures the display cable to the panel 16 Disconnect the touch cable 2 Display panel 57 ...

Страница 66: ...ull the cable from the connector 18 Separate the middle frame from the display by rotating the top of the display away from the frame 1 and then pulling the frame away from the display 2 NOTE Display and middle frame appearance may vary To install the display panel reverse the removal procedures 58 Chapter 4 Removal and Replacement Procedures ...

Страница 67: ... page 40 7 Remove the power button board and disconnect the cable from the fingerprint reader board see Power button and fingerprint reader boards on page 33 8 Remove the audio board see Audio board on page 54 9 Remove the VESA bracket Fan assembly see VESA mounting bracket fan assembly on page 43 10 Remove the rear I O cover see Rear I O cover on page 47 11 Remove the I O bracket see I O bracket ...

Страница 68: ...nna from the chassis 1 and then pull the other end of the cable through the hole in the chassis 2 Remove the left antenna and cable To install the antenna reverse the removal procedures NOTE When connecting the antennas cables be sure to match the numbers on the cable with the same number printed on the WLAN module 60 Chapter 4 Removal and Replacement Procedures ...

Страница 69: ... the bezel and screen surface from scratches or other damage 2 If the rear port cover is installed remove the cover See Removing the rear port cover on page 19 3 Route the power and all peripheral cables through the opening in the base of the stand 4 Connect the peripheral cables to the appropriate ports 5 Reassemble the computer Connecting cables 61 ...

Страница 70: ...ferent types of boot sources Configure features such as Secure Boot power management virtualization support and language and keyboard type used in Setup and POST Replicate the system setup by saving system configuration information on a USB device and restoring it on one or more computers Enable or disable DriveLock security or securely erase a hard drive when supported by drive Using Computer Set...

Страница 71: ... Advanced and Main menus to those previously saved by Save Custom Defaults select Apply Custom Defaults and Exit If no custom defaults have been saved then factory defaults are used NOTE Settings in the Security menu are not modified by Apply Defaults Those values are reset by Restore Security Settings to Factory Defaults at the bottom of the Security menu NOTE Not all settings shown in the follow...

Страница 72: ...rmware System BIOS version ME Firmware version Intel only Video BIOS version Reference code version Super I O Firmware version USB Type C controller s firmware version Service Born on date Serial number SKU number UUID Universally Unique Identifier Asset tracking number Feature byte Build ID Product family System board ID System board CT number Communication Integrated MAC Address System Diagnosti...

Страница 73: ...enter the minimum BIOS version that can be rolled back to Unrestricted rollback to older BIOS Restricted rollback to older BIOS Allow BIOS updates using a network BIOS Update Preferences Allows the administrator to select the source of network updates www hp com or another network server and allows configuration of a periodic check for updates including policies for Check for updates and prompt th...

Страница 74: ...sword which controls access to the following features Setup Menu F10 3rd Party Option ROM Management F3 Update system ROM WMI commands that change system settings BIOS Configuration Utility BCU Alternative power on password NOTE Creating a BIOS user disables the Fast Boot option NOTE If the password is set it is required to change Computer Setup options update the BIOS and make changes to certain ...

Страница 75: ... also allows you to recover the last known good MBR should changes to the MBR be detected when the system is restarted NOTE Most operating systems control access to the MBR of the current bootable disk the BIOS cannot prevent changes that may occur while the operating system is running Restores the backup Master Boot Record to the current bootable disk Default is disabled Only appears if all of th...

Страница 76: ...ices clears BIOS passwords not including DriveLock and restores settings in the Security menu to factory defaults Computer Setup Advanced NOTE Support for specific Computer Setup options may vary depending on the hardware configuration Table 5 3 Computer Setup Advanced for advanced users Option Heading Display Language Lets you select the language of the menus in F10 Setup and the keyboard layout ...

Страница 77: ...ull OS booting preventing firmware attacks UEFI and Windows Secure Boot only allow code signed by pre approved digital certificates to run during the firmware and OS boot process Legacy Support Enable and Secure Boot Disable Legacy Support Disable and Secure Boot Enable Legacy Support Disable and Secure Boot Disable Default is Legacy Support Disable and Secure Boot Disable Secure Boot Key Manageme...

Страница 78: ...Built In Device Options Embedded LAN Controller Select to show the device in the operating system Default is enabled Wake On LAN Lets you either disable the Wake On LAN feature or configure where the computer boots including the network or hard drive Default is Boot to Network Dust Filter Select to enable the Dust Filter replacement reminder which can be set for 15 30 60 90 120 or 180 days The rem...

Страница 79: ...rted USB Type C Controller Firmware Update Default is enabled Option ROM Launch Policy These policies control whether Legacy Option ROMs or UEFI drivers are loaded Default is All legacy for Windows 7 and other non Windows configurations Default is All UEFI for Windows 10 or later Configure Option ROM Launch Policy All legacy All UEFI All UEFI except video Power Management Options Runtime Power Man...

Страница 80: ...fault is disabled USB Redirection Support enable disable Default is enabled USB redirection allows USB devices plugged into a client computer to be transparently redirected to the guest operating system Unconfigure AMT on next boot Do Not Apply Apply Default is Do Not Apply SOL Terminal Emulation Mode ANSI VT100 Default is ANSI SOL terminal emulation mode is only activated during remote AMT redire...

Страница 81: ...to Removable Media option creates a file named HPSETUP TXT on an inserted USB flash media device This file can be edited to change the settings on Restore An asterisk marks the selected option for a setting NOTE It is recommended that you save any modified computer configuration settings to a USB flash media device and save the device for possible future use To restore the configuration insert the...

Страница 82: ...he following order a Connected USB drive NOTE To download the HP PC Hardware Diagnostics UEFI tool to a USB drive see Downloading HP PC Hardware Diagnostics UEFI to a USB device on page 74 b Hard drive c BIOS 3 When the diagnostic tool opens select the type of diagnostic test you want to run and then follow the on screen instructions NOTE If you need to stop a diagnostic test press esc Downloading...

Страница 83: ... automatically detect your product 4 Select your computer and then select your operating system 5 In the Diagnostic section follow the on screen instructions to select and download the UEFI version you want Downloading HP PC Hardware Diagnostics UEFI to a USB device 75 ...

Страница 84: ...ng red The flashing lights are error codes that will help you diagnose the problem Refer to POST error messages and diagnostic front panel LEDs and audible codes on page 112 for more information If you are working on a network plug another computer with a different cable into the network connection There may be a problem with the network plug or cable If you recently added new hardware remove the ...

Страница 85: ...page 112 for more information Press and hold any key If the system beeps then the keyboard should be operating correctly Check all cable connections for loose connections or incorrect connections Wake the computer by pressing any key on the keyboard or pressing the power button If the system remains in suspend mode shut down the computer by pressing and holding the power button for at least four s...

Страница 86: ...and will not turn off when the power button is pressed Cause Solution Software control of the power switch is not functional 1 Press and hold the power button for at least four seconds until the computer turns off 2 Disconnect the power cord from the electrical outlet Computer will not respond to keyboard or mouse Cause Solution Computer is in Sleep state To resume from Sleep state press the power...

Страница 87: ...puter Setup In case of forgotten password power loss or computer malfunction you must manually disable the Smart Cover lock A key to unlock the Smart Cover Lock is not available from HP Keys are typically available from a hardware store Poor performance Cause Solution Processor is too hot 1 Make sure airflow to the computer is not blocked Leave a 10 2 cm 4 inch clearance on all vented sides of the...

Страница 88: ...documentation that came with the application for suggestions on how to improve performance by adjusting parameters in the application 2 Add more memory 3 Upgrade the graphics solution Cause unknown Restart the computer Computer powered off automatically and the Power LED flashes red four times and then white two times Cause Solution Processor thermal protection activated A fan may be blocked or no...

Страница 89: ... OR Press and hold the power button for less than 4 seconds If the hard drive LED does not turn on white then 1 Check that the unit is plugged into a working AC outlet 2 Open the access panel and check that the power button cable is properly connected to the system board 3 Check that the power supply cables are properly connected to the system board 4 Check to see if the 5V_aux light on the system...

Страница 90: ...stem fan spins If the fan does not spin make sure the fan cable is plugged onto the system board header 3 If fan a plugged in and not spinning replace it Power LED flashes Red four times once every second followed by a two second pause and the computer beeps four times Beeps stop after fifth iteration but LEDs continue flashing Computer powered off automatically and the Power LED flashes red three...

Страница 91: ...e Explorer from the list of applications In the left column expand This PC right click on a drive select Properties and then select the Tools tab Under Error checking click Check Drive not found identified Cause Solution Cable could be loose Check cable connections The system may not have automatically recognized a newly installed device See reconfiguration directions in the Solving hardware insta...

Страница 92: ...ptions and ensure the bootable hard drive is listed immediately under the Hard Drive entry Computer will not boot from hard drive Cause Solution The device is attached to a SATA port that has been hidden in Computer Setup 1 Check SATA cable connections 2 Run the Computer Setup utility and ensure Device Available is selected for the device s SATA port in Advanced Port Options Boot order is not corr...

Страница 93: ... previous section for a list of compatible cards Media card is locked Locking the media card is a safety feature that prevents writing to and deleting from an SD Memory Stick PRO card If using an SD card make sure that the lock tab located on the right of the SD card is not in the locked position If using a Memory Stick PRO card make sure that the lock tab located on the bottom of the Memory Stick...

Страница 94: ...audio problems see the common causes and solutions listed in the following table Headset microphone connected to the front is not working or is very quiet Cause Solution The front Headset connector supports CTIA Cellular Telephone Industries Association style headsets and not OMTP Open Mobile Terminal Platform style headsets These differ by the microphone connections Make sure that a CTIA style he...

Страница 95: ...lication is set to use a different audio device than speakers Some graphics cards support audio over the DisplayPort connection if applicable so multiple audio devices may be listed in Device Manager Make sure the correct device is being used To access Device Manager in Windows 7 click Start select Control Panel and then select Device Manager To access Device Manager in Windows 10 type device mana...

Страница 96: ...rect audio device The operating system controls may be set to use a different audio device as the default output device than what is expected Set the operating system to use the correct audio device Solving printer problems If you encounter printer problems see the documentation that came with the printer and to the common causes and solutions listed in the following table Printer will not print C...

Страница 97: ...king correctly Symptoms include lagging mouse movement jumpy mouse keyboard or no function of mouse keyboard and external drive Cause Solution If your computer is equipped with USB 3 0 ports connected USB 3 0 devices can interfere with the wireless keyboard USB receiver Connect the wireless keyboard USB receiver to a USB 2 0 port that is separated from ports with USB 3 0 devices If you still exper...

Страница 98: ...u and then press Enter 3 Use the arrow keys to select Shut Down and then press Enter 4 After the shutdown is complete plug the mouse connector into the back of the computer or the keyboard and restart Program in use has stopped responding to commands Shut down the computer using the keyboard then restart the computer Mouse may need cleaning Remove the roller ball cover on the mouse and clean the i...

Страница 99: ...ce is not turned on Turn off the computer turn on the external device then turn on the computer to integrate the device with the computer system When the system advised you of changes to the configuration you did not accept them Reboot the computer and follow the instructions for accepting the changes A plug and play board may not automatically configure when added if the default configuration con...

Страница 100: ...y with HP memory 4 Replace the system board Solving network problems Some common causes and solutions for network problems are listed in the following table These guidelines do not discuss the process of debugging the network cabling Table 7 2 Solving Network Problems Network driver does not detect network controller Cause Solution Network controller is disabled 1 Run Computer Setup and enable net...

Страница 101: ...er is not properly loaded Reinstall network drivers System cannot autosense the network Disable auto sensing capabilities and force the system into the correct operating mode Diagnostics reports a failure Cause Solution The cable is not securely connected Ensure that the cable is securely attached to the network connector and that the other end of the cable is securely attached to the correct devi...

Страница 102: ...e network drivers using the Recovery Disc Set in Windows 7 If necessary download the softpaq from the web from a different computer The cable is not securely connected Ensure that the cable is securely attached to the network connector and that the other end of the cable is securely attached to the correct device The network controller is defective Contact an authorized service provider New networ...

Страница 103: ...ecute the ME firmware for Out of Band OOB third party data storage and other management functions System will not boot or does not function properly after installing additional memory modules Cause Solution A memory module is not installed in the DIMM1 or XMM1 socket Ensure that a memory module is installed in the DIMM1 or XMM1 socket on the system board This socket must be populated with a memory...

Страница 104: ...ched to a SATA port that has been hidden in the Computer Setup utility Run the Computer Setup utility and ensure Device Available is selected for the device s SATA port in Advanced Port Options Removable Media Boot is disabled in the Computer Setup utility Run the Computer Setup utility and enable booting to removable media in Advanced Boot Options Network Boot is enabled in Computer Setup Run the...

Страница 105: ...re is not installed Install decoder software Damaged media Replace media Movie rating locked out by parental lock Use DVD software to remove parental lock Media installed upside down Reinstall media Cannot eject compact disc tray load unit Cause Solution Disc not properly seated in the drive Turn off the computer and insert a thin metal rod into the emergency eject hole and push firmly Slowly pull...

Страница 106: ...a type 1 Try using a slower speed when recording 2 Verify that you are using the correct media for the drive 3 Try a different brand of media Quality varies widely between manufacturers Solving USB flash drive problems If you encounter USB flash drive problems common causes and solutions are listed in the following table USB flash drive is not seen as a drive letter in Windows Cause Solution The d...

Страница 107: ...olutions listed in the following table A USB device headphone or microphone is not recognized by the computer Cause Solution Device is not properly connected 1 Turn off the computer 2 Reconnect the device to the front of the computer and restart the computer The device does not have power If the USB device requires AC power be sure one end is connected to the device and one end is connected to a l...

Страница 108: ... the computers s RJ 45 connector If the connection is good the PC LED light on the front of the cable DSL modem will be on IP address is not configured properly Contact your ISP for the correct IP address Cookies are corrupted A cookie is a small piece of information that a Web server can store temporarily with the Web browser This is useful for having the browser remember some specific informatio...

Страница 109: ...mputer will not continue and the HP logo does not display Cause Solution ROM issue POST error has occurred Observe the beeps and LED lights on the front of the computer See POST error messages and diagnostic front panel LEDs and audible codes on page 112 to determine possible causes See the Worldwide Limited Warranty for terms and conditions Illegal Operation has Occurred error message is displaye...

Страница 110: ...reates a backup of the HP Recovery partition on the computer The backup can be used to reinstall the original operating system in cases where the hard drive is corrupted or has been replaced For information on creating recovery media see Creating HP Recovery media select products only on page 102 For information on the recovery options that are available using the recovery media see Using Windows ...

Страница 111: ...tely to create recovery discs If you use an external optical drive it must be connected directly to a USB port on the computer the drive cannot be connected to a USB port on an external device such as a USB hub If you cannot create DVD media yourself you can obtain recovery discs for your computer from HP See the Worldwide Telephone Numbers booklet included with the computer You can also find cont...

Страница 112: ...overy Manager offers the Remove Recovery Partition option For more information see Removing the HP Recovery partition select products only on page 106 Recovering using HP Recovery Manager HP Recovery Manager software allows you to recover the computer to its original factory state by using the HP Recovery media that you either created or that you obtained from HP or by using the HP Recovery partit...

Страница 113: ...le keyboard connect the keyboard to the keyboard dock before beginning these steps select products only 1 Type recovery in the taskbar search box select Recovery Manager and then select HP Recovery Environment or For computers or tablets with keyboards attached press f11 while the computer boots or press and hold f11 as you press the power button For tablets without keyboards Turn on or restart th...

Страница 114: ...low the on screen instructions Removing the HP Recovery partition select products only HP Recovery Manager software allows you to remove the HP Recovery partition to free up hard drive space IMPORTANT After you remove the HP Recovery partition you will not be able to perform System Recovery or create HP recovery media from the HP Recovery partition So before you remove the Recovery partition creat...

Страница 115: ...to restore the contents of your computer See Backing up your information on page 108 Guidelines When creating recovery media or backing up to discs use any of the following types of discs purchased separately DVD R DVD R DL DVD R DVD R DL or DVD RW The discs you use will depend on the type of optical drive you are using Be sure that the computer is connected to AC power before you start the recove...

Страница 116: ...ore personal files in the Documents library and back it up regularly Back up templates that are stored in their associated directories Save customized settings that appear in a window toolbar or menu bar by taking a screen shot of your settings The screen shot can be a time saver if you have to reset your preferences When backing up to discs number each disc after removing it from the drive NOTE F...

Страница 117: ...rd for tasks such as installing software running utilities or changing Windows settings Refer to Help and Support To access Help and Support select Start and then select Help and Support To recover information you previously backed up 1 Select Start select All Programs select Maintenance and then select Backup and Restore 2 Follow the on screen instructions to recover your system settings your com...

Страница 118: ...erating system media If you cannot use the recovery media you previously created using the HP Recovery Disc Creator select products only you must purchase a Windows 7 operating system DVD to reboot the computer and repair the operating system To order a Windows 7 operating system DVD go to the HP website For U S support go to http www hp com support For worldwide support go to http welcome hp com ...

Страница 119: ...ted 1 Eject the Windows 7 operating system DVD and then insert the Driver Recovery DVD 2 Install the Hardware Enabling Drivers first and then install Recommended Applications Backing up restoring and recovering in Windows 7 111 ...

Страница 120: ...hedule reconfigure the computer to the Full Boot Every x Days mode using Computer Setup NOTE For more information on Computer Setup see Computer Setup F10 Utility on page 62 POST numeric codes and text messages This section covers those POST errors that have numeric codes associated with them The section also includes some text messages that may be encountered during POST NOTE The computer will be...

Страница 121: ...g POST execution of the Management Engine ME BIOS Extensions option ROM 1 Reboot the computer 2 Unplug the power cord re seat the memory modules and reboot the computer 3 If the memory configuration was recently changed unplug the power cord restore the original memory configuration and reboot the computer 4 If the error persists replace the system board 00C PMM Deallocation Error during MEBx Clea...

Страница 122: ... the system board 2E3 Incompatible Memory Module in Memory Socket s X X A memory module in memory socket identified in the error message is missing critical SPD information or is incompatible with the chipset 1 Verify proper memory module type 2 Try another memory socket 3 Replace with a supported module 2E4 DIMM Configuration Warning The current memory configuration is not optimized Rearrange the...

Страница 123: ...y and resetting CMOS on page 119 3 Replace the hard disk drive 3F2 Hard Disk 2 Error Hard disk 2 error 1 Check and or replace cables 2 Clear CMOS See Password security and resetting CMOS on page 119 3 Replace the hard disk drive 400 Serial Port A Address Conflict Detected Both external and internal serial ports are assigned to the same resources 1 Remove any serial port expansion cards 2 Clear CMO...

Страница 124: ...ed a wireless module installed in the system that is not supported and has been disabled Replace with a supported module 800 Keyboard Error Keyboard failure 1 Reconnect keyboard with computer turned off 2 Check connector for bent or missing pins 3 Ensure that none of the keys are depressed 4 Replace keyboard 801 Keyboard or System Unit Error Keyboard failure 1 Reconnect the keyboard with computer ...

Страница 125: ...pply fan 910 Filter Warning Airflow filter is dirty Replace the airflow filter Interpreting system validation diagnostic front panel LEDs and audible codes During the system validation phase that occurs at system startup the BIOS validates the functionality of the following subsystems and conditions AC adapter System board power Processor failure BIOS corruption Memory failure Graphics failure Sys...

Страница 126: ... embedded controller is checking or recovering the boot block Hardware 3 2 The embedded controller has timed out waiting for BIOS to return from memory initialization 3 3 The embedded controller has timed out waiting for BIOS to return from graphics initialization 3 4 The system board displays a power failure crowbar 3 5 The processor is not detected 3 6 The processor does not support an enabled f...

Страница 127: ...OS button with power removed will reset the BIOS settings to factory defaults It may be useful to back up the BIOS settings or save them as custom defaults before resetting them in case they are needed later Back up can be performed in Computer Setup or using the BiosConfigUtility tool available from www hp com See Computer Setup F10 Utility on page 62 for information on backing up the BIOS settin...

Страница 128: ...rged of static electricity by briefly touching a grounded metal object See the Safety Regulatory Information guide for more information 3 Remove the access panel 4 Locate the header and jumper NOTE The password jumper is green so that it can be easily identified For assistance locating the password jumper and other system board components see the system board components image at System board callo...

Страница 129: ...ctricity by briefly touching a grounded metal object See the Safety Regulatory Information guide for more information 3 Remove the access panel CAUTION Pushing the CMOS button will reset CMOS values to factory defaults It is important to back up the computer CMOS settings before resetting them in case they are needed later Back up is easily done through Computer Setup See Computer Setup F10 Utilit...

Страница 130: ...cy responsible for evaluation in the country where the power cord set will be installed 2 The power cord set must have a minimum current capacity of 10A 7A Japan only and a nominal voltage rating of 125 or 250 volts AC as required by each country s power system 3 The diameter of the wire must be a minimum of 0 75 mm2 or 18AWG and the length of the cord must be between 1 8 m 6 feet and 3 6 m 12 fee...

Страница 131: ... set fittings appliance coupler and wall plug must bear the certification mark of the agency responsible for evaluation in the country where it will be used 2 The flexible cord must be Type SVT or equivalent No 18 AWG 3 conductor The wall plug must be a two pole grounding type with a NEMA 5 15P 15A 125V or NEMA 6 15P 15A 250V configuration 3 Appliance coupler flexible cord and wall plug must bear ...

Страница 132: ...beginning steps in this chapter Current BIOS steps 1 Follow steps a through l below to restore the nonvolatile memory that can contain personal data Restoring or reprogramming nonvolatile memory that does not store personal data is neither necessary nor recommended a Turn on or restart the computer and then press esc while the Press the ESC key for Startup Menu message is displayed at the bottom o...

Страница 133: ...tform Module TPM and or fingerprint reader one or two prompts will appear one to clear the TPM and the other to Reset Fingerprint Sensor press or tap F1 to accept or F2 to reject l Remove all power and system batteries for at least 24 hours 2 Complete one of the following Remove and retain the storage drive or Clear the drive contents by using a third party utility designed to erase data from an S...

Страница 134: ...4 KBytes not customer accessible No Yes Stores NIC configuration and NIC firmware NIC EEPROM is programmed using a utility from the NIC vendor that can be run from DOS A utility is required to write data to this memory and is available from the NIC vendor Writing data to this ROM in an inappropriate manner will render the NIC non functional DIMM Serial Presence Detect SPD configuration data 256 By...

Страница 135: ...pplied using this utility Bluetooth flash select products only 2 Mbit No Yes Stores Bluetooth configuration and firmware Bluetooth flash is programmed at the factory Tools for writing data to this memory are not publicly available but can be obtained from the silicon vendor A utility is required for writing data to this memory and is made available through newer versions of the driver whenever the...

Страница 136: ...diagnostics The UEFI BIOS provides functionality beyond that of the legacy BIOS In addition the UEFI BIOS works to initialize the computer s hardware before loading and executing the OS the run time environment allows the loading and execution of software programs from storage devices to provide more functionality such as advanced hardware diagnostics with the ability to display more detailed syst...

Страница 137: ...oot Keys a Turn on or restart the computer and then press esc while the Press the ESC key for Startup Menu message is displayed at the bottom of the screen b Select the Security menu select Secure Boot Configuration and then follow the on screen instructions c At the Secure Boot Configuration window select Secure Boot select Clear Secure Boot Keys and then follow the on screen instructions to cont...

Страница 138: ...3 kg 13 62 lbs 6 18 kg 19 24 lb 8 73 kg 19 46 lb 8 83 kg 19 68 lbs 8 93 kg 21 12 lb 9 58 kg 21 34 lb 9 68 kg 21 44 lbs 9 73 kg Temperature Range Operating Nonoperating 50 to 95 F 10 to 35 C 22 to 140 F 30 to 60 C Relative Humidity non condensing Operating Non operating 10 90 at ambient 5 95 at ambient Maximum Altitude unpressurized Operating Non operating 0 10 000 ft 0 3 048 m 0 30 000 ft 0 9 144 ...

Страница 139: ...cting cables 61 power cord 61 country power cord set requirements 123 Customer Support 76 D display panel removing 56 drive 2 5 inch removing 23 optical drive replacing 24 types 23 Driver Recovery DVD creating 107 using for restore 110 E electronic label 1 electrostatic discharge ESD 12 preventing damage 13 error codes 112 117 messages 112 F F10 Setup access problem 78 f11 recovery 110 features ov...

Страница 140: ...cting 61 power cord set requirements country specific 123 power problems 82 power supply 130 removing 45 power on password 119 printer problems 88 problems audio 86 CD ROM or DVD 96 Computer Setup 78 F10 Setup 78 flash drive 98 front panel 99 general 78 hard drive 83 hardware installation 91 Internet access 100 keyboard 89 Media Card Reader 85 memory 95 mouse 89 network 92 power 82 printer 88 soft...

Страница 141: ... height removing 20 attaching and removing 20 recline removing 20 Startup Repair using 109 static electricity 13 supported discs recovery 103 system board removing 50 system memory removing personal data from volatile 124 system recovery 104 system restore point creating 103 system restore point creating 102 T temperature control 15 thermal module removing 35 tools servicing 17 top components 2 V ...

Отзывы: