background image

ScanPal EDA61K Mobile Computer

39

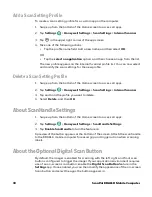
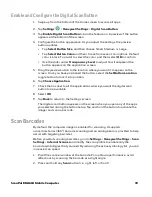
Enable and Configure the Digital Scan Button

1. Swipe up from the bottom of the Home screen to access all apps.

2. Tap 

Settings


 > 

Honeywell Settings

 >

 Digital Scan Button

.

3. Tap 

Enable Digital Scan Button

 to turn the feature on. A preview of the button 

appears at the bottom of the screen. 

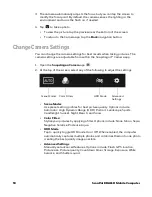
4. Configure the button appearance. As you adjust the settings, the preview 

button updates.
• Tap 

Select Button Size

, and then choose Small, Medium or Large.

• Tap 

Select Button Color 

and then choose from seven color options. Default 

color is black. Tap a dot to select the color, and then select 

OK

 to confirm.

• Use the slider under 

Transparency Level 

to adjust how transparent the 

button appears on the application screen.

5. Drag the preview button to the location where you want it to appear on the 

screen. Once you have positioned the button, select the 

Set Button Location


toggle button to lock it into position. 

6. Tap 

Choose Application. 

7. Check the box next to all the applications where you want the digital scan 

button to be available. 

8. Select 

OK

.

9. Tap 

Back

 to return to the Settings screen. 

The digital scan button appears on the screen when you open any of the apps 

you selected during the button setup. Tap and hold the button to activate the 

imager and scan a barcode. 

Scan Barcodes

By default, the computer imager is enabled for scanning. It supports 

omni-directional (360°) barcode scanning and an aiming beam is provided to help 

assist with targeting barcodes.

Before you start scanning barcodes, go into 

Settings

 > 

Honeywell Settings

 >

 Scan 

Settings

 > 

Internal


Scanner

 and modify the scan profile to enable only the 

barcode symbologies that you need. By reducing the active symbology list, you can 

increase scan speed.

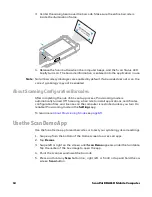
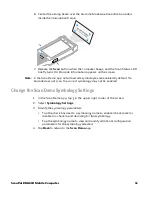
1. Point the scanner window at the barcode. For optimum performance, avoid 

reflections by scanning the barcode at a slight angle.

2. Press and hold any 

Scan

 button (i.e., right, left, or front). 

Содержание ScanPal EDA61K Series

Страница 1: ...User Guide ScanPal EDA61K Series Mobile Computer powered by Android ...

Страница 2: ... document contains proprietary information that is protected by copyright All rights are reserved No part of this document may be photocopied reproduced or translated into another language without the prior written consent of HII Copyright 2020 Honeywell International Inc All rights reserved Web Address www honeywellaidc com Trademarks Google and Android are trademarks of Google LLC Bluetooth trad...

Страница 3: ...puter 13 Configure the Screen Backlight 13 About the Good Read LED 14 About the Keypad 14 About the Audio Features 17 Insert a microSD Card 18 How to Transfer Files 19 Accessories for the Computer 20 Chapter 2 About the User Interface and Applications 21 About the User Interface 21 About Honeywell Applications 27 Applications You Can Download to the Mobile Computer 28 Unlock Developer Options 29 C...

Страница 4: ... Configure Phone Settings 46 Chapter 5 Use the Camera 49 About the Color Camera 49 Take a Photo 49 Change Camera Settings 50 Record a Video 51 Change Video Settings 51 Use the Camera as a Flashlight 52 Chapter 6 Configure the Computer 53 How to Configure the Computer 53 About Network Communications 61 About Wireless Security 64 About Bluetooth Communications 66 About Serial and USB Communications ...

Страница 5: ...t the Honeywell Upgrader 73 Reboot Restart the Computer 75 About Erase All Data Factory Reset 75 Clean the Computer 76 Appendix A Specifications 77 Computer Agency Information 77 Physical and Environmental Specifications 78 Imager Specifications 78 Barcode Symbologies Supported 78 EX20 Imager Reading Distances 79 N6703 Imager Reading Distances 80 ...

Страница 6: ...vi ScanPal EDA61K Mobile Computer ...

Страница 7: ...ervice center to obtain a Return Material Authorization number RMA before you return the product To obtain warranty or non warranty service return your product to Honeywell postage paid with a copy of the dated purchase record To learn more go to www honeywellaidc com and select Service Repair at the bottom of the page For ongoing and future product quality improvement initiatives the mobile compu...

Страница 8: ...viii ScanPal EDA61K Mobile Computer ...

Страница 9: ...ivity with a WLAN 802 11a b g n ac dual band radio and Bluetooth v4 2 technology that includes Bluetooth Low Energy BLE support All models are available with either a N6703 1D 2D high performance imager or an EX20 Near Far 1D 2D high performance 2D imager for long range scanning applications up to 15 2 m 50 ft Note Throughout this manual all versions of the mobile computer are referred to as the E...

Страница 10: ... support across all network technologies x Integrated GPS receiver GPS Supported Protocols Simultaneous GNSS Receiver Support for GPS GLONASS Galileo and Beidou x Mid tier rugged specifications with IP64 sealing x x Customer accessible microSD slot for removable memory cards up to 128 GB SDXC SDHC SDIO compliant x x Value added software components supporting specialized imaging and OCR functions x...

Страница 11: ...ScanPal EDA61K Mobile Computer 3 Features of the EDA61K Scan Button Touch Panel Scan Indicator Power Indicator Microphone Scan Engine Return Key Power Button Keyboard model dependent ...

Страница 12: ...is available only on EDA61K 1 models Speaker Battery Battery Latch and Button USB Port Charging Contact Laser Safety Label Location Camera Lens and Flash model dependent Hand Strap optional Micro SIM and MicroSD Card Door battery removed Scan Button ...

Страница 13: ...sentative for replacement battery ordering information Charge the Battery Before Use Before using EDA61K computers ship with the battery significantly discharged of power Fully charge the battery before using your computer for the first time You can charge the battery with a EDA61K charging accessory before or after you install the battery in the computer A fully discharged battery charges in appr...

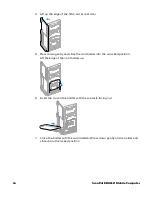
Страница 14: ... minutes AND You insert a new battery within 30 seconds Remove the battery 1 Save your files and close any open applications 2 Press and hold the Power button until the options menu appears 3 Tap Power Off then tap Ok 4 Release one end of the hand strap at the bottom of the computer Caution Improper battery replacement or incompatible device usage may result in risk of burns fire explosion or othe...

Страница 15: ...d the battery to release the lock 6 Lift up the edge of the battery and remove it from the computer Install the computer 1 Insert the charged battery into the computer 2 Press down on the bottom edge of the battery to engage the lock 3 Attach the hand strap 1 2 1 2 ...

Страница 16: ...rge information The icon changes depending on the charge level Battery Status Icons The Battery status LED color and behavior e g steady on blinking off indicates the charging status of the battery To view status descriptions and to learn how to modify the Battery LED behavior see About the Battery Status LED Setting on page 9 1 2 Icon Status The battery charge is at 100 The battery charge is at 5...

Страница 17: ...D as a notification LED for applications or device management solutions For more information on how to use the LED as a notification LED see http developer android com guide topics ui notifiers notifications html Battery Status LED Connected to Power LED State Description No Blinking amber Battery level is below 15 No Off Battery level is more than 15 Yes Steady amber Battery level is between 0 an...

Страница 18: ...reen A list shows the battery usage for individual apps and services For usage details select one of the apps or services in the list You can also access the Battery saver feature from the battery screen About Battery Life and Conservation If you store the battery outside of the computer for long periods of time the battery slowly discharges To maintain battery performance storing the battery in a...

Страница 19: ...e battery or apply mechanical shocks or pressure to it Do not disassemble or open crush bend or deform puncture shred or burn the battery Do not immerse the battery pack in water or get the battery pack wet before proper installation in the computer Store the computer for more than a day If you are storing the computer for a few days e g over the weekend install a fully charged battery or connect ...

Страница 20: ...Start You can either scan a configuration barcode or select manual to set up the computer To learn more about how to Scan Barcodes on page 39 During the manual setup process follow the prompts on the screen to Set up the Wi Fi network connections Set the time date and time zone if no Wi Fi connection is available Personalize name the computer Set up security and privacy options Once you complete t...

Страница 21: ...ter case 1 Swipe up from the bottom of the Home screen to access all apps 2 Tap Settings Security location Screen lock 3 Choose one of the following options None Swipe Pattern PIN Password 4 Follow the on screen prompts to complete the setup 5 Exit the Settings app Configure the Screen Backlight The display has an ambient light sensor that automatically adjusts the backlight intensity to conserve ...

Страница 22: ...ont speaker To learn more about how to use and configure the imager engine for scanning see Use the Image Engine beginning on page 31 Scan Status LED Descriptions About the Keypad The EDA61K keypad configurations LED Color Description Green Good read of a barcode Red Failure to scan barcode Check to make sure you have the correct symbology enabled Scan Status LED Alphanumeric Keypad Numeric Keypad...

Страница 23: ...s To learn more about customizing the key functions see Remap a Button or Key on page 23 Enter Characters on the Alphanumeric Keypad Press the relevant character or number key To type a symbol or special character 1 Press the orange modifier key once 2 Press the key for the letter or special character eg Example Press and then to type the asterisk symbol To type a single uppercase alphabetic chara...

Страница 24: ...lue modifier key a will dispay in the status bar to indicate that the keypad is in alphabetic mode 2 Press the key for the letter or special character eg Example Press and then twice and to type the word and in lower case letters To type a single uppercase alphabetic character 1 Press the blue modifier key once a will display in the status bar 2 Press to activate Caps lock a will change to A in th...

Страница 25: ...nfigure in the Settings app To change audio settings select the Settings app and then tap Sound Note Sound settings are model dependent Some settings may not be available for your model type Sound Settings aA aA 8 TUV 3 DEF P3 2 ABC P2 aA aA aA 8 TUV 3 DEF P3 2 ABC P2 Setting Description Media volume Use the sliders to set the volume for media e g music videos and games calls alarms and rings noti...

Страница 26: ...battery from the computer refer to page 6 2 Press down on the card access door hinge and lift the opposite end to open it 3 Press down gently and slide the card holder away from the open access door Lift the edge of the holder up Phone ringtone Set the phone ringtone Default notification sound Select a notification sound Advanced Select to expand the settings menu Default alarm sound Select a alar...

Страница 27: ... desktop computer through a USB connection When the mobile computer is connected and USB is configured for file or photo transfer use a file browser e g File Explorer or Windows Explorer on your workstation to transfer files between the two computers If you are transferring files to and from a Mac use the Android File Transfer application available from www android com filetransfer Note File trans...

Страница 28: ...battery All other accessories are ordered and shipped separately For a complete list of compatible accessories for the EDA61K mobile computer series and their part numbers see the EDA60K EDA61K Accessory Guide available for download from the EDA61K product page at www honeywellaidc com Contact your local sales representative for ordering information Accessory Description Battery AB18 Replacement o...

Страница 29: ... learn about the Honeywell applications on the computer About the User Interface The Android operating system provides a touch friendly and easy to navigate user interface When you turn On the mobile computer the Home screen is the first screen that appears after language provisioning and the startup Wizard is complete Notification Status Bar Search Bar Home Screen Panel Favorites Tray Navigation ...

Страница 30: ...h bar Search the Internet or the computer using Google Touch the microphone icon in the search box to initiate a voice search or command Home Screen Panel You can create more than one custom Home screen panel Swipe left or right on the Home to switch between your custom panels Favorites tray App icons in the customizable tray are visible on all Home screen panels Button Description Back Return to ...

Страница 31: ...ton or key name 8 Exit the Settings app Icon Description Icon Description Incomplete calender events Sound is disabled Pending alarm and Alarm is set Vibrate mode is turned on New text message or multimedia message Airplane mode is turned On Error with text or multimedia message delivery Bluetooth is turned On New email Bluetooth is connected ABD has been enabled USB troubleshooting has been enabl...

Страница 32: ... from the top of the screen to open the notifications panel 2 Respond to the notification You can take one of the following actions Tap the notification to open the associated app Tap a quick reply or action command e g Reply Archive if available Swipe the notification sideways off the screen to dismiss it Slide the notification left or right to reveal the settings icon Choose between Stop notific...

Страница 33: ...an empty section of the screen 2 Select either Wallpapers Widgets or Home Settings Customize the Favorites Tray Modify the Favorites tray to contain the apps you use the most 1 Tap and hold the app icon you want to replace on the Favorites tray 2 Drag and drop the app on X Remove at the top of the screen 3 Swipe up from the bottom of the screen to access all apps 4 Tap and hold the icon of the app...

Страница 34: ...e screen left or right to view the other Home screens Slide Slowly move your finger across the screen without pausing when you first touch For example you can slide a notification to the left until the Settings gear is revealed Double tap Tap quickly twice on a web page map or other screen to zoom in Double tap again to zoom out Pinch In some apps you can zoom in and out by placing two fingers on ...

Страница 35: ...to create custom applications for your Honeywell mobile computer can be found in the Honeywell Software Development Kit SDK for Android available from the Technical Support Downloads Portal HUpgrader Use the HUpgrader app to view the current OTA version on the computer check for updates or initiate an OTA upgrade from storage Security Use the Security app to protect data and control permissions EZ...

Страница 36: ...riod expires you need to purchase a license For more information about Enterprise Browser visit www honeywellaidc com About Honeywell Launcher Launcher is a configurable locked down menu program designed for Honeywell computers that prevents end users from accessing the start menu and other non authorized applications Use Launcher to provide a platform where your mobile computer users are limited ...

Страница 37: ...hase a license For more information about Launcher visit www honeywellaidc com Unlock Developer Options Developer options only appear in the Settings app if you unlock the feature If you are a developer working with the computer you can easily unlock the additional settings to use for testing and debugging applications under development for the computer 1 Swipe up from the bottom of the Home scree...

Страница 38: ...30 ScanPal EDA61K Mobile Computer ...

Страница 39: ...can profile You can modify the Default Profile or create new profiles for custom applications from Settings Honeywell Settings Scanning Use the imager as a camera to capture black and white images such as signatures or pictures of damaged inventory Note Instead of using the internal imager you can also use Bluetooth communications to connect the computer to an external scanner such as the Granit 1...

Страница 40: ...ettings Scan Settings 3 Tap Internal Scanner Default Profile 4 Select from the following Data Processing Settings Symbology Settings Decode Settings Imager Settings Trigger Settings or Notification Settings 5 Modify the settings to meet your application needs To learn more about the scanner settings Default Scan Settings on page 33 Change the Bluetooth Scanner Settings When the Bluetooth scanner i...

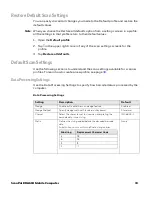
Страница 41: ...llowing sections to understand the scan settings available for scanner profiles To learn how to create a new profile see page 38 Data Processing Settings Use the Data Processing Settings to specify how barcode data is processed by the computer Data Processing Settings Setting Description Default Wedge Enable or Disable the scan wedge feature Enabled Wedge Method Specify wedge method Standard or Ke...

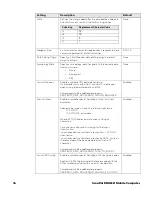
Страница 42: ...CH BROWSER Enabled Scan to Intent Enable or disable special handling of scan to intent barcodes Applies to barcodes in one of the following formats ACTION ACTION extra data Where ACTION and extra data are any string of characters Launches an application listening for the intent Intent action com honeywell scantointent intent action ACTION Intent extra com honeywell scantointent intent extra DATA c...

Страница 43: ...Description Default Center Decode When enabled the imager scans and decodes a barcode only if part of the barcode is at the center of the aimer window This is useful in situations where several barcodes may be very close together in the imager field of view Tap the check box to toggle the feature on or off Select Center Decode to adjust the Window dimensions Honeywell recommends leaving the settin...

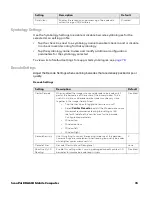
Страница 44: ... decoding No optimiza tion Region of Interest Set the ROI for decoding Options include Disable ROI is disabled and the entire original image is sent to the decoder Standard Use the aimer position to weight activity Activity calculated on the row and the column in the middle of each cell The ROI window may not include the aimer Standard aimer centered Activity calculated on the row and the column i...

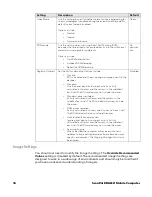
Страница 45: ... on scan button press Options available One Shot Continuous Read on release Read on second trigger press One Shot Same symbol timeout Set the minimum buffer time in seconds before the scanner reads the same barcode This can be adjusted to prevent inadvertent scans of the same barcode if the code is left in the scan field longer than the Decode Timeout limit The default same symbol timeout is 1000 ...

Страница 46: ...Tap Settings Honeywell Settings Scan Settings Internal Scanner 3 Tap and hold the profile you want to delete 4 Select Delete and then OK About ScanHandle Settings 1 Swipe up from the bottom of the Home screen to access all apps 2 Tap Settings Honeywell Settings ScanHandle Settings 3 Tap Enable ScanHandle to turn the feature on A preview of the button appears at the bottom of the screen Attach the ...

Страница 47: ...ect the Set Button Location toggle button to lock it into position 6 Tap Choose Application 7 Check the box next to all the applications where you want the digital scan button to be available 8 Select OK 9 Tap Back to return to the Settings screen The digital scan button appears on the screen when you open any of the apps you selected during the button setup Tap and hold the button to activate the...

Страница 48: ... mode is automatically turned Off Scanning a barcode to install applications certificates configuration files and licenses on the computer is restricted unless you turn On enable Provisioning mode in the Settings app To learn more About Provisioning Mode see page 69 Use the Scan Demo App Use the Scan Demo app to read barcodes or to test your symbology decode settings 1 Swipe up from the bottom of ...

Страница 49: ...s are enabled by default If a barcode does not scan the correct symbology may not be enabled Change the Scan Demo Symbology Settings 1 In the Scan Demo app tap in the upper right corner of the screen 2 Select Symbology Settings 3 Modify the symbology parameters Tap the check box next to a symbology name to enable check mark or disable no check mark decoding for that symbology Tap the symbology nam...

Страница 50: ...42 ScanPal EDA61K Mobile Computer ...

Страница 51: ...c for voice and data connections around the globe These features are certified by PTCRB GCF and all major US carriers After you turn on the phone and activate service with your wireless carrier you can customize the phone features and network settings in the Wireless Networks section of the Settings app Note Both WWAN radios support Network Information and Time Zone NITZ messages to automatically ...

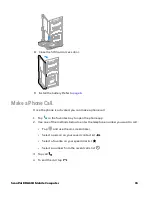
Страница 52: ...5 Press down gently and slide the card holder into the unlocked position Lift the edge of the card holder up 6 Insert the card in the holder with the contacts facing out 7 Close the holder with the card installed Press down gently on the holder and slide it into the locked position ...

Страница 53: ...ed you can make a phone call 1 Tap in the favorites tray to open the phone app 2 Use one of the methods below to enter the telephone number you want to call Tap and use the on screen dialer Select a person on your saved contact list Select a favorite on your speed dial list Select a number from the recent calls list 3 Tap call 4 To end the call tap ...

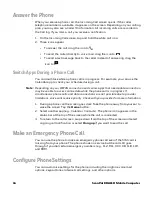
Страница 54: ...nable to access online data while the phone call is in progress If simultaneous phone calls and data connections are not possible due to provider limitations voice calls receive priority Check with your provider for more information 1 During a phone call the screen goes dark Take the phone away from your ear to wake the screen Tap the Home button 2 Select another app e g Calendar Contacts The phon...

Страница 55: ...en the phone app 2 Tap next to the microphone icon at the top of the screen 3 Select Settings The Call settings menu appears 4 Change phone settings as necessary Note Available settings vary depending on your cellular carrier and phone plan ...

Страница 56: ...48 ScanPal EDA61K Mobile Computer ...

Страница 57: ...of the computer Use the Photos app to view photos and videos stored on the EDA61K By default the photos and videos captured with the Camera app are saved on the computer under Internal shared storage DCIM Camera How to Zoom The camera zoom is controlled using a pinching motion on the touch screen Place two fingers on the screen at the same time and then spread them apart to zoom in enlarge and obj...

Страница 58: ...p of the screen select any of the following to adjust the settings Scene Modes Use preset setting profiles for best picture quality Options include Automatic High Dynamic Range HDR Portrait Landscape Sports Candlelight Sunset Night Beach and Snow Color Filters Stylize your pictures by applying a filter Options include None Mono Sepia Negative Solarize Posterize Aqua HDR Mode Tap to quickly toggle ...

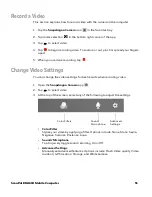
Страница 59: ...deo Settings You can change the video settings for best results when recording video 1 Open the Snapdragon Camera app 2 Tap to select video 3 At the top of the screen select any of the following to adjust the settings Color Filter Stylize your video by applying a filter Options include None Mono Sepia Negative Solarize Posterize Aqua Sound Microphone Tap to quickly toggle sound recording On or Off...

Страница 60: ...K Mobile Computer Use the Camera as a Flashlight To use the camera as a flashlight 1 Open Quick Settings see page 24 2 Tap the Flashlight icon to turn the flashlight on Select the icon again to turn the flashlight off ...

Страница 61: ...u configure the computer using the Settings app Start the Settings App The Settings app is available from the all apps menu and the notification panel Swipe up from the bottom of the Home screen to access all apps and then tap Settings OR Swipe down from the top of the Home screen and then select in the status bar Note To view a simplified settings menu without descriptions swipe right from the le...

Страница 62: ... selecting only 2G networks to save battery life Turn Mobile data On or Off Turn Roaming On or Off View Data use information Access advanced options including 4G LTE Mode On Off setting Preferred network settings CDMA roaming settings and subscription settings i e RUIM SIM NV Access point name and selection Network selection settings Data usage Manage mobile cellular data usage View mobile or Wi F...

Страница 63: ...ss Cast Set up a Cast connection Cast project audio and screen content to a secondary device such as a television Printing Set up a printer connection with the CK3 Connection options include cloud print services Wi Fi printing via a router Received Files View statistics and received files Setting Description Apps info View a list of all apps installed on the computer and system services running Sc...

Страница 64: ...el Set the Brightness level manually Night light Activate the Night light feature to adjust the screen tint to a light amber for easier viewing and reading in dim light or for the hours you use the device before going to sleep Set the feature to stay on or define a schedule to turn the feature On Off You can manually adjust the intensity of the amber hue once the feature is activated Wallpaper Set...

Страница 65: ...tricted installation of applications certificates configuration files and licenses Provisioning mode is turned Off by default To learn more About Provisioning Mode see page 69 Battery Optimizer View battery status and app usage information Create and enable or disable a battery optimization profile that implements a group of settings to conserve power Options include None When selected no battery ...

Страница 66: ...t log path delete logs or upload logs for technical support troubleshooting Glove mode Enable or disable Glove mode Web Applications Enables access for the Honeywell Mobility SDK for Web apps and lets you set a port www honeywellaidc com Setting Description Screen Lock Activate and configure a screen lock i e None Swipe Pattern Pin Password Lock screen preferences Configure the following lock scre...

Страница 67: ...t to add and manage Corporate or Email account on the computer Automatically sync data Turn auto sync On or Off for accounts Turning the feature On allows apps to refresh data automatically Setting Description Screen Readers Text to speech output TTS Select and configure the preferred TTS engine set language speech rate and pitch of synthesized voice Display Configure display features that may aid...

Страница 68: ...gs SMS Wi Fi passwords and permissions is automatically backed up to the Google Drive Advanced Reset Option Select from the following reset options Reset Wi Fi Mobile Bluetooth Use to reset all network settings including Wi Fi Mobile data and Bluetooth Reset app preferences Use reset app preference back to defaults This apps you disabled notification changes default app actions set background data...

Страница 69: ...ns Before you connect to a Wi Fi network you need to know about your network security protocol and its required credentials By default the 802 11 radio is disabled 1 Swipe up from the bottom of the Home screen to access all apps 2 Tap Settings Network internet Wi Fi 3 Tap Off to toggle Wi Fi radio On A list of discovered networks appears 4 On the list tap a network name to initiate a connection To...

Страница 70: ...ough a proxy server Note Proxy settings apply only to the Wi Fi network you modify You must change proxy settings for each network requiring a proxy server 1 Swipe up from the bottom of the Home screen to access all apps 2 Tap Settings Network internet Wi Fi The list of available Wi Fi networks appears 3 Tap to the right of the connected network you want to edit 4 Tap in the upper right of the app...

Страница 71: ...ssign a static IP address a Tap DHCP and then select Static from the list b Enter the required network information and then tap Apply 7 Tap Save How to Connect to Virtual Private Networks The computer supports connecting to virtual private networks VPNs This section describes how to add and connect to VPNs To configure VPN access you must obtain details from your network administrator You can view...

Страница 72: ...ngs Network internet Advanced VPN 3 Tap and hold the name of the VPN in the list 4 Tap to the right of the VPN profile you want to edit 5 Edit the VPN settings as necessary 6 When you are done tap Save About Wireless Security The computer provides these security solutions for your wireless network Wi Fi Protected Access 2 WPA2 Wi Fi Protected Access WPA 802 1x Honeywell recommends WPA2 security wi...

Страница 73: ...tificate To use a certificate you must install it in the trusted credential storage on the computer Note Apps such as email and browsers that support certificates allow you to install certificates directly from within the app For more information see the help that comes with the app 1 Copy the certificate or key store from your PC to the mobile computer 2 Swipe up from the bottom of the Home scree...

Страница 74: ...Bluetooth technology The Bluetooth radio must be turned On to discover pair and connect to other Bluetooth devices System bar icons indicate Bluetooth radio status Connect a Bluetooth Device To connect to a Bluetooth device you must turn On the Bluetooth radio and then select the device from a list of discovered devices 1 Swipe up from the bottom of the Home screen to access all apps 2 Tap Setting...

Страница 75: ...tap Rename Rename Share or Unpair a Paired Device You can rename a paired device to make it easier to identify it on the list or unpair the device to remove it from the paired list 1 Swipe up from the bottom of the Home screen to access all apps 2 Tap Settings Connected devices Previously connected devices Bluetooth 3 Tap next to the paired device 4 Take one of the following actions To rename the ...

Страница 76: ... devices Use Bluetooth or USB Tethering to Share a Data Connection You can share your mobile computer data connection with another device through a USB tethering or Bluetooth tethering connection Minimum requirements for USB Tethering 1 The EDA61K must have an Android 9 OS or later 2 A EDA61K compatible USB communication accessory Set up and Connection 1 Connect the USB communication accessory to ...

Страница 77: ...m 2 Select Resources Software 3 Click on the Technical Support Downloads Portal link https hsmftp honeywell com 4 Create an account if you have not already created one You must login to download the software 5 Install the Honeywell Download Manager tool on your workstation e g laptop or desktop computer prior to trying to download any files 6 Navigate to the software Honeywell Mobility SDK for And...

Страница 78: ...are inaccessible Note To learn more about network and security for Honeywell mobile computers with Android operating systems go to www honeywellaidc com Enable or Disable Provisioning Mode 1 Swipe up from the bottom of the Home screen to access all apps 2 Tap Settings Honeywell Settings Provisioning mode 3 Tap the button to toggle the provisioning On or Off ...

Страница 79: ... can be accessed through the Technical Support Downloads Portal 1 Go to www honeywellaidc com 2 Select Resources Software 3 Click on the Technical Support Downloads Portal link https hsmftp honeywell com 4 Create an account if you have not already created one You must login to download the software 5 Install the Honeywell Download Manager tool on your workstation e g laptop or desktop computer pri...

Страница 80: ...s and verify AutoInstall is enabled 7 Tap Packages Update from the AutoInstall Settings screen If required by the app the computer may automatically initiate a reboot before starting the installation process When the installation is finished a message appears or the unit finishes rebooting and the lock screen appears 8 Once installation is complete turn Provisioning mode Off Note Some updates do n...

Страница 81: ...tall folder on the card The system update screen appears during the upgrade process When the upgrade is finished the lock screen appears 9 Once installation is complete turn Provisioning mode Off About the Honeywell Upgrader Use the Honeywell Upgrader app HUpgrader to check for and install OTA updates or view the current OTA version installed on the computer View the Installed OTA Version 1 Swipe ...

Страница 82: ...de On 4 Save the OTA file zip in the following folder on the EDA61K computer Internal shared storage Download 5 Tap HUpgrader to open the Honeywell Updater app 6 Tap in the upper right corner and then tap Select OTA from storage 7 Select the storage location i e Internal Storage where you saved the file 8 Tap the OTA update file The computer examines the file and then starts the installation 9 Onc...

Страница 83: ... the reset use Before You Begin If you added a Google Account to the EDA61K computer make sure you have your Google username and password associated with the computer If you do not have the username and password you will not be able to use the computer after the reset This is a security measure that prevents unauthorized users from using the device if they try a Full factory reset If you did not a...

Страница 84: ...ment in which you are using the computer The computer withstands application of the following cleaning agents when applied to a clean soft cloth and removed immediately with a dry soft cloth Acetic acid 10 in water Ethyl alcohol 10 in water Mild soap solutions Note Always leave the battery installed when you clean the computer 1 Press the Power button to suspend the computer 2 Dip a clean cloth to...

Страница 85: ...y insert and in this user guide Read all guidelines before using your computer Product documentation is available for download from www honeywellaidc com Public certificates are available for download from www honeywellaidc com compliance Label Locations Labels inside the battery compartment contain information about the computer including compliance information model number serial number and MAC ...

Страница 86: ... Specifications The ScanPal EDA61K Series offers two Honeywell high performance imager options EX20 Near Far Imager N6703 Slim Imager Barcode Symbologies Supported The computer supports the following barcode symbologies 1D Symbologies 2D Symbologies Postal Codes Default Default Default Codabar Enabled Aztec Code Enabled China Post Disabled Code 39 Enabled Codablock A Disabled Korean Post Disabled ...

Страница 87: ...symbol is at the edge of the image Standard 2 of 5 Disable OCR Disabled Interleaved 2 of 5 Enable Digimarc Disabled Matrix 2 of 5 Disable TLC 39 Disabled MSI Disable Telepen Disable Trioptic Disable UPC EAN Settings Enabled UPC A Enabled UPC E Enabled 1D Symbologies 2D Symbologies Postal Codes Default Default Default Focus Standard Range Symbology Near Distance Far Distance 10 mil Code 39 mm 150 1...

Страница 88: ...d Depth of Field are impacted if the barcode symbol is at the edge of the image N6703 Imager Field of View Resolution Note DPI can be calculated based on the following formula Horizontal DPI 832 pixels width of horizontal field of view inches Vertical DPI 640 pixels width of vertical field of view inches Focus Horizontal Field Angle degrees 14 0 Vertical Field Angle degrees 8 7 Focus Standard Rang...

Страница 89: ... Honeywell 9680 Old Bailes Road Fort Mill SC 29707 www honeywellaidc com EDA61K A EN UG 01 Rev A 03 20 ...

Отзывы: