


4-1
S E C T I O N 4
Data Field Programming
• • • • • • • • • • • • • • • • • • • • • • • • • • • • • • • • • • • • • • •
About Data Field Programming
The following pages list this control’s data fields in numerical order. Field numbers are listed in the
left column followed by a “Title and Data Entries” column, which lists the valid entries for each field.
Experienced installers can simply follow this column when programming the data fields. The
“Explanation” column provides explanatory information and special notes where applicable.
Programming Data Fields
Data field programming involves making the appropriate entries for each of the data fields.
Start Data Field programming by entering the installer code + 8 + 0 + 0.
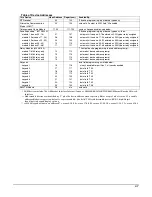
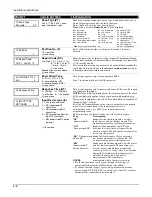
System Setup Fields
FIELD
TITLE and DATA ENTRIES
EXPLANATION
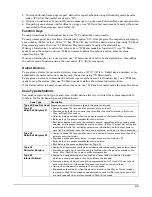
*20
Installer Code
Enter 4 digits, 0-9
The Installer Code is used to assign the 4-digit Master Security Code.
See "Master Code" in the
System Operation
section
for procedure.
*21
Quick Arm Enable
0 = do not allow quick arm
1 = allow quick arm
If enabled, a user code is not needed to arm the system. Instead,
users can press the [#] followed by an arming key to arm the system.
However, the user code is always needed to disarm the system.
*22
RF Options
Entry 1 - Jam detection
0 = no RF Jam detection; 1 = detect RF Jam*
Entry 2 – supervision interval
0 = 12 hours; 1 = 2 hours; 2 = 20 minutes
when disarmed/ 2 hours when armed
3 = 12 hrs for burg zones/ 3 hrs for fire zones
If jam detection enabled, a report is sent if the system detects an RF
jamming signal. See field *178 for other jam/supervision options.
When using RF Receivers with 5800 series transmitters, entry 2
should be 0 or 3.
* Must be selected for
prEN50131-5-3
Class 2 compliance.
UL installations must be 1 if wireless devices are used.
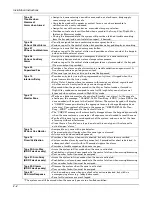
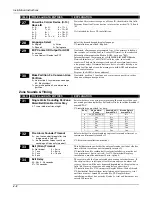
*23
Quick (Forced) Bypass
0 = no quick bypass
1 = allow quick bypass (code + [6] + [#] )
All zones bypassed by this function will be displayed after the bypass
is initiated.
UL installations must be 0 (no forced bypass)
*24
RF House ID Code
00 = disable all wireless keypad usage
01–31 = House ID for partition 1, 2, 3
Does not apply to 5839 or 5828/5828V.
The House ID identifies receivers and wireless keypads. If a 5827 or
5827BD wireless keypad or 5804BD/5804BDV transmitter is being
used, a House ID code
must
be entered, and the keypad must be set
to the same House ID. You can assign RF house ID for each partition.
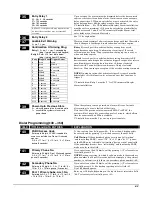
*25
Arming Prevention Override
Entry 1: 0 = no arming prevention override
1 = allow arming with an RF trouble failure
2 = allow arming with an AC Mains Loss
4 = allow arming with a system low battery
8 = allow arming with a phone or comm failure
Entry 2: 0 = no tamper override***
1
†
= allow arming with a tamper fault
2
†
= allow arming with a tamper fault once
4 = allow arming with a bell supervision failure
If no override is selected, systems will not be able to be armed when
there is a supervision failure, system low battery, AC mains loss, or a
tamper condition.
If override is enabled, the user must enter the arming sequence twice
to arm the system; the first entry of user code + arm command will
not arm, but a second entry of user code +arm command will arm the
system.
E.g., To select arm with “supervision failure” and “low battery”, enter
5 (1 + 4)
† NOTE:
If tamper option 1 or 2 is selected, field *175 digit 2 must
be “0.”
*** Must be 0 for
prEN50131-3
compliance
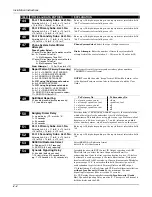
*26
Chime By Zone / #65 Prog Mode
Entry 1: Chime by Zone
0 = no zone list (chimes on fault of
any
entry/
exit or perimeter zone when chime mode on)
1 = use zone list (chimes on fault of
specific
zones in zone list 3 when Chime mode on)
Entry 2: #65 Program Mode (for Installer
Code Access)
0 = Installer code can enter programming mode
1 = Installer Code Access disable
Chime by Zone
If enabled, you can define the specific zones intended to chime when
faulted while the system is in Chime mode. Use zone list 3 to assign
these zones (see
∗
81
Zone List Programming
section for details).
Installer Code Access:
Some installations may require that the
Installer cannot access the system without the end user’s permission
(EN50131-1 compliance). If selected (Installer code disabled), the
system master or partition master must first enable the Installer code
before it can be used. Once enabled, the Installer code remains active
until any other user enters their code.
To enable the Installer code:
master code + [#] + 65
Содержание ADEMCO VISTA-48D
Страница 2: ...ii ...
Страница 28: ...Installation Instructions 3 8 ...
Страница 42: ...Installation Instructions 4 14 ...
Страница 62: ...Installation Instructions 5 20 ...