4
G
B
G
B
• This appliance should NEVER be used by any individual suffering from any physical ailment
that would limit the user’s capacity to operate the controls or who has sensory deficiencies in
the lower half of their body.
• NEVER use directly on swollen or inflamed areas or skin eruptions.
• If you feel any discomfort whilst using this appliance, discontinue use and consult your doctor.
• This is a non-professional appliance, designed for personal use and intended to provide a
soothing massage to worn muscles. DO NOT use as a substitute for medical attention.
• DO NOT use before going to bed. The massage has a stimulating effect and can delay sleep.
• Do not use for longer than the recommended time.
PRODUCT FEATURES:
INSTRUCTIONS FOR USE:
IMPORTANT - Preparing the appliance for use
The Shiatsu Massager comes with 2 screws located on the back of the unit to protect the massage mechanism during
shipment, which must be removed before the first use to allow the shiatsu feature to function. Use the provided Allen
key. Then, properly dispose of the screws.
WARNING – Failure to remove screws may cause permanent damage to the appliance.
NOTE: complete steps 1 and 3 before switching the appliance on at the mains.
1. Attach the Massage seat to almost any chair using the integrated strap located at the back of the cushion. Ensure it
is held firmly in place by adjusting the strap as necessary.
2. Connect the power supply lead from the adaptor with the corresponding lead in the side of the cushion.
3. Plug the adaptor into a 230V mains.
4. Once seated, use the remote control to operate the appliance. Press the ‘Power’ button to activate the control and
select one of massage types detailed below.
5. For a gentler massage place a towel between your back and the massager.
6. Press the ‘Power’ button to stop the massage. The LED will blink while the massage mechanism returns to the
starting point before switching off.
Shoulder Massage:
1. To turn on the massage in the shoulders, simply press the Shoulder button and the LED light will illuminate.
2. To deselect, press the button again.
Shiatsu Massage:
1. FULL BACK: pressing this button gives a full Shiatsu massage up and down the back.
2. UPPER BACK: pressing this button gives a Shiatsu massage focusing on the mid to upper back.
3. LOWER BACK: pressing this button gives a Shiatsu massage focusing on the mid to lower back.
4. The ‘
▲▼
’ buttons allow you to target the massage to a specific area. Simply press either button to stop the
massage mechanism on the desired spot. Use the buttons to move it up or down.
5. To revert to standard massage mode, reselect one of the 3 massage zone buttons.
Rolling Massage:
1. FULL BACK: pressing this button gives a full Rolling massage up and down the back.
2. UPPER BACK: pressing this button gives a Rolling massage focusing on the mid to upper back.
3. LOWER BACK: pressing this button gives a Rolling massage focusing on the mid to lower back.
4. Use the ‘
◄►
’ buttons to adjust the width of the massage mechanism.
NOTE:
• Only gentle force should be exerted against the seat in order to eliminate risk of injury.
• There is a 15 minute auto shut-off on this appliance for your safety. This feature should not be considered as a
substitute for ‘OFF’. Always remember to switch the appliance off when not in use.
• Take care to position the product where it will not damage wooden or upholstered surfaces.
MAINTENANCE:
Cleaning
Unplug the appliance and allow to cool before cleaning. Clean only with a soft, slightly
damp sponge.
• Never allow water or any other liquids to come into contact with the appliance.
• Do not immerse in any liquid to clean.
• Never use abrasive cleaners, brushes, glass / furniture polish, paint thinner etc to clean.
Storage
Place the appliance in its box or in a safe, dry, cool place. Avoid contact with sharp
edges or pointed objects which might cut or puncture the fabric surface. To avoid breakage,
DO NOT wrap the power cord around the appliance. DO NOT hang the unit by the cord.
Plug (MODEL SBM-500H-3GB ONLY)
If the plug on this appliance is damaged, it can be replaced with a BS 1363 plug,
fitted with a 5A BS 1362 fuse. Only use a 3amp fuse with this appliance.
Care must be taken when changing the plug. If in doubt, contact a qualified electrician.
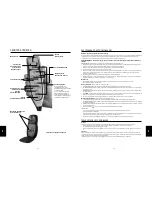
Shoulder Position
Adjustment
Rolling Massage
Zone Selector
Power Button
Demo Button
5
Mains Adaptor
Spot Shiatsu
Heat Button
For soothing heat when massage is
on, simply press the heat button. To
deselect, press the button again. For
your safety, heat cannot be turned
on if massage is not selected.
Moving Shiatsu
massage mechanism
Width Adjustment
Shoulder Massage
Shiatsu Zone Selector


