Item #0000 000 000
Model #EFG8195L-2
□
Clean the fixture with a soft, dry cloth.
□
Do not use any cleaners with chemicals, solvents or hash abrasives.
WARNING:
Before attempting to clean the fixture,
disconnect the power to the fixture by turning the
breaker off or removing the fuse from the fuse box.
Troubleshooting
Problem
Possible Cause
Solution
The fixture will not illuminate.
The power is off.
Ensure the power supply is On.
The circuit breaker is
off.
Ensure the circuit breaker is in the On position.
The fuse blows or circuit
breaker trips when the fixture
is illuminated.
The wires are crossed
or the power wire is
grounding out.
Check the wire connections.
Installation (continued)
5
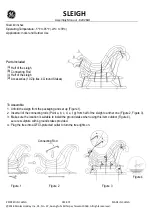
Securing the canopy
6
Installing bulbs
□
Place the canopy (A) over the mounting screw (CC),
and ensure it is flush with the ceiling.
□
Screw the lock nuts (C) onto the mounting
screws (BB) to secure the canopy to the
ceiling.
□
Screw seven 60-Watt maximum, incandescent
candelabra-base bulbs (sold separately) into the
sockets (F).
NOTE:
You can use LED equivalent energy-saving
bulbs that do not exceed 8 Watts each (sold
separately).
Care and Cleaning