18
monty 3550 / 3550AIR
USA - CANADA
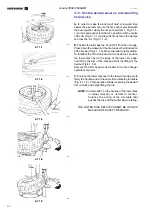
2.3.1-1
A
B
R
2.3.1-2
C
D
E
2.2 Air Installation
WARNING
THE AIR INSTALLATION MUST BE MADE ONLY BY
LICENSED PERSONNEL.
WARNING
EXCESSIVE AIR PRESSURE CAN SERIOUSLY INJURE
PERSONNEL AND DAMAGE THE MACHINE.
Ensure that the line pressure is within the limits required
by the machine. If the air pressure exceeds 12 bar (170
psi) it is mandatory to install a pressure regulator before
the air inlet of the machine
It is suggested that the air supply be equipped with a water
separator and air lubricator.
After ensuring all the above proceed as follows:
A.
FOR ELECTRIC MOTOR POWERED VERSION ONLY:
Connect the machine to the air supply with a rubber hose
equipped with 1/4”NPT treaded junction.
FOR AIR MOTOR POWERED VERSION ONLY:
Connect the machine to the air supply with a rubber hose
equipped with 3/8”NPT treaded junction.
WARNING
BEFORE CONNECTING THE MACHINE TO THE AIR
SUPPLY BE SURE ALL PERSONNEL ARE CLEAR OF
THE MACHINE AND THAT NOTHING IS LEFT ON THE
TURNTABLE AREA (TOOLS)
B.
Should you install any optional accessories, please refer
to the relevant instructions.
2.3 Accessories Installation
2.3.1 Installing the Kit: EAA0332G91A -
SLIDING JAW +4 INCH KIT
WARNING
BEFORE INSTALLATION, DISCONNECT THE TIRE
CHANGER FROM THE ELECTRICITY AND
COMPRESSED AIR SUPPLIES.
See
Figure 2.3.1-1
1) Remove the standard jaws (
R
), present on the tire
changer turntable.
2) Insert the +4” jaws supplied in the kit on the turntable
sliding parts and align the side holes (
A
) with the holes
(
B
) in the sliding parts.
CAUTION: SECURE THE SLIDING PARTS WITH BOTH
SCREWS IN THE HOLES PREPARED.
See
Figure 2.3.1-2
3) Insert the screws (
C
) in the side holes in the jaws, put the
washers (
D
) on the opposite side and secure with the nuts (
E
).
NOTE
: If the holes (
B
) in the sliding parts are blocked by


