background image

Intesis

TM


Home Automation (WMP) 

– Hisense VRF


User Manual r1.0 EN 


© HMS Industrial Networks S.L.U. - All rights reserved


This information is subject to change without notice


  URL 


 http

s

://www.intesis.com  


                16 / 24


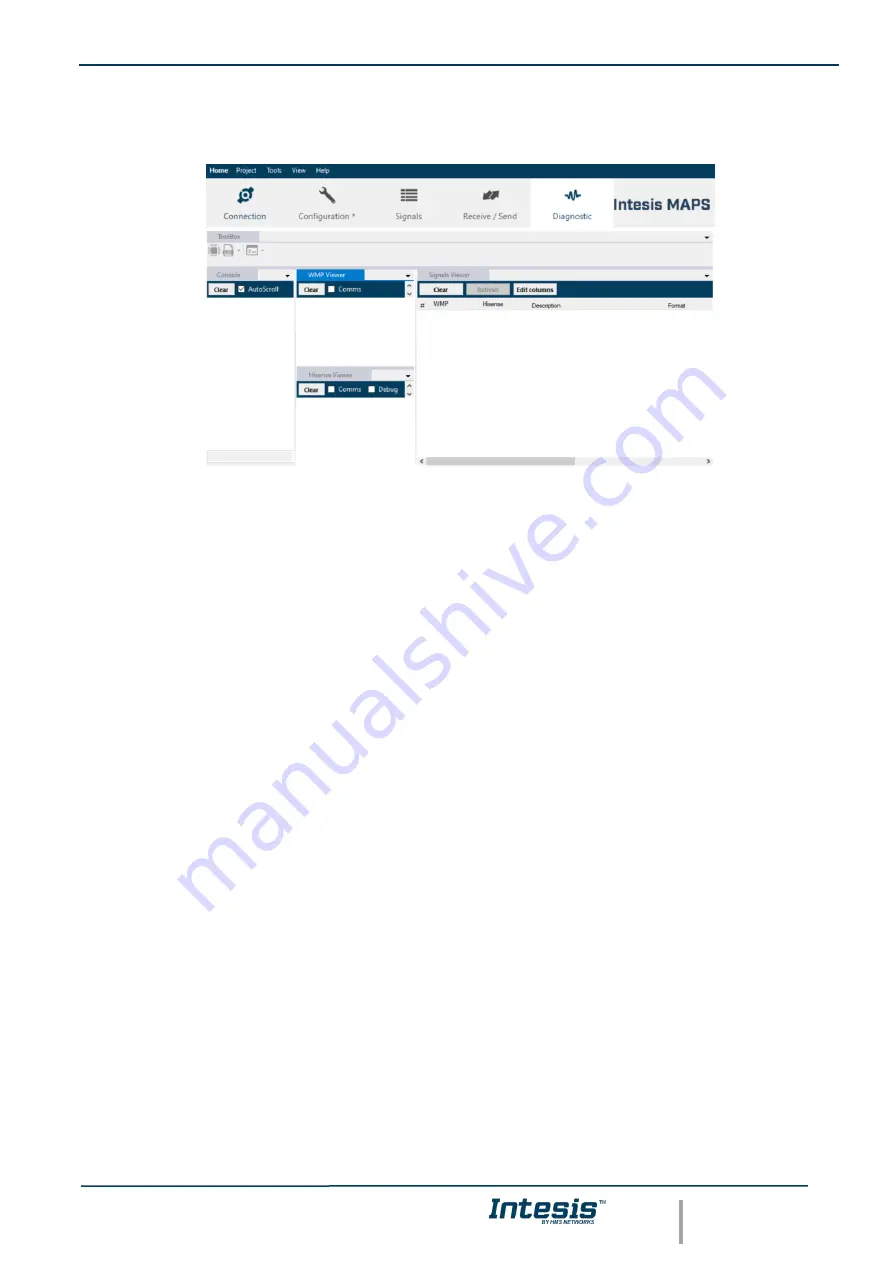
To check the status, viewer for the Internal and External protocols are available. It is also available 
a  generic  Console  viewer  for  general  information  about communications  and  the  gateway  status 
and  finally  a  Signals  Viewer  to  simulate  the  BMS  behavior  or  to  check  the  current  values  in  the 
system. 


Figure 4.14 

Diagnostic


More information about the Diagnostic section can be found in the Configuraion Tool manual. 

4.2.9.  Set-up procedure 

1.  Install Intesis MAPS on your laptop, use the setup program supplied for this and follow the instructions given by 

the Installation wizard. 

 
2.  Install Intesis in the desired installation site. Installation can be on DIN rail or on a stable not vibrating surface 

(DIN rail mounted inside a metallic industrial cabinet connected to ground is recommended). 

 
3.  For the Home Automation (WMP) communication, connect the communication cable coming from the Ethernet 

port of the WMP TCP installation to the port marked as Ethernet Port of Intesis. More details i

3


C

ONNECTIONS

. 

 
4.  Connect the communication cable coming from the 

Hisense VRF

 installation to the port marked as Port A of 

Intesis.  

 
5.  Power up Intesis. The supply voltage can be 9 to 36 Vdc or just 24 Vac. Take care of the polarity of the supply 

voltage applied. 


WARNING!

 To avoid earth loops that can damage Intesis and/or any other equipment connected to it, we 

strongly recommend:  


The use of DC power supplies, floating or with the negative terminal connected to earth. 

Never use a 

DC power supply with the positive terminal connected to earth

.  


The use of AC power supplies only if they are floating and not powering any other device. 

 
6.  If you want to connect using IP, connect the Ethernet cable from the laptop PC to the port marked as Ethernet


of Intesis. More details i

3


C

ONNECTIONS

. 

 
If you want to connect using USB, connect the USB cable from the laptop PC to the port marked as Console


of 

Intesis. More details i

3


C

ONNECTIONS

. 

 
7.  Open Intesis MAPS, create a new project selecting a copy of the one named IBOX-WMP-HS-Template. 
 
8.  Modify the configuration as desired, save it and download the configuration file to  Intesis as explained in the 

Intesis MAPS user manual. 

Содержание Intesis HS-AC-MBS-16

Страница 1: ...Hisense VRF Air Conditioning Gateway for the integration of Hisense VRF systems into Home Automation systems WMP USER MANUAL Issue date 09 2020 r1 0 ENGLISH...

Страница 2: ...poses and are only intended to help improve understanding of the functionality and handling of the product In view of the wide range of possible applications of the product and because of the many var...

Страница 3: ...ks S L U All rights reserved This information is subject to change without notice URL https www intesis com 3 24 Gateway for the integration of Hisense VRF systems into Home Automation systems WMP ORD...

Страница 4: ...to Hisense VRF installation 9 3 3 Connection to Home Automation WMP 9 3 4 Connection to PC Configuration tool 9 4 Set up process and troubleshooting 10 4 1 Pre requisites 10 4 2 Intesis MAPS Configura...

Страница 5: ...Hisense VRF communication gateway The aim of this integration is to monitor and control Hisense air conditioning systems remotely from a Home Automation system To do it so Intesis communicates with I...

Страница 6: ...is WMP protocol Commands toward the indoor units are permitted Each indoor unit is offered as a set of WMP commands Element WMP commands supported Indoor Unit SET control CHN status GET read 1 3 Capac...

Страница 7: ...and the commands allowed to interact with them OUTDOOR UNITS SIGNALS Signal description Function Values Commands Comm Error OU ERROROU OK ERR CHN GET INDIVIDUAL UNITS Signal description Function Value...

Страница 8: ...vice Ethernet Home Automation WMP Console UDP TCP Connect the cable coming from the IP network to the connector ETH of the gateway Use an Ethernet CAT5 cable If communicating through the LAN of the bu...

Страница 9: ...Intesis device in order to connect H Link bus to the Intesis Remember to follow all safety precautions indicated by Hisense Connect the Hisense H Link TB2 bus to connectors A3 and A4 of gateway s Por...

Страница 10: ...e VRF installation connected to the corresponding port Connectors connection cables PC for the Configuration Tool usage and other auxiliary material if needed are not supplied by Intesis for this stan...

Страница 11: ...face parameters Figure 4 2 Intesis MAPS configuration tab 4 2 3 General configuration These are the general settings of the gateway Here you can find General configuration In this section you can incl...

Страница 12: ...TCP settings for the WMP communication with the Home Automation system Port WMP TCP communication port setting Default port 3310 Keep Alive Set the time of inactivity to send a keep Alive message Def...

Страница 13: ...l to manual entry of each unit autodiscover of present units in an H Link installation is possible To do so click button Scan Following window will appear Figure 4 5 Intesis MAPS Scan Hisense Units wi...

Страница 14: ...on tab after importing scan results Acnum Acnum is the parameter or number associated to every ac unit This parameter identifies the ac unit from the home automation side In this gateway this number c...

Страница 15: ...tically once the new configuration is loaded Figure 4 13 Intesis MAPS Receive Send tab After any configuration change do not forget to send the configuration file to the Intesis using the Send button...

Страница 16: ...m the Ethernet port of the WMP TCP installation to the port marked as Ethernet Port of Intesis More details in 3 CONNECTIONS 4 Connect the communication cable coming from the Hisense VRF installation...

Страница 17: ...le COMMS and check that there is communication activity some TX frames and some other RX frames This means that the communication with the Home Automation Hub is OK In case there is no communication a...

Страница 18: ...llowed Power 1 x Plug in screw terminal block 3 poles 9 to 36VDC 10 Max 140mA 24VAC 10 50 60Hz Max 127mA Recommended 24VDC Push Button Button A Not used Button B Not used Operation Temperature 0 C to...

Страница 19: ...ights reserved This information is subject to change without notice URL https www intesis com 19 24 6 Dimensions Recommended available space for its installation into a cabinet wall or DIN rail mounti...

Страница 20: ...rved This information is subject to change without notice URL https www intesis com 20 24 7 AC Unit Types compatibility A list of Hisense unit model references compatible with INMBSHIS O000 and their...

Страница 21: ...gerant lnert Gas Mixing 03 Transmission Abnormality between lndoor and Outdoor incorrect Wiring Loose Terminals Disconnect Wire Blowout of Fuse Outdoor Unit Power OFF 04 Abnormality between lnverter P...

Страница 22: ...of Compressor 24 Heat Exchanger Liquid Pipe Thermistor 25 Heat Exchanger Gas Pipe Thermistor 29 Low Pressure Sensor 31 System lncorrect Capacity Setting of Outdoor Unit and lndoor Unit lncorrect Capa...

Страница 23: ...Voltage Short Circuit 54 Abnormality of lnverter Fin Temperature Abnormal lnverter Fin Thermistor Heat Exchanger Clogging Fan Motor Failure 55 lnverter Failure lnverter PCB Failure 57 Fan Controller A...

Страница 24: ...without notice URL https www intesis com 24 24 C1 Switch Box Unit lncorrect lndoor Unit Connection between outdoor unit and indoor unit C2 lncorrect lndoor Unit Connection No Setting 9 or More lndoor...

Отзывы: