E2 - 8
3.3
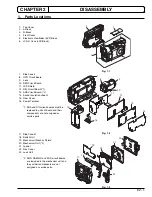
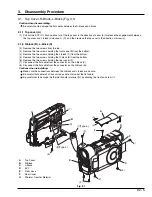
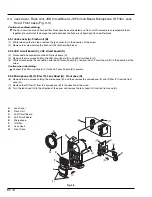
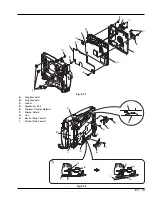
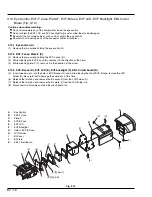
Jack Cover, Flash Unit, JKR Circuit Board, JKF Circuit Board, Microphone, IR Filter, Lens
Hood, Front Case (Fig. 3-3)
Caution when disassembling:
The flash circuit board and flash emitter block have been assembled as a flash unit: Disassemble or reassemble them
together. Be careful not to damage the cable between the flash circuit board and flash emitter block.
3.3.1 Jack cover (A), Flash unit (B)
(1) While releasing the two tabs, remove the jack cover (A) in the direction of the arrow.
(2) Remove the screw holding the flash unit (B) (flash emitter block).
3.3.2 JKR circuit board (C), JKF circuit board (D)
(3) Disconnect one connector on the JKR circuit board (C).
(4) Remove the two screws holding the JKR circuit board (C) and JKF circuit board (D).
(5) While disconnecting the connection with the JKR circuit board (C), remove the JKF circuit board (D) in the direction of the
arrow.
Caution when reinstalling:
Connect the JKR circuit board (C) to the JKF circuit board (D) securely.
3.3.3 Microphone (E), IR filter (F), Lens Hood (G), Front case (H)
(6) Remove the two screws holding the microphone (E), and then remove the microphone (E) and IR filter (F) from the front
case (G).
(7) Remove the IR filter (F) from the microphone (E) in the direction of the arrow.
(8) Turn the lens hood (G) in the direction of the arrow and remove the lens hood (G) from the front case (H).
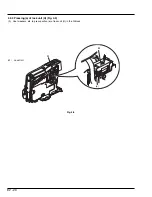
Fig. 3-3
B
H
E
F
A
(2)
(1)
(7)
(6)
(3)
C
D
(4)
G
(1)
(5)
(8)
A
:
Jack Cover
B
:
Flash Unit
C
:
JKR Circuit Board
D
:
JKF Circuit Board
E
:
Microphone
F
:
IR Filter
G
:
Lens Hood
H
:
Front Case

