Checking Your Rotation
Estimated time to complete: 20 minutes
The direction your motors’ spin determines if it will take off or just flop around on the
ground.
Place your top shell on your bottom shell, making sure all your wires are inside the frame
and nothing’s sticking out. Secure the frame with a few zip ties (not too many, because you
will need to remove them after you test).
Remove the cap screws on your motors (and keep track that the greens go on Motors 1 and
3 and blacks go on Motors 2 and 4), and carefully wrap a small piece of your tape around
your motor shafts so you have a little flag hanging off one side of each shaft. This will help
you see what direction your motors are turning. Make sure you only put the tape on the
shafts and aren’t touching the motors so it impedes their spin.
Plug in your battery, and tuck it inside your drone. Place it on a flat floor or a table with
nothing around it that could get caught in the motors. Then arm your drone (refer to your
transmitter’s manual on how to do this).
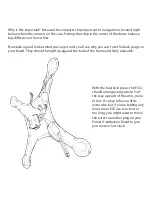
Slowly increase the throttle on your transmitter and watch the motors turn. Motors 1 and 3
should spin CLOCKWISE and Motors 2 and 4 should spin COUNTERCLOCKWISE.
NOTE: This might mess you up because the direction of the spin for each motor is opposite
of what was written on the boxes they came it.
Take note which motors are turning in the wrong direction, if any. Then unplug your battery,
clip the zipties holding the shells together, open up your frame, and unplug any TWO wires
between the motor and the ESC on the wonky motor and swap them. This will reverse the
direction of the motor. Then close it back up and test again until you have all the motors
spinning correctly.

