background image

Содержание AR-2000

Страница 1: ...MODEL AR 2000 FLAIL SHREDDER OPERATOR S MANUAL DO NOT USE OR OPERATE THIS EQUIPMENT UNTIL THIS MANUAL HAS BEEN READ AND THOROUGHLY UNDERSTOOD PART NUMBER 79203019 Rev A ...

Страница 2: ......

Страница 3: ... Point Hitch 11 14 PTO s 11 14 16 Rockshaft Wheels 16 17 Towing 18 19 Trailing Hitch 14 Tractor 11 GENERAL Specifications 55 To Purchaser 2 Storage 22 LUBRICATION 23 26 OPERATION 20 22 General 20 21 Height Adjustment 21 22 SAFETY 3 10 Before Operation 4 Decal Location 7 10 During Operation 5 General 3 4 Service 5 6 Towing 5 SERVICE 28 42 Belts 30 Drive Shaft Bearings 35 Gearbox 36 38 Hardware 28 K...

Страница 4: ...DEATH OR SERIOUS INJURY CAN RESULT All references to LEFT or RIGHT means view ing the equipment from the rear and facing the tractor Additional copies of this manual are available from your Hiniker Dealer ALWAYS OBTAIN ORIGINAL HINIKER SER VICE PARTS BECAUSE SUBSTITUTE PARTS COULD ADVERSELY AFFECT EQUIPMENT PERFORMANCE AND WARRANTY All photos in this manual refer to paragraph s preceding the photo...

Страница 5: ... most serious safe ty hazard It is a reminder for observing the stated precautions and what can happen if they are ignored Decals of this class are red and white Safety 3 SAFETY There are other decals and copy in this manual that pertain to protecting the equipment They are not directly related to operator safety These have black letters on a white background to distinguish them from safety decals...

Страница 6: ... low the manufacturer s label safety precau tions when using them 18 Do not assume everyone is as safety con scious as yourself BEFORE OPERATION 1 Insure unit s PTO assembly is fully engaged with gearbox and tractor shafts and SLID ING COLLARS ARE RETURNED TO THEIR LOCKED POSITIONS 2 NEVER allow improperly supervised minors or anyone else to operate this equipment It is your responsibility to insu...

Страница 7: ...ND TRANSPORT KIT IS 107 8 11 WIDE THESE WIDTHS ARE WITH THE PTO RE MOVED If these widths are not permitted or advisable under your circumstances the hitch of either machine must be removed Check local regulations on towing width and warning lights 2 Never tow trailing shredders in field mode with the PTO detached from the tractor and hooked to the gearbox 3 HINIKER shredders are provided with 1 AS...

Страница 8: ...ent for any excessively worn damaged or cracked parts before starting use Replace these with genuine HINIKER parts 5 DO NOT SERVICE END DRIVE BELTS WHEN TRACTOR IS RUNNING 6 Replace all shields removed for service and check PTO shield for free rotation before operating this equipment REMEMBER ACCIDENT PREVENTION IS PART OF YOUR JOB ...

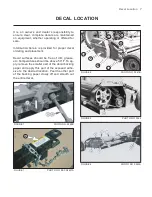
Страница 9: ...d placement Decal surfaces should be free of dirt grease etc Temperatures should be above 50 F To ap ply remove the smaller part of the decal backing paper and apply this part of the exposed adhe sive to the desired location Peel the other part of the backing paper slowly off and smooth out the entire decal FIGURE 1 PHOTO NO 2992B 22 FIGURE 1 PHOTO NO DSCN4637A 9 9 13 26 8 20 19 FIGURE 2 PHOTO NO ...

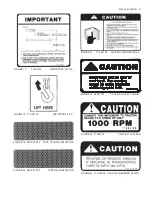
Страница 10: ...GURE 6 PHOTO NO 3545B FIGURE 7 PHOTO NO 3546B FIGURE 7A PHOTO NO 2998A FIGURE 8 79202299 LOGO AR 2000 FIGURE 9 71505168 LOGO HINIKER AR 2000 FIGURE 10 79202337 LOGO AR 2000 FIGURE 14 79203023 IMPORTANT MAINTAIN BELTS FIGURE 16 71504126 IMPORTANT OPERATE MACHINE ...

Страница 11: ...5 03174 IMPORTANT LIFT FIGURE 19 850 001 285 TAPE YELLOW REFLECTOR FIGURE 20 850 001 305 TAPE RED REFLECTOR FIGURE 21 715 04132 CAUTION READ MANUAL FIGURE 22 85501787 CAUTION SAFETY CHAIN FIGURE 23 71504129 CAUTION 1000 RPM FIGURE 24 715 03056 CAUTION REVERSE 25 MPH ...

Страница 12: ...E 27 71505171 WARNING KEEP HANDS ETC FIGURE 28 71505170 WARNING DO NOT OPERATE FIGURE 29 WARNING DO NOT EXCEED FIGURE 30 520 03138 DANGER ROTATING DRIVE FIGURE 31 520 03139 DANGER SHIELD MISSING FIGURE 32 71504131 DANGER KEEP FLIPPERS FIGURE 33 71505172 WARNING WEIGHT ...

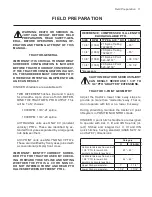
Страница 13: ...SPLINE AND NOTING WHETHER THE PTO IS A CV OR NON CV DO NOT INTERMIX FRONT AND REAR PTO HALVES BETWEEN DIFFERENT PTO s FIELD PREPARATION REFERENCE COMPRESSED O A LENGTH EACH AVAILABLE PTO SIZE RPM TYPE ACC NO LENGTH 1 3 8 1000 21 Spline Trailing 79202278 55 1 3 4 1000 20 Spline Trailing 79202277 55 1 3 8 1000 21 Spline 3 Point 520 02157 38 1 16 1 3 4 1000 20 Spline 3 Point 520 02159 39 1 4 Accessor...

Страница 14: ...TANT REALIZE THE OVERHUNG MA CHINE MOMENT WEIGHT SUBSTANTIALLY VARIES FROM THE NARROWEST 15 TO THE WIDEST 25 SHREDDERS Typical minimum unit s weights are WIDTH LBS KG 15 foot 3375 1531 18 foot 3866 1754 20 foot 4163 1888 25 foot 5200 2360 DANGER DEATH OR SERIOUS INJURY CANRESULT DONOTOPERATE3POINT HITCH UNITS WITHOUT ADEQUATE TRACTOR FRONT END WEIGHTS USING AN UNDERSIZE OR INADEQUATELY FRONT END W...

Страница 15: ... generally appropriate for tractors with larger tires and or greater lift range Refer to Photo 2965A Three upper link pin holes Item 3 4 5 are also 4 apart each Refer to Photo 2965A IF OPERATION IS IN CAT II MODE AND LOWERMOST lower link pin hole Item 1 is used install upper link pin in hole Item 3 or if UPPERMOST lower link pin hole Item 2 is used install upper link pin in hole Item 4 IF OPERATIO...

Страница 16: ... PHOTO NO 3555A SHREDDER PTO s IMPORTANT IT IS CRITICAL TO KNOW WHAT TRACTOR CONFIGURATION IS INVOLVED BEFORE HOOKUP THE PROPER SHREDDER PTO MUST BE USED OTHERWISE UNSATIS FACTORY PERFORMANCE WILL RESULT Hitch jack Item 1 Photo DCP0603 is not needed on 3 point hitch units except when an end trans port accessory is used Its storage position is on pedestal on top the gearcase The lost motion slot It...

Страница 17: ...ED BY AN OVERRUNNING CLUTCH Item 1 Clean gearbox spline of any encrusted dirt or grease and lightly oil it Slide outer PTO collar Item 2 toward its adjacent yoke Item 3 and slide PTO over the gearbox spline Reverse the sliding collar to lock the assemblies together PHOTO NO 2969A NOTICE TO FACILITATE PTO HOOK UPS CHECK TRACTOR SPLINE FOR BURRS OR OTHER DAMAGE IF SHREDDER S LOCKING COLLAR IS DIFFIC...

Страница 18: ... couplers with tractor s remote hydraulic outlets Insert tractor quick couplers to give shredder a DOWNWARD movement when tractor hydraulic lever is shoved FORWARD and vice versa CAUTION DEATH OR SERIOUS INJURY CAN RESULT STOP TRACTOR ENGINE AND RELIEVE HYDRAULIC PRESSURE BEFORE CONNECTING OR DISCONNECTING HYDRAULIC LINES DO NOT USE YOUR HAND TO CHECK FOR HYDRAULIC LEAKS HIGH PRESSURE FLUID CAN PE...

Страница 19: ... and transversely slide the entire assembly to the fol lowing tire centerline as applicable Tire cen terline spacings should be EQUALIZED on each side of the shredder s centerline For other row spacings adjust the above set tings accordingly Torque up each wheel leg s 6 clamping bolts by uniformly tightening the lower 3 to snug fit Subsequently torque and retorque top 3 to 146 206 Ft lbs 198 279 N...

Страница 20: ...ED UP TO BOTH TRACTOR AND SHREDDER OTHERWISE IT CAN BE DAMAGED IF NEC ESSARY TO OTHERWISE TOW DETACH EN TIRE PTO ASSEMBLY FROM GEARBOX AND SECURE IT BEHIND A DRIVE SHAFT SHIELD Three point hitch shredders may be towed with the PTO detached from the tractor PROVIDED its support chain is used PHOTO NO 2993A Use a safety towing chain Item 1 between the shredder and towing vehicle Hook chain around br...

Страница 21: ...AIN BETWEEN TOWING VE HICLE AND SHREDDER THE SMV S REFLECTIVE SURFACE MUST BE VISIBLE FROM THE REAR OF UNIT CHECK LOCAL REGULATIONS ON TOWING WIDTH AND WARNING LIGHTS WARNING DEATH OR SERIOUS IN JURY CAN RESULT NEVER LEAVE 3 POINT PTO HOOKED TO SHREDDER GEARBOX WHEN USING END TRANSPORT THE FRONT HITCH PTO AND PTO HOLDER MAY BE REMOVED TO REDUCE THE END TRANSPORT WIDTH IF REQUIRED IMPORTANT NEVER U...

Страница 22: ... ROWS ALWAYS RAISE UNIT TO MINIMIZE CROSSWISE STRESS ON WHEELS LOWER UNIT FOR OPERATION AT REASONABLE RATE TO PREVENT REPEAT ED CRASHING GROUND CONTACT IMPORTANT FOR TRAILING HITCH END TURNS ACROSS RIDGED ROWS SLOW FORWARD SPEED TO MINIMIZE EXCESSIVE BOUNCING AND SCALPING IF AFTERMAR KET HYDRAULICS ARE NOT USED CAUTION DEATH OR SERIOUS IN JURY CAN RESULT FOR TRAILING UNITS SOME TRACTOR MASTER PTO ...

Страница 23: ...d The skid plate is just to prevent the knives from dig ging into the dirt The skid plates must be at least 2 1 2 above the highest ground point within the shredded width TRAILING HITCH HEIGHT ADJUSTMENT 1 Position unit astraddle rows and insure wheels are centered in row middles before making any adjustments Rotate rockshaft wheels until knives clear rows by GREATER than 3 PHOTO NO 3551 With unit...

Страница 24: ...s position control down stop until shredder is approximately level 5 Shred a short distance stop and check stub ble to insure knives are properly clearing rows and satisfactory performance is obtained If necessary reset rockshaft wheels and trac tor s position control stop 6 Adjust 3 point upper link length to position cross pin in lost motion slot approximately 1 from rear of slot IMPORTANT ALWAY...

Страница 25: ...d at least seasonally After 300 hours operation drain and refill A 1000 RPM GEARBOX IS CHECKED BY MEASURING 3 7 8 TO 4 DEPTH TO LUBE LEVEL BELOW FILL HOLE THREAD TOP OR USE CHECK PLUG AT REAR CLEAN PLUG BEFORE REMOVING USE A P I 85W 1406L5 EXTREME PRESSURE LUBRICANT Items 29 and 30 are only on 25 foot machines Lubrication Chart Ref No Description Interval 1 Front Cross Bearing Daily 2 Front Shield...

Страница 26: ...PHOTO NO 2964 PHOTO NO 2968B 10 9 7 8 PHOTO NO DCP0560 15 8 7 PHOTO NO DCP0571 14 13 12 PHOTO NO DCP0569 11 GEAR BOX PHOTO NO DSCN4624A 24 Lubrication ...

Страница 27: ...Lubrication 25 16 16 PHOTO NO DCP0608 17 PHOTO NO DCP0625 23 23 26 PHOTO NO DCP0631 PHOTO NO 2977A PHOTO NO 2973B 25 PHOTO NO DCP0641 ...

Страница 28: ...26 Section 26 Lubrication 18 PHOTO NO DCP0627 24 PHOTO NO DCP0643 PHOTO NO 2976 19 PHOTO NO DCP0629 27 28 PHOTO NO DCP0647 30 29 PHOTO NO DSCN4609A ...

Страница 29: ...ing 1 Wheel not exactly centered on middles 1 Readjust wheel spacings 2 Different tire sizes on same unit 2 Correct Excessive shredder vibration 1 Missing or broken knives 1 Inspect and replace See SERVICE section 2 Rock damaged rotor 2 Replace 3 Worn or loose rotor bearings 3 Inspect and maintain See SERVICE section 4 Loose or misaligned end sheaves 4 Inspect and maintain See SERVICE section 5 De...

Страница 30: ... ONLY WITH GRADE 5 BOLTS 3 marks on heads and re tained with TYPE B or F LOCKNUTS except on wheel legs sheaves backwrap idler inside nut and the gearbox which have lockwashers Type B locknuts are PLAIN hex Type F locknuts are FLANGED hex IMPORTANT DO NOT REPLACE HARDWARE WITH LOWER GRADE ITEMS EXCEPT ON SHEAVES PAGE 34 ALL BOLT TORQUE VALUES ARE FOR GRADE 5 HARDWARE OVER OR UNDER TORQUING CAN RESU...

Страница 31: ...o DCP0594 PHOTO NO DCP0594 Rotate the knives so that the edge of the side slicer knives that is not worn is facing in the direction of travel Put the knives and bushing back between the same ears that they came from on the shredder rotor Secure them by torquing the 5 8 x 2 3 4 Gr 8 bolt and lock nut to 95 110 lb ft To replace side slicer knives loosen the 5 8 x 2 3 4 Gr 8 bolt and lock nut Remove ...

Страница 32: ...ve old belts c Roll DO NOT PRY the new belt into the pulley grooves working back and forth be tween the large and small pulley OUTER ROTOR BEARINGS All rotor bearings are flange mounted and pilot ed They have no eccentric locking collars and are loosened from their shafts by removing 2 3 8 Allen set screws from their inner races Be cause of high vibration associated with shred ders these set screw...

Страница 33: ...OFT OR UNEVEN GROUND LIFT ONLY FROM MAIN FRAME 1 INCH DIAMETER HITCH PINS Service 31 4 Remove 2 3 8 Allen set screws from the inner race of the outer rotor bearing Item 1 which are factory retained with anaerobic thread lock Perma Lok HM118 red or Lock tite 242 blue 2 5 3 4 4 4 4 2 6 7 1 PHOTO NO DCP0659 5 Remove 4 1 2 locknuts Item 6 which are factory retained with anaerobic threadlock eg Lock ti...

Страница 34: ...this bearing is also being serviced it is not necessary to remove it from the rotor at this time 8 Remove center anti wrap shields This allows access through the rotor s inner end notches to bearing s inner race Allen set screws De tach shield and lube tube 9 Loosen 2 3 8 Allen set screws Item 1 from center bearing Item 2 These are retained with anaerobic threadlock eg Locktite 242 blue or Perma l...

Страница 35: ...xially SNUG WITH NO PRE LOAD proceed to completely reinstall outer bearing and anti wrap shields 13 If washers are not as stated above it will be necessary to remove outer bearing See Pho to DCP0659 page 31 and add or subtract washers 2 3 16 nominal I D washers are available as part numbers Washer Part Number 1 16 Thick 79202329 1 8 Thick 79202328 Check that all previously removed and or loosened ...

Страница 36: ...NO DCP0656 5 For installation insure the tapered mating surfaces of the inner bushing Item 1 and sheave Item 5 are free of dirt paint rust metal chips and LUBRICANT IMPORTANT DO NOT USE LUBRICANTS ANTISEIZE AND OR EXCESSIVE BOLT TORQUES WHEN ASSEMBLING Q D SHEAVES THESE CAN BREAK THE ASSEM BLY 6 Insure woodruff key is in place before slid ing inner bushing on shaft Align in out the Allen set screw...

Страница 37: ...ut with a HAND WRENCH ONLY Tighten un til seal is seated and bearings substantially drag then back nut off 1 6 turn to insert and spread cotter 4 Use zerk to fully lube hub cavity and bear ings while rotating hub and until lube emerg es through outboard bearing Pack hub cap 9 Continue bolt torquing until above values oc cur or NO LESS THAN 1 8 HUB FLANGE TO SHEAVE CLEARANCE EXISTS There will alway...

Страница 38: ... follows 1 Remove 12 3 8 socket head bolts Item 1 holding the 2 halves together Tap input shaft Item 2 with a soft hammer while holding the output shaft Item 3 off the work table Be careful to not damage the case s mating sur faces by prying them apart 2 The input and output shafts and gears are pre cision fitted Do not separate them by prying on an individual set Lift them apart together 3 Remove...

Страница 39: ...erobic sealants have installa tion and SAFETY CAUTIONS on their containers These should be adhered to PTO OVERRUN CLUTCH All 4 PTO s have an overrun clutch at their juncture with the gearbox input shaft This includes a sliding lock collar identical to the lock collar at the tractor end 1 Depress collar Item 1 and extract external snap ring 2 allowing collar to slide off See Photo 3349 PHOTO NO 334...

Страница 40: ...Cup Large Bearing Cone Large Bearing Cup Small Bearing Cone Small 1 1 1 1 1 1 3 2 9 10 11 12 13 14 15 16 650 06056 702 05093 950 011 032 203 51156 203 51074 203 50308 601 02001 79201412 Seal 1 3 4 Shaft Retaining Ring 1 3 4 Shaft Socket Head Cap Screw 3 8 16 x 2 1 4 Plug 1 2 NPT Sock Head Hex Bushing 1 2 NPT 1 8 NPT Pressure Relief Bearing Cone 625580 Plain Plug 1 4 NPT 200300 3 1 12 1 1 1 1 1 100...

Страница 41: ...tem 3 Snap cone and tube shield free of small plastic bearing ring Shield cone Item 2 and tube shield Item 4 can be pried apart with a flat screwdriver applied along area Item 5 FIGURE 90 PHOTO NO 3038 4 Remove clean and inspect small bearing ring Item 1 Replace if worn or damaged Clean ring track Item 2 and thoroughly re lube it as well as bearing ring before reas sembly When reinstalling bearing...

Страница 42: ...rtially extracted bushing 6 LIGHTLY tap yoke at position shown until bush ing is fully out Repeat this for other side of the yoke and separate it from center cross remain ing in undisturbed yoke Item 4 NOTICE WALTERSCHEID TOOL SW23 IS NOT SERVICED BY HINIKER PROCURE DIRECT FROM VENDOR At GKN Walterscheid Inc 2715 Davey Road Woodridge IL 60517 FAX 630 972 9392 Ph 630 972 9300 7 Repeat above steps t...

Страница 43: ...s to drive center cross needle bushing Item 4 upward Vertically rocking yoke Item 5 as bushing is driven out provides ear clearance between yokes Item 2 and Item 3 PHOTO NO 3044 5 The partially extracted needle bushing Item 1 can be removed with a Walterscheid tool SW23 Item 2 This tool inserts between vice jaws Item 3 and radially clamps the partially extracted bushing 6 Carefully rock flange ass...

Страница 44: ...nting either outer yoke to flange yokes assembly insure center cross zerks are aligned for gun access FIGURE 98 PHOTO NO 3046 12 Clamp flange yokes assembly Item 1 between vice jaws as shown Insert outer yoke and re placed center cross assembly Item 2 into yoke Item 3 Start needle bushing Item 4 into yoke With a 1 1 4 O D driver not shown continue seating both bushings inward Insure both center cr...

Страница 45: ...nd po sition forklift as close as possible to shipping pack age Lift off carrier and deposit on a firm clear and level work area See Photo 2980 PHOTO NO 2980 For overhead chain sling off loading use a chain sling Item 1 approximately 5 long on each run Fix EACH sling chain hook SECURELY around both 1 diameter hitch pins Item 2 where shown by decal Item 3 Lift off carrier and deposit on a firm clea...

Страница 46: ...is being supported by the sling chain IMPORTANT GROSSLY LOOSE SLING CHAIN SLACK CAN ALLOW THE SHREDDER TO FALL WITH EXCESSIVE FORCE ON THE SUP PORTING EQUIPMENT Slowly lower unit onto the rear corner blocks Item 3 until its front Item 4 is approximately 18 above the ground PHOTO NO 3137 Place blocks under each front corner as at Item 1 These blocks should be approximately 8 10 high and wide enough...

Страница 47: ...better especially under ridged conditions if tire pressures are kept no greater than recommend ed Contract ratchet jack s to rotate wheel legs suf ficiently upward to permit installation of wheels and tires The wheels are offset that is the wheel dish is greater on one side than the other Install the wheels and tires with the deepest dish TOWARD the wheel leg This places its loaded centerline betw...

Страница 48: ... 39 1 4 Telescoped O A length Whole goods item 520 02159 All TRAILING PTO s are C V constant velocity and identified by extended front yokes separat ed by a large guide hub between them TRAILING HITCH The trailing hitch bundle consists of the hitch A frame Item 1 and a lower adjustable draft link Item 2 Remove both base unit draft pins Item 3 and position hitch Item 1 with thicker hitch clip on to...

Страница 49: ...SHREDDER OTHERWISE IT CAN BE DAMAGED IF TOWED WITHOUT FULL HOOKUP DETACH ENTIRE PTO FROM GEARBOX AND SECURE IT BEHIND CROSS DRIVE SHAFT SHIELD PHOTO NO 2969A 3 POINT HITCH NOTICE MOVE HITCH JACK ITEM 1 FROM SHIPPING POSITION TO PEDESTAL ITEM 2 AT TOP OF GEARCASE THIS JACK IS NOT NEEDED ON 3 POINT UNITS EXCEPT WHEN AN END TRANSPORT ACCESSORY IS USED This hitch weighs 300 136 kg Therefore use a hois...

Страница 50: ...the lost motion slots and the top draft link Remove pin Item 8 from double flat ends of link Item 3 and install it astraddle draft hole Item 5 Insure both pin cotters are spread Raise shredder with hoist Item 1 sufficient to loosen each front corner s blocks and remove them Chain and anchor eye Item 9 are always main tained on whatever position top link pin Item 10 is in It supports the PTO whenev...

Страница 51: ... and cylin ders Check the hydraulic level on the trac tor and refill as needed 2 Using the tractor controls fully extend the end transport cylinders Move the jack to the tube on the end transport hitch Raise or lower the jack so the hitch will be in position to hook to the drawbar of the tractor 3 With the end transport cylinders fully ex tended insert the 2 cylinder stops over the cylinder rods t...

Страница 52: ...TO NO 3559 PHOTO NO 3552A Insert tractor quick couplers to give shredder a DOWNWARD movement when tractor hydraulic lever is shoved FORWARD and vice versa IMPORTANT TO PREVENT ROCKSHAFT TWISTING INSTALL IDENTICAL LENGTH OF STOP COLLARS ON EACH CYLINDER ROD OR IDENTICALLY SET BOTH HYDRAULIC CYL INDER INTEGRAL TRIPS It is not recommended to use remote hydraulics on 3 point hitch shredders OPTIONAL H...

Страница 53: ...Photo DCP 0549 7 7 PHOTO NO DCP0549 5 The hoses connected to the rod end ports Item 10 should be connected to one tee Item 9 and the hoses from the base end ports Item 8 should be connected to the oth er tee Item 9 Refer to Photo DCP0554 9 8 10 11 11 9 10 8 13 PHOTO NO DCP0554 6 Connect the two 3 8 x 120 hoses Item 11 to the fitting tees Item 9 Run the hoses forward and through the hose carrier It...

Страница 54: ...52 Assembly DWG NO 6418 ...

Страница 55: ...ns mounting the light bar and SMV toward the rear of the direction of travel 2 Install two spade mount brackets on each end of mounting angle bar with 5 16 hard ware provided 3 Install the wire storage bracket on the op posite shield using two existing bolts Important Use two existing bolts on top of the shield Loosen only two 2 inner bolts DO NOT LOOSEN the two 2 outer bolts as this will require ...

Страница 56: ...e end panels using the 4 3 4 x 1 3 4 bolts Item 2 provided making sure the head of the bolt is on the rotor side of the end panel Use the 3 4 locknuts Item 3 provided on the out side of the end panel as shown in Photo DCP0669 and DCP0677 1 3 3 3 3 PHOTO NO DCP0677 OPTIONAL CENTER GRASS DIVIDER ASSEMBLY This is used to reduce center streaking when shredding clipping grass etc Remove the 2 1 2 bolts...

Страница 57: ...TO 3 Point 1 3 4 1000 20 Spline PTO 3 Point SPECIFICATIONS Constant Velocity PTO Trail Standard 5V Banded Drive Belts 4 Groove 4 Groove 4 Groove 5 Groove Rim Width 5 or 8 Wide 5 or 8 Wide 5 or 8 Wide 8 Wide Approximate Trail Hitch Weight W Tires 7 60 x 15 6PR or 9 5L x 15 7 60 x 15 6PR or 9 5L x 15 7 60 x 15 6PR or 9 5L x 15 9 5L x 15 Approximate Trail Hitch Weight W Tires 3730 lbs 1692 lbs 4090 l...

Страница 58: ...56 Notes NOTES ...

Страница 59: ...not approved by Hiniker Company or any alteration or repair by others in such manner as in our judgement affects the product materially and adversely shall void this warranty NO EMPLOYEE OR REPRESENTATIVE IS AUTHORIZED TO CHANGE THIS WARRANTY IN ANY WAY OR GRANT ANY OTHER WARRANTY HINIKER reserves the right to make improvement changes on any of our products without notice HINIKER does not warrant ...

Отзывы: