


FM 3180 Installation Guide
13
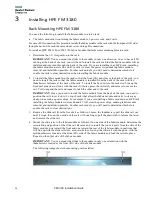
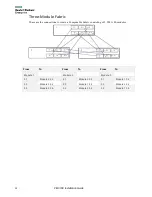
The following image shows the slide rail orientation with the thumb screws at the front (I/O side) of
the fabric module as per this issue.
5.
Using a lift tool, carefully align the fabric module slide rail with the fixed rails in the rack slot, then
carefully slide the fabric module into the rack slot, verifying that the rails insert properly.
6.
Hand-tighten the thumbscrews to secure the fabric module in the rack.
7.
The fabric module is shipped with power supplies installed as ordered. Route and connect the power
cables into separate circuits in the rack.
Important: For redundancy, connect the two power supplies to separate power sources.
8.
The fabric module is shipped with power supplies installed as ordered. Route and connect the power
cables into separate circuits in the rack.
Important: For redundancy, connect the two power supplies to separate power sources.
Establishing a Management Connection
You can establish a management connection to the fabric module using either method:
•
Connect the console device to the Console port and establish a connection
•
Connect a management network to the MGMT port on the fabric module.
Establishing a Console Connection
The serial console may be needed for part of the initial fabric module setup, for troubleshooting, or for
general fabric module management using Linux and the CLI. For serial access, the console system must
be connected to the console port on the fabric module. To connect to the serial console port, use the
following settings:
•
115.2 Kbps
•
8 data bits