background image

Doc No: 7860263

2

4

O

5

6

7

1

2

3

1

3

4

4

O

5

6

7

1

2

3

0%

1.

2.

Ch1

Ch2

Data is subject to change without notice. More information at: www.helvar.com

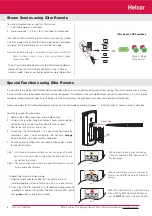
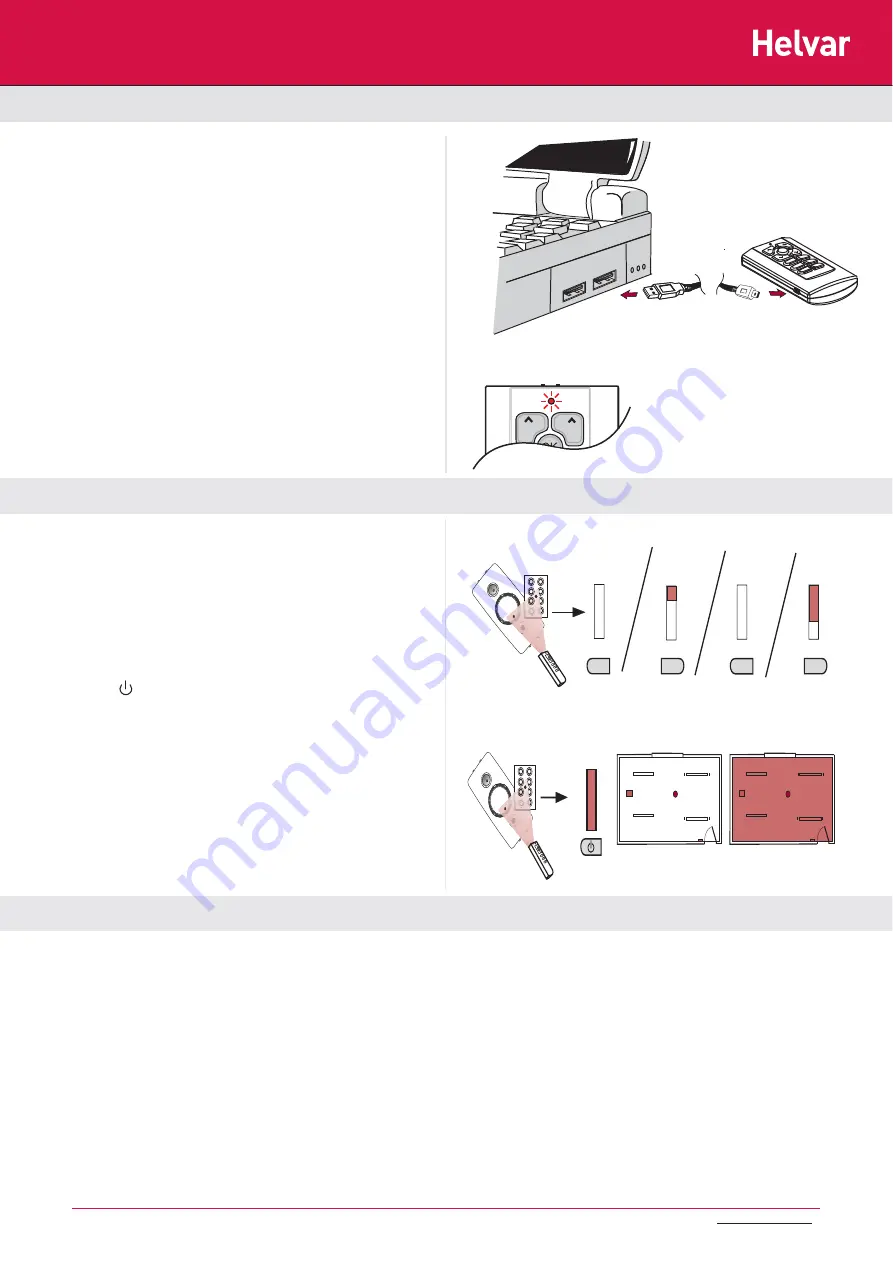
To switch lights on / recall a scene using the iDim remote:

1.   Point the remote at a controller.

2.   Press scene key 1, 2, 3 or 4 to recall the required scene.

Modify Light Levels using iDim Remote

Switching Lights On / Recall Scenes using iDim Remote

To switch lights off:

1.   Point the remote at a controller.

2.   Press       key on remote control to switch the lights off.

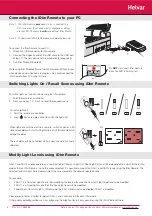
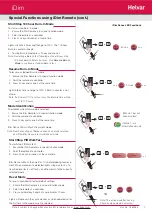
Connecting the iDim Remote to your PC

To connect the iDim Remote to your PC:

1.   Attach Mini USB connector to iDim remote.

2.   Connect the opposite end of the USB cable to the USB port 

      of the PC. The new device will be automatically recognised.

3.   Run iDim Studio (if installed)

While using iDim Studio software, the iDim Remote LED fl ashes red 

when device communication is in progress. Do not disconnect the 

iDim Remote from PC during this time.

Note 1:  The iDim Remote 

only

 needs to be connected to a 

             PC if you want to set advanced confi guration settings   

             via your PC. The remote 

will 

work without iDim Studio.

Note 2:  To download iDim Studio please visit www.helvar.com

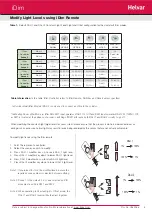
DALI 1 and DALI 2 scenes operate as a combination of Constant Light (CL), Fixed Light (FL) and Offset dependent on which of the 6 iDim 

modes that an iDim Sense is in and the scene selected. It is possible to modify the DALI 1 and DALI 2 levels using the iDim Remote. The 

adjusted levels will only be temporary unless they are stored into the already selected scene.

For example:

If DALI 1 is a Constant Light Scene then modifying the levels will cause the Constant Light target level to be modifi ed. 

• 

If DALI 1 is a Fixed Light scene then the Fixed Light level will be modifi ed.  

• 

If operating in Constant Light + Offset mode, the DALI 2 level will also be affected if DALI1 is modifi ed.

• 

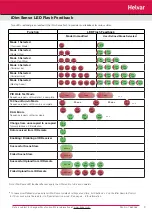
Please refer to table 1 overleaf for default DALI 1 and 2 scene setup for each iDim mode. 

Other advanced confi guration such as confi guring the bright out level is only possible using the iDim Studio software. 

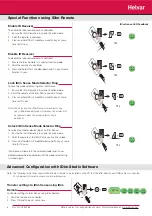
When lights are switched off via a remote, switch or panel; a 90 

second exit delay will start. During this time any PIR movement will 

extend the delay. 

The exit delay will be cancelled when a new scene is manually 

selected.

Do 

NOT

 disconnect iDim Remote 

when the LED is fl ashing red. 

Содержание iDim

Страница 1: ...efficiency intelligence easiness P e o p l e I n n o v a t i o n s S o l u t i o n s iDim Remote Control 304 User Manual ...

Страница 2: ...iguration F Function key Fn G Lights off H Transmitter I Mode selector button J Battery cover K USB connection Mini B Technical Specifications Connections PC to remote USB 2 0 A Cable to USB Mini B Cable Power Power Supply 2 x AAA LR03 1 5 V Batteries Operating Conditions Ambient Temperature 0 to 40 C Relative Humidity 90 max non condensing Storage Temperature 10 C 70 C Operating Range Operating r...

Страница 3: ...to the remote cradle 1 Place iDim Remote onto cradle mounting point 2 Push iDim Remote downwards until it clicks holding the unit in place Note Remove the iDim remote by following the above procedure in reverse Attach iDim Remote to Cradle Assemble iDim Remote Cradle for Desktop Use To assemble the iDim Remote Cradle for desktop use 1 Attach rubber feet A to base B 2 Insert base B into recess C on...

Страница 4: ...The remote will work without iDim Studio Note 2 To download iDim Studio please visit www helvar com DALI 1 and DALI 2 scenes operate as a combination of Constant Light CL Fixed Light FL and Offset dependent on which of the 6 iDim modes that an iDim Sense is in and the scene selected It is possible to modify the DALI 1 and DALI 2 levels using the iDim Remote The adjusted levels will only be tempora...

Страница 5: ...ise DALI 2 light level 7 Press DALI 2 modifier key down to lower DALI 2 light level Note 1 If you intend to store the modified levels ensure the required scene number is selected before modifying Note 2 Scene 1 is the default on scene selected by PIR movement and Solo SW1 and SW2 Note 3 When operating in Constant light Offset mode the DALI 1 and DALI 2 levels will both adjust together Table 1 Defa...

Страница 6: ... scenes to be altered unintentionally Please see below for activating and deactivating special function mode and overleaf pages 7 8 for the types of special functions possible To deactivate special function mode 1 Hold the mode selector button for 1 second to return to standard operation Special function mode is now deactivated 2 Check that the iDim Remote is in standard operating mode by recallin...

Страница 7: ...elected and if the iDim Sense is in User Defined mode If Mode 1 has not been modified If Mode 1 is in User Defined mode Start Stop 100 hour Burn In Mode To start or stop Burn In mode 1 Ensure the iDim Remote is in special function mode 2 Point the remote at a controller 3 Press Fn key and scene 1 at same time Lights will blink 4 times and then go to 100 The 100 hour Burn In counter will begin 4 To...

Страница 8: ... at the iDim Sense you wish to lock 3 Press and hold DALI 2 modifier up and Fn key at same time for 10 secs Note When locked the iDim Sense mode selector ring can still be manually turned However the modes will be ignored unless the mode selector ring is unlocked Unlock iDim Sense Mode Selector Ring To unlock the mode selector ring of an iDim Sense 1 Ensure the iDim Remote is in special function m...

Страница 9: ...50 ms 250 ms 250 ms 250 ms 250 ms 250 ms 250 ms 250 ms 250 ms 250 ms 250 ms 250 ms 250 ms 250 ms 250 ms 250 ms 250 ms 250 ms 250 ms 250 ms 250 ms 250 ms 250 ms 250 ms 250 ms 250 ms 250 ms 250 ms 250 ms 250 ms 250 ms 250 ms 250 ms 250 ms 250 ms 250 ms 250 ms 250 ms 250 ms 625 ms 125 ms 125 ms 125 ms 125 ms 125 ms 125 ms 125 ms 125 ms 625 ms 125 ms 125 ms 125 ms 125 ms 250 ms 250 ms 250 ms 250 ms 25...

Страница 10: ...2393 145 France Helvar Bureau France 12 Allée Joséphine de Beauharnais FR 95320 Saint Leu la Forêt France Tel 33 1 3418 1281 Fax 33 1 3418 0880 Finland Helvar Oy Ab Yrittäjäntie 23 FI 03600 Karkkila Tel 358 9 5654 1 Fax 358 9 5654 9600 Italy Helvar S r l Via W Tobagi 26 1 IT 20068 Peschiera Borromeo MI Tel 39 02 5530 1033 Fax 39 02 5530 1032 Sweden Helvar AB Åsögatan 155 SE 116 32 Stockholm Tel 46...

Отзывы: