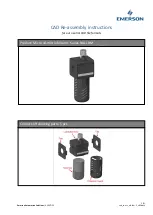
manualshive.com logo in svg
background image

8 | 

P a g e


Platform Assembly                                                    


1.


Before attaching leg brackets to platform, determine the orientation of the 
platform. Consider size, the direction of the non-skid, and leg location.


2.


Install leg brackets with legs 
to platform. Pull brackets up 
before tightening the two bolts 
with 

1/2”  

nuts. Tighten one of 


two 

9/16”  

bolts on each leg 

bracket with the leg slid down 
to the appropriate height.  
 

3.


Confirm the height of the 
platform is appropriate and then 
level the platform using a 48” 
bubble level. Always level up so that you do not change the overall height 
of the platform. If platform is to be installed against an existing structure, 
consider leaving platform a bit out of level for water runoff.  
 

4.


Tighten all 

9/16

 bolts to lock the legs in place. The legs are held via pressure 

– there is no need to penetrate through the leg with the bolt. It is normal 
for the bolt head to protrude out from the bracket.


5.


Verify all hardware is tight.  


04OCT19  | 630-00103-01 Rev B

Содержание MODRAMP

Страница 1: ...ELEVATION RAMP INSTALLATION MANUAL 04OCT19 630 00103 01 Rev B...

Страница 2: ...ear long pants with appropriate footwear that provides toe protection Gloves should always be worn when handling the equipment Eye and ear protection should be used whenever cutting or drilling metal...

Страница 3: ...t damages to the modular ramp and its components Harmar will not warrant damages to the Elevation Ramps modular ramping and its components due to the direct or indirect violation of the 850 lb weight...

Страница 4: ...4 P a g e Product Speci cation Drawings 04OCT19 630 00103 01 Rev B...

Страница 5: ...ng e Harmar components list 2 Verify all site work has been completed in advance 3 Consider if paver stones or a landing pad will be needed 4 Verify all parts components are loaded 5 Verify all tools...

Страница 6: ...y on ground near install location Assemble any platforms Assemble any ramp runs Attach ramp runs to landings Assemble handrails Install bottom landing pad if necessary Con rm everything is tight and l...

Страница 7: ...ts w ratchet Tape measure 6 48 bubble level Metal cutting saw Metal le and deburring tool Hammer Mallet 36 bar clamp Alignment tool or screw driver Lawn tools shovel rake etc PPE Safety Equipment Tip...

Страница 8: ...e height 3 Con rm the height of the platform is appropriate and then level the platform using a 48 bubble level Always level up so that you do not change the overall height of the platform If platform...

Страница 9: ...ting structure you must rst mount the J Hook to that structure The top edge of the J Hook should be level with the landing The J Hook must be plumb vertically once securely fastened 4 You are responsi...

Страница 10: ...on to appropriate height and tighten both brackets and both legs b Level ramp section from side to side and securely tighten fasteners Leaving one side a bit loose will make sliding in the next ramp s...

Страница 11: ...ing the ramp and mounting to the J Hook They can be added once ramp is inclined and self supporting c Install transition plate into bottom groove on the last section of the ramp run Avoid getting dirt...

Страница 12: ...er tube on the handrail Slide connection sleeve roughly half way into upper tube and secure with provided self tapping screw The handrail tubing is already predrilled for this connection Using a drive...

Страница 13: ...mine orientation The predrilled holes will face down to the ground once installed to the ramp handrail 4 Finish installation by sliding the exposed connection sleeve into ramp handrail While holding t...

Страница 14: ...ling a turning platform you must assemble the 90 degree closure kit before mounting both rails Assemble closure kit as shown and secure with provided self tappers Install assembled closure kit into ha...

Страница 15: ...t should be matched to that of the other lower rails 4 With adjustable elbows in place installer must measure and cut provided tubing to t tightly between the rails Avoid leaning on either rail when m...

Страница 16: ...rom the bottom looking up you can view the pitch of the ramp by siting the upper handrail with your eyes All handrail joints are smooth and there are no sharp edges It may be necessary to le down any...

Отзывы: