background image

36

OPERATION

Figure 35 – Player Information Screen

The PLAYER INFORMATION menu has three submenus, which may be
accessed by using the Navigation Buttons to highlight the submenu’s
icon, and pressing the Enter Button to select it. These submenus are 
different from the Setup menus in that many items are for display only
and cannot be changed using the menu system.

PLAYBACK INFO Submenu:

This submenu displays basic disc and

playback mode information. See Figure 36. Access this submenu by
highlighting the Info icon (top icon with a small “i”) and pressing the
Enter Button. See Figure 36.

Figure 36 – Playback Info Submenu

• Disc:

This line displays the disc type, such as DVD-Video.

• Disc ID:

If the disc is encoded with an identification label, such as 

a movie title, it will appear here.

• Playlist:

This line indicates whether playback will occur in the disc’s

order, or following a programmed playlist. For DVDs this line will
always indicate playback in the disc’s order, as programmed play 
is not available for DVDs.

• Repeat:

This line displays the current repeat mode, or Off if Repeat

mode is not active.

PROGRAM submenu:

The Program submenu is not available for DVDs.
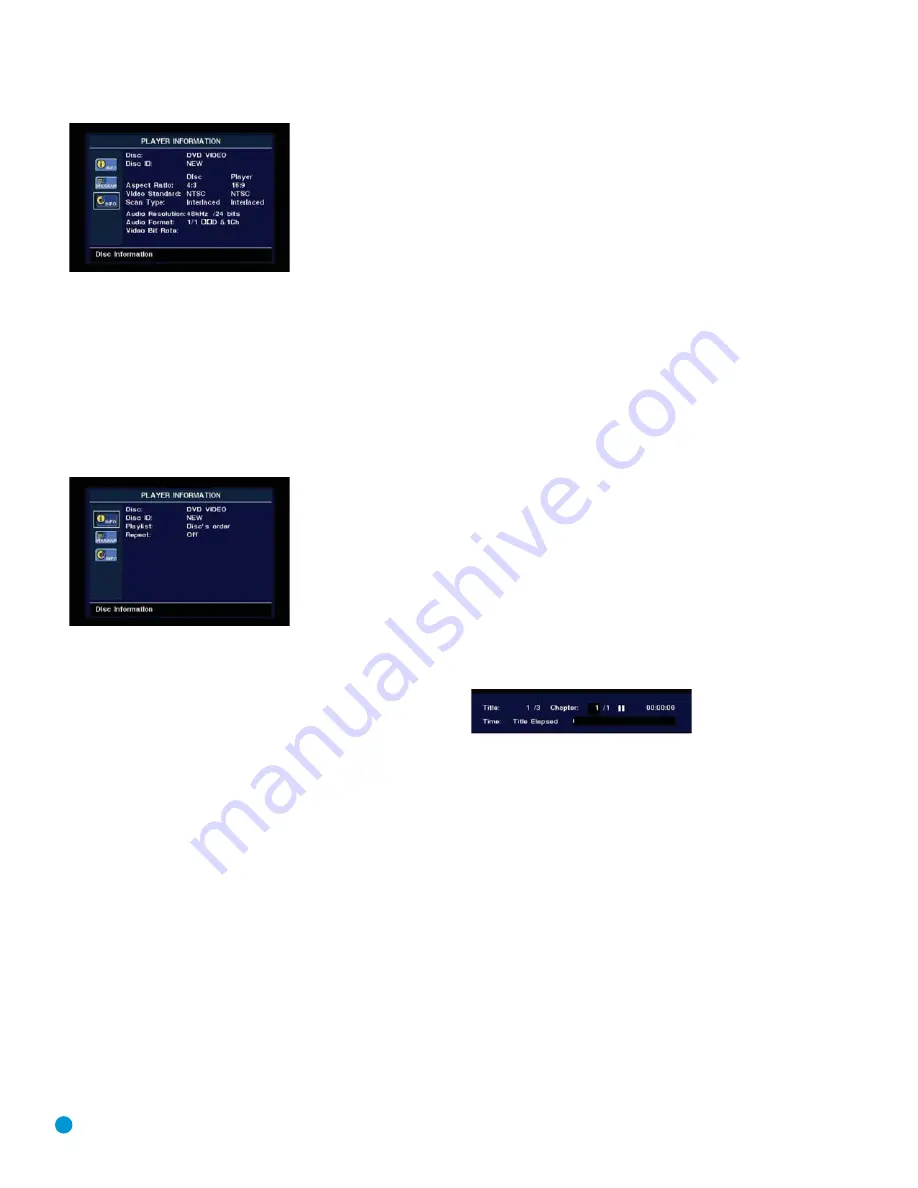
DISC INFO Submenu:

This submenu displays detailed information

about the disc content (see Figure 35). You will not be able to make 
any changes to the items on this submenu. However, you may use the
VIDEO SETUP submenu to change the DVD 38 player settings for video
aspect ratio or scan type.

• Disc:

This line displays the disc type.

• Disc ID:

If the disc is encoded with an identification label, it will 

appear here.

• Aspect Ratio:

This line displays the aspect ratio of the video content 

on the disc, and the format in which it is being played back according
to the setting established in the VIDEO SETUP submenu. Some discs
may contain two versions of the same program with a widescreen

aspect ratio on one side of the disc, and a standard aspect ratio on
the other.

• Video Standard:

The disc’s format is shown here. For Region 1 players,

this will normally be NTSC, although some DVDs that are open region
(playable in all regions) may be in the PAL format. The DVD 38 will 
convert the video to the NTSC format used by your television.

• Scan Type:

This line displays whether the video program on the 

DVD was recorded with a progressive- or interlaced-scan rate. It also
displays how the program is being played back, based on the setting
established in the VIDEO SETUP submenu.

• Audio Resolution:

This line displays the sample rate and bit rate for 

the current audio format.

• Audio Format:

This line displays the current audio track, such as 

Dolby Digital 5.1 or Linear PCM.

• Video Bit Rate:

This line displays the video bit rate up to the maximum

of 10 Mbps. This indication will vary as a disc is played in response to
changes in the amount of compression that was applied to the video
signal when the disc was created. Thus, as shown in Figure 35, when
the disc is stopped or paused, this line will remain blank.

When you have finished viewing the Player menus, press the Info or
Clear Button to remove the displays from the screen and return to 
normal play.

On-Screen Status Display

When a DVD is playing, you may press the Status Button at any time to
view a quick summary of the disc’s playback status. The Status Bar not
only gives you a snapshot of the unit’s current state, it also provides an
easy way to select a different group, title, chapter or track, or use the
time search feature. See Figure 37.

Figure 37 – Status Bar

• 

Group/Title:

For DVD-Video discs, this displays the current title 

number and the total number of titles on the disc. For DVD-Audio
discs, the current group number and total number of groups are
shown.

• 

Chapter:

For DVD-Video discs, this shows the current chapter and

the total number on the disc. For DVD-Audio discs, the current and
total tracks are shown.

• 

Play Mode Icon:

This displays the current play mode icon;

i.e., Play 

, Pause 

±

, Stop 

Í

.

• 

Time Display:

This section of the display shows the time correspon-

ding to the type of display indicated in the Time Display Type. The
Time Search function enables you to start playback at any point in the
program. Use the 

/

Navigation Buttons to highlight this display.

You may then use the Numeric Keys to enter the numbers correspon-
ding to the time on the disc from which you wish play to commence.
Press the Enter Button and play will begin at the selected time position.

Time Display Type:

This section identifies the type of information 

in the Time Display section of the display. Use the Navigation Buttons

DVD 38 OM(color).qxd  2/7/07  3:57 PM  Page 36

Содержание DVD 38

Страница 1: ...DVD 38 DVD AUDIO VIDEO PLAYER WITH HDMI...

Страница 2: ...roduct be sure the antenna or cable system is grounded so as to provide some protection against voltage surges and built up static charges Article 810 of the National Electrical Code ANSI NFPA 70 prov...

Страница 3: ...immediately with a dry cloth NEVER use benzene aerosol cleaners thinner alcohol or any other volatile cleaning agent Do not use abrasive cleaners as they may damage the finish of metal parts Avoid spr...

Страница 4: ...4 STAPLE INVOICE HERE...

Страница 5: ...28 Step Four Video Setup 29 Step Five Video Adjustments 32 OPERATION 32 Turning On the DVD 38 32 Playback Basics 35 DVD Playback 39 CD Playback 41 MP3 Windows Media and JPEG Playback 43 VCD Playback...

Страница 6: ...n 50 years ago and in the intervening years we have witnessed amazing advances in consumer electronics With our line of high performance DVD players Harman Kardon offers a complete home theater soluti...

Страница 7: ...l PBC The DVD 38 will NOT play the following DVD discs with a Region Code other than 1 or 0 DVD ROM data discs DVD RAM discs CD I discs CD G discs SVCD discs Kodak Photo CD discs Kodak Picture CD disc...

Страница 8: ...functions by pressing the forward or reverse Step or Skip Buttons on the remote The Disc Recognition function is not activated by Pause mode Stop Press once to stop play and enter Resume mode in whic...

Страница 9: ...icator Standby On Play Skip Search Reverse Remote IR Sensor Pause Skip Search Forward Open Close NOTE To make it easier to follow the instructions throughout the manual that refer to this illustration...

Страница 10: ...on on the remote This indicator does not reflect the HDMI Mode setting Time Indicators These positions show the running time of a disc in play NOTE These positions will also display text messages abou...

Страница 11: ...analog audio outputs to the same device NOTE The Coaxial Digital Output should only be connected to a digital input Even though it is the same RCA type connector as standard analog audio connections D...

Страница 12: ...xial Digital Audio Output Composite Video Output 2 Channel Analog Audio Outputs 6 Channel Analog Audio Outputs NOTE To make it easier to follow the instructions throughout the manual that refer to thi...

Страница 13: ...ich plays the tracks on a CD in random order Numeric Keys Use these buttons to directly enter a track or chapter number to skip to that section of the disc or to enter a password for the parental cont...

Страница 14: ...se Audio Clear Playlist Repeat A B Repeat Random Info Audio Mode Previous Step Skip Search Slow Reverse Angle Backlight System Setup Play Video Off Pause Navigation NOTE To make it easier to follow th...

Страница 15: ...ement on use the AUDIO ADJUSTMENTS submenu to set the DVD 38 s bass management settings Stereo This mode is used when a 2 channel downmix of a multichannel audio signal is desired For example if you a...

Страница 16: ...ers in the system will be calibrated to sound equally loud at the listening position most sound tracks use the surround speaker for ambient effects only and they program their materials to steer very...

Страница 17: ...s are normally covered by a shutter to protect them from dust The shutter opens as the cable is inserted See Figure 2 Figure 2 Optical Digital Audio Due to the nature of digital signals as binary bits...

Страница 18: ...axial digital audio jack or vice versa Both the chrominance color and luminance intensity components of the video signal are transmitted using a single cable See Figure 6 Figure 6 Composite Video S vi...

Страница 19: ...er such as the optional Harman Kardon HE 1000 to the Remote IR Input jack If your receiver or any of your other components are equipped with a compatible remote IR input you may use the included 1 8 m...

Страница 20: ...2 Channel Analog Audio Outputs See Figure 11 Figure 11 2 Channel Analog Audio Outputs NOTE The DVD 38 is capable of downmixing 5 1 channel materials to the two channel format but it is necessary to ad...

Страница 21: ...tiroom system to play 96kHz discs when your receiver is not capable of processing 96kHz audio or if your receiver is not equipped with digital audio inputs then connect the DVD 38 s 2 Channel Analog A...

Страница 22: ...ay be turned on from Standby mode a Press the Standby On Switch on the front panel or remote See Figure 16 Figure 16 Standby On Switch b Press the Open Close Button on the front panel or remote See Fi...

Страница 23: ...ht an icon and press the Enter button to select or deselect it When the icon is selected it will look like a button that has been pressed in When it is deselected it looks like a button in the out pos...

Страница 24: ...of the back cover The subtitles may also be switched on or off or a new language selected during playback using the Subtitle Button If you have selected a subtitle language and subtitles do not appear...

Страница 25: ...ith an on screen status message asking whether you wish to start playback from the beginning of the disc or resume at the point where you left off Even when the setting is activated to benefit from Di...

Страница 26: ...n t sure of your receiver s capabilities select the 48kHz setting At the 48kHz setting high resolu tion materials will be downsampled to 48kHz If you select the 96kHz setting when your receiver is not...

Страница 27: ...unless these settings are also used for the receiver s other source inputs in which case they should be left the way you set them when you configured your receiver If you have any questions about the...

Страница 28: ...dness or even the presence of information in the surround channels so as not to distract the viewer from the main action taking place on screen If the test tones on your test disc sound as loud in the...

Страница 29: ...Adjustments banner by changing the setting from Off to On See Step Five below for more information on using the Video Adjustments banner to optimize your picture settings HDMI SETTINGS This setting di...

Страница 30: ...eference and the surrounding light in the TV room 2 If the brightness of the white bar no longer increases when the contrast is turned up or the borders of the white harman kardon letters on top bloom...

Страница 31: ...When you have finished making your adjustments navigate to the word Done and press the Enter Button to exit the Video Adjustments banner and return to the VIDEO SETUP submenu When you have finished m...

Страница 32: ...disc If there is glue or a similar substance on the disc remove the glue completely before using the disc Do not expose the disc to direct sunlight or sources such as hot air ducts or leave it in a ca...

Страница 33: ...and timing information and other relevant data will also appear in the Main Information Display Any time a control button is pressed an icon will appear in the upper right corner of the screen to ind...

Страница 34: ...Step Previous or Skip Step Next button repeatedly Press the Pause or Play Button to resume normal play Frame by frame movement in reverse is not available NOTE Playback of a disc with 96kHz 24 bit aud...

Страница 35: ...of fast play buttons or prohibit access to the Chapter Menu display during the playback of copyright notices studio logos movie credits or trailers Zoom The DVD 38 s advanced digital video processing...

Страница 36: ...mat used by your television Scan Type This line displays whether the video program on the DVD was recorded with a progressive or interlaced scan rate It also displays how the program is being played b...

Страница 37: ...e default audio language is set in the AUDIO SETUP menu To change the audio soundtrack press the Audio Select Button to display the Audio banner and show the current audio soundtrack configuration See...

Страница 38: ...ssage on screen See Figure 43 Press the Repeat Button again to cycle through the options Figure 43 Repeat Message Repeat 1 Repeats the DVD chapter or DVD Audio track currently being played until the d...

Страница 39: ...of tracks on the disc will appear Use the Navigation Buttons to scroll through the list Press the Enter Button or the Play Button while a track is highlighted to begin play Figure 47 Program Submenu...

Страница 40: ...t allow you to take advantage of the capacity of the unit for unattended playback Repeat Program Repeats the current playlist if Programmed Order has been selected at the Playlist setting Repeat 1 Tra...

Страница 41: ...will appear See Figure 51 Figure 51 Player Information Screen For WMA Disc This screen will display a list of the main folders contained on the disc The elapsed time will appear in the upper right cor...

Страница 42: ...il the desired folder is selected Press the Enter Button to expand the folder navigate to the desired track and press the Enter or Play Button to begin play Only stereo audio playback is available for...

Страница 43: ...ind that the Stop Pause Track Skip Forward and Reverse Slow Forward and Reverse Step Forward and Reverse and Fast Forward and Reverse Search functions are all available depending on how the disc was e...

Страница 44: ...it press the Navigation Button to move to Step P02 5 Continue entering the disc track numbers into the desired program step positions You need not do so in step order you may use the Navigation Button...

Страница 45: ...enu and change Video Output setting to desired type Disc does not play Disc loaded improperly Load disc label side up align the disc with the guides and place it in its proper position Incorrect disc...

Страница 46: ...d being used or Stop play of disc and clear all displays from screen password has been forgotten Press and hold Clear Button until the display blinks This resets the password and all settings to their...

Страница 47: ...sions H x W x D 5 x 14 3 8 x 20 127mm x 365mmx 508mm Shipping Weight 8 8 lb 4kg Depth measurement includes knobs buttons and terminal connections Height measurement includes feet and chassis All featu...

Страница 48: ...files may be burned onto a compact disc The DVD 38 is capable of recognizing JPEG files and enabling you to view them on your video screen MP3 Files MP3 is an audio compression format that was develop...

Страница 49: ...y the resume function will be retained even after the DVD 38 has been placed in Standby mode by pressing the Standby On Switch but not after the unit has been unplugged from AC power Title For a DVD a...

Страница 50: ...s Setting Default Your Setting Preferred Audio Language English Digital Output Bitstream PCM Limit 96kHz Dynamic Range Maximum Delay Unit Feet Bass Management On Table A3 Audio Adjustments Menu Bass M...

Страница 51: ...Video Scan Type Interlaced Video Adjustments Off HDMI Settings Determined at Power Up Table A5 Video Adjustments Menu Settings All settings default to 0 showing bar ending at midpoint of the graph ex...

Страница 52: ...250 Crossways Park Drive Woodbury New York 11797 www harmankardon com 2007 Harman International Industries Incorporated All rights reserved Part No CQX1A1188Z...

Отзывы: