Page GB-28
Start-up
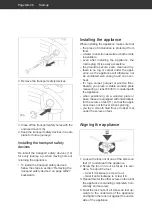
2. Remove the transport safety devices.
(b)
3. Close off the transport safety holes with the
enclosed covers (b).
4. Keep the transport safety devices in a safe
place for future journeys.
Installing the transport safety
devices
Re-install the transport safety devices (14)
for every journey, e.g. when moving home or
returning the appliance.
• To install the transport safety devices,
follow the steps in section “Removing the
transport safety devices” on page GB-27
backwards.
Installing the appliance
When installing the appliance, make sure that
– the place of installation is protected from
frost.
– a water connection as well as a bath or sink
is available.
– even after installing the appliance, the
mains plug (8) is easily accessible.
– the ground is secure, even, clean and dry.
– there is no rug or carpet under the appli-
ance, as the appliance will otherwise not
be ventilated well enough and can over-
heat.
– for rugs, carpet, parquet or wooden floor-
boards, you place a stable wooden plate
measuring at least 60×60 cm underneath
the appliance.
– when positioning on a wooden plate or
base, these are equipped with indentations
for the screw-on feet (11) so that the appli-
ance does not fall over when spinning.
– you lay a smooth tiled floor or rubber mat
under the screw-on feet.
Aligning the appliance
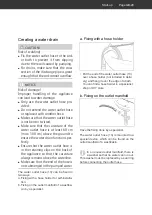
(11)
1. Loosen the lock nut of one of the screw-on
feet (11) underneath the appliance.
2. Screw the foot in or out as far as it is sen-
sible. To adjust the foot,
– twist it clockwise to screw it out.
– twist it anti-clockwise to screw it in.
3. Repeat this for the other screw-on feet until
the appliance is standing completely hori-
zontally and securely.
4. Twist the lock nuts of all screw-on feet up-
wards to the underside of the appliance
and tighten the lock nut against the under-
side of the appliance.

