Halton EcoloAir 10000CFM Скачать руководство пользователя страница 21

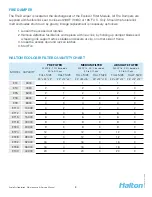
HALTON LIMITED WARRANTY

Halton (“Manufacturer”). Warrants only to its direct purchasers and to no others, that all products 
manufactured by the Manufacturer shall be free from defect in materials and workmanship for a period 
of twelve (12) months from the date of the original installation and start-up or eighteen (18) months 
from date of shipment, whichever occurs fi rst. All products sold but not manufactured by Manufacturer 
will be warranted for a period of twelve (12) months from date of shipment. 

For products manufactured by the Manufacturer we agree to pay any reasonable labor costs necessary 
to repair or replace, at Manufacturers option, defective parts or materials for a period of twelve (12) 
months from date of original installation and start-up or eighteen (18) months from date of shipment, 
whichever occurs fi rst. All labor costs subject hereto shall be performed during standard work hours at 
straight-time rates. 

For products sold but not manufactured by the Manufacturer we agree to pay any reasonable labor costs 
necessary to repair or replace, at Manufacturers option, defective parts or materials for a period of (90) 
days from date of original installation and start-up or (12) months from date of shipment, whichever 
occurs fi rst. All labor costs subject hereto shall be performed during standard work hours at straight-
time rates. 

Purchaser shall pay incurred premium labor charge, including overtime, weekends and holidays. 
Travel time, service charges, miscellaneous tools, material charges, and labor charges resulting from 
inaccessibility of equipment will not be paid by Manufacturer. 

This 

LIMITED WARRANTY SHALL APPLY ONLY

 to products that have been installed and maintained 

in accordance with the installation and Care Instruction Manuals. Purchaser shall be solely responsible 
for adhering to the instructions and procedures set forth in the said instruction manuals. 

This 

LIMITED WARRANTY SHALL NOT BE APPLICABLE

 to any damage or defect resulting from fi re, 

fl ood, freezing or any Act of God, abuse, misuse, accident, neglect or failure to adhere to all instructions 
set forth in the installation and Care Instruction Manuals. Furthermore, this limited warranty shall not 
apply to any product that has been altered, unless such alteration has been approved in writing by a 
duly authorized representative of the manufacturer. In no event shall the manufacturer be liable for any 
loss, expense,  personal injury or consequential damage, of any kind or character, as may result from a 
defect in material, and/or workmanship, however caused. 

EXCEPT AS IS EXPRESSLY SET FORTH IN THIS LIMITED WARRANTY, MANUFACTURER MAKES 
NO WARRANTY OF MARKETABILITY FOR FITNESS OR ANY PARTICULAR PURPOSE. NEITHER 
DOES MANUFACTURER MAKE ANY WARRANTY, EXPRESSED OR IMPLIED, WITH RESPECT TO 
PRODUCTS SOLD BY MANUFACTURER OR AS TO THE USE THEREOF. 

Halton Indoor Climate Systems, Ltd.

1021 Brevik Place, Mississauga, ON L4W 3R7 CANADA
Tel: 905-624-0301 Fax:  905-624-5547
Website address  

www.haltoncanada.com

Halton Company

101 Industrial Drive, Scottsville, 42164 USA
Tel: 270-237-5600 Fax:  270-237-5700
Website address  

www.haltoncompany.com

Содержание EcoloAir 10000CFM

Страница 1: ... Instructions EcoloAir Unit 3000CFM 4000CFM 5000CFM 6000CFM 8000CFM 10000CFM 12000CFM 15000CFM 18000CFM 20000CFM 24000CFM 28000CFM 32000CFM 36000CFM 40000CFM UL 1978 Standard for Grease Ducts and or UL 710 Exhaust Hoods for Commercial Cooking Equipment ...

Страница 2: ...aintenance Service Manual EAOMSI 012009 rev1 EN GENERAL The EcoloAir System should be installed operated and maintained as illustrated in the Installation Instruction Manual and the Operation and Maintenance Instruction 1 2 ...

Страница 3: ...3 EcoloAir Operation Maintenance Service Manual EAOMSI 012009 rev1 EN MAJOR COMPONENTS FOR ECOLOAIR 1 EcoloAir Control Panel 3 Exhaust Fan Module 2 Filter Module 4 Odor Reducing Module 3 4 ...

Страница 4: ...2 Pre Filter 3 Medium Filter 4 Hinged Access Door Absolute Filter 5 High Efficiency Filter 6 Ecolo Odor Reducing Module 7 Screwed On Access Panel 8 Door Latch 9 Ecolo Support Bracket 10 Fire Damper 11 Insulation 12 Hanger or Lifting Bracket 13 20 Gauge Insulation Skin 14 16 Gauge Welded Fire Proof Panels 15 Stiffner Channels 16 Removable Pressure Tube Cover 17 Pressure Tube Ports 18 Absolute Filter...

Страница 5: ...2009 rev1 EN PRESSURE SWITCH AIRTUBE PARTS 1 Pressure Switch Air Tube 2 Pressure Switch Air Tube Connecting Nut 3 Elbow 4 16 Gauge Top Panel 5 Elbow Lock Nut 6 Mullion 7 16 Gauge Bottom Panel 8 Structural Base 9 Fire Proof Door Gasket 10 Filter By Pass Gasket ...

Страница 6: ...n continue to shut off check all pressure switch setting PRESSURE SWITCH ADJUSTMENTS Check Pressure Switch Operation proceed as follows A Turn down Alarm Delay Timer in Ecology Control Panel B Turn Number 1 Pre Filter Pressure Switch down counter clockwise until alarm sounds and Indicator Light illuminates Note Setting Return Pressure Switch to original setting 5 Static Pressure C Turn Number 2 Me...

Страница 7: ... in Step G M Reset Time Delay Timer to 50 seconds Reset Ecology Control Panel Disconnect Switch Off and On again FILTER REMOVALTEST To perform Filter Removal Test proceed as follows 1 Ensure all filters are in place and properly seated 2 Remove one absolute filter 3 Start fan Alarm should sound and fan should shut down within one minute 4 Replace High Efficiency filter 5 Restart Fan NOTE A FACTORY INS...

Страница 8: ...er side of frame 3 Close the access door and lock all latches 4 Start Fan HALTON ECOLOAIR FILTER QUANTITY CHART MODEL CAPACITY PRE FILTER MEDIUM FILTER ABSOLUTE FILTER MERV 8 70 based on 3 0 to 0 10 μm MERV 14 90 based on 3 0 to 0 10 μm MERV 16 95 based on 3 0 to 0 10 μm FULL SIZE HALF SIZE FULL SIZE HALF SIZE FULL SIZE HALF SIZE 24 x 24 x 2 24 x12 x2 24 X24x15 24 x12 x15 24 x24 x12 24 x12 x12 EF3...

Страница 9: ...ing A switch is provided on the Ecolo Control Panel to be activated for the desired application The unit when shipped will be set for a 20 second spray every 1 minute This can be adjusted in the field to give the required setting for each particular installation SETTING ECOLOTIME ON ANDTIME OFF CYCLE The Ecolo Unit is set to operate either 1 To set the Ecolo time on press the T ON button on the ele...

Страница 10: ...18 Motor Pulley 19 Electrical Box Terminal Strip 20 Pressure Switch optional location 21 Firestat 22 Air Tubes for Pressure Switch optional location 23 Pressure Switch Box Cover optional location 24 Pressure Tube Cover optional location 25 Top Panel FANTYPES For all models a double width double inlet Class 2 airfoil type fan is used The motor and drive pack age is located in the exhaust airstream ...

Страница 11: ...h the bearing collars Polishing the fan shaft with emery cloth and some light lubrication on the fan shaft will make removal much easier 4 Remove bolts fastening the bearing to the top and bottom bearing base plates 5 Re install equipment in reverse order of removal Care should be taken to properly tighten the set screws in the bearing locking collar see chart for recommended tightening torque of ...

Страница 12: ...r point method with a piece of string or a straight edge The two sheaves will be aligned when two points near and far on the face of each of the sheaves touch the straight edge of the string when the string is a straight line Refer to the figure below for correct alignment Fan Sheaves Misaligned Fan Sheaves Aligned ...

Страница 13: ...s run in period the belts seat themselves in the sheave grooves and the initial stretch is removed After a day or two the drive should be stopped and another check made for the correct amount of tension The tension should now compare with the values in column Normal Time If the force is below the level in column Normal Time The belts are too loose If the force is greater than the high level the be...

Страница 14: ... ALARM HORN OPTIONAL RECESSED TRIM ANGLE SHIPPED LOOSE DOOR LATCH CONTROL PANEL MODELS EPLV5 1 w WASH HOODS w ECOLO EPLV5 1A w WASH HOODS EPLV5 3 w DRY HOODS w ECOLO EPLV5 3A w DRY HOOD In accordance to UL Standard S647 each filter component grease and odor shall have an interlock to prove the component is in place Where any of these interlocks are interrupted the cooking equipment shall not be abl...

Страница 15: ...and reset linkage b Tighten or replace belts c Replace filters d Reset and check amperage draw e Recommend to owner to have system serviced Unit will not start a No power b Fuses blown c Off on overload heater in magnetic starter d 120 volt control transformer fuse e Blown 5 amp fuse in exhaust hood wash control panel f Defective exhaust fan motor g Fan switch on Ecology control panel in OFF positi...

Страница 16: ...lter not seated properly b Broken or loose pressure switch air tube c Exhaust fan belt slipping not moving enough air d Timer not set correctly e Defective timer f Off on overload heaters g Overall pressure switch 4 not set properly a Seat filters b Repair break or tighten fitting c Tighten or replace fan belts d Set time for 60 seconds e Replace timer If burnt out it will have burn mark on top righ...

Страница 17: ...tor light labeled filters overall will be illuminated and the system will shut down After the cause of the alarm has been corrected the system can be restarted by pushing the reset button and also turning the main disconnect switch to the OFF position then back to the ON position MAINTENANCE INSTRUCTIONS NOTE Heavy hamburger type operations require extra maintenance and frequent filter changes We re...

Страница 18: ...ing on some fans such as arrangements 1 8 9 and 10 is often cap loaded Removal of the securing means may result in a sudden change in impeller position 5 Historical data is often the best indicator for determining the operational condition of the fan Maintenance logs which include lubrication vibration levels temperature levels power requirements inspection and other pertinent records should be ma...

Страница 19: ...d and installed per drawings and in accordance with recognized acceptable engineering practices and with the fan manufacturer s recommendations 1 5 Check and tighten all bolts fasteners and set screws as necessary 1 6 Check the fan assembly and bearings for proper grounding to prevent static electricity discharge 1 7 Ensure power and drive components such as motor starter variable frequency drive ...

Страница 20: ...y and recheck item 1 5 through 1 17 as the initial start up may have loosened the bolts fasteners and set screws 3 0 The fan may now be put into operation but during the first eight 8 hours of running it should be closely observed and checked for excessive vibration and noise At this time checks should also be made of motor input current and motor and bearing temperatures to ensure that they do no...

Страница 21: ...e charges miscellaneous tools material charges and labor charges resulting from inaccessibility of equipment will not be paid by Manufacturer This LIMITED WARRANTY SHALL APPLY ONLY to products that have been installed and maintained in accordance with the installation and Care Instruction Manuals Purchaser shall be solely responsible for adhering to the instructions and procedures set forth in the...

Отзывы: