


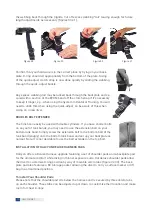

‘To Install the Light Retainer Assembly:
•
Insert the rigid webbing grommet hole through the right outer slot on the Cinch (figure
15).
•
Fold the webbing and align the grommet with the hole on the Cinch. Secure both items
with the 5/8” bolt & tighten snugly (figure 16).
•
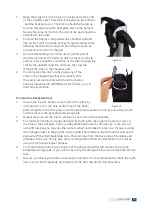
Thread the waist band webbing through the backplate slots.
•
Slide the buckle fixture on to the waist band with the open end of the buckle facing the
backplate. The buckle is secured to the tab of webbing protrudes from the attached light
fixture (figure 17).
•
The buckle can be adjusted and the light positioned according to individual preference
(figure 18).
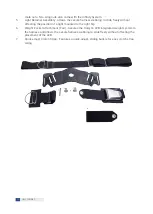
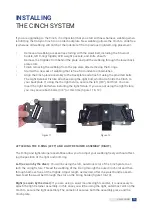
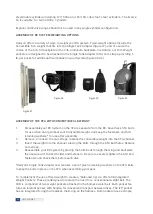
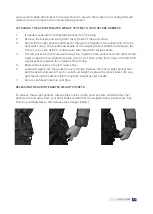
ATTACHMENT OF ACB INTEGRATED WEIGHT POCKETS TO THE CINCH
•
Insert the ACB attachment webbing through the triglide on the pocket (figure 19). Adjust
ment of this triglide position determines placement on the waist. The extra webbing
should be tucked into the slot after attachment (figure 20).
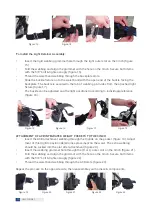
•
Insert the webbing grommet hole through the (R or L) outer slot on the Cinch (figure 21).
•
Fold the webbing and align the grommet with the hole on the Cinch. Secure both items
with the 5/8” bolt & tighten snugly (figure 22).
•
Thread the waist band webbing through the ACB slots (figure 23).
Repeat the process on the opposite side, then reassemble your harness & components.
Figure 13
Figure 14
Figure 15
Figure 16
Figure 17
Figure 18
Figure 19
Figure 20
Figure 21
Figure 22
Figure 23
16
HALCYON.NET
Содержание TRAVELER
Страница 1: ...BUOYANCY COMPENSATOR OWNER S MANUAL 2019...
Страница 34: ...NOTES 34 HALCYON NET...
Страница 35: ...NOTES 35 HALCYON NET...