


VII.
SERVICE AND MAINTENANCE
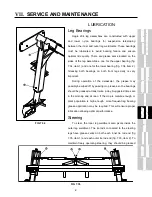
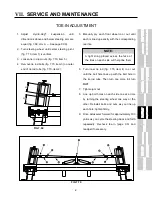
1. Remove wheel assembly from hub and
disassemble as shown in figure 7.39. Bearing
cups may remain in hub.
2. Thoroughly clean bearing with adequate cleaning
solvent and blow dry with compressed air. Take
care not to spin the bearings with the
compressed air.
3. Check bearings for wear; if bad, replace.
4. Grease inner bearing adequately with bearing
grease and install on back side of hub assembly
with inner bearing seal.
5. Install hub assembly on spindle.
6. Grease outer bearing adequately with bearing
grease and install in hub with washer and spindle
nut.
7. Tighten nut first by hand and then with a wrench
until you feel a slight drag while turning the hub.
This will seat the bearings.
8. Back nut off slowly until you notice slight side
play or hub “wobble.” Retighten nut until “wobble”
is unapparent and there is no drag.
9. Install cotter pin, dust cap, and wheel.
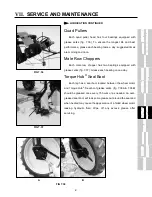
Four Blade Male Row Cutters
Grease both upper (fig. 7.40, item 1) and lower
(fig. 7.40, item 2) shaft bearings 4 times a day.
Suggested times are morning, mid-morning, noon,
and mid-afternoon.
LUBRICATION CONTINUED
FIG 7.40
1
2
FIG 7.39
1
6
2
7
3
8
5
9
10
4
11
x
Tire Pullers
1 – Puller spindle
2 – Inner bearing seal
3 – Inner bearing
4 – Inner bearing cup
5 – Bearing hub
6 – Outer bearing cup
7 – Outer bearing
8 – Washer
9 – Spindle nut
10 - Cotter pin
11 - Dust cap
Содержание 204
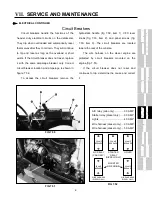
Страница 133: ...x IX TROUBLE SHOOTING TASSELTROL LS SYSTEM ELECTRICAL CONTINUED FIG 9 1 1 2...
Страница 134: ...x IX TROUBLE SHOOTING NOTES...
Страница 140: ...138 NOTES...
Страница 141: ...x...


