


17
Parameter
Description
n
Number of NVMe drives in the RAID array.
l
RAID level.
z
RAID capacity.
3.
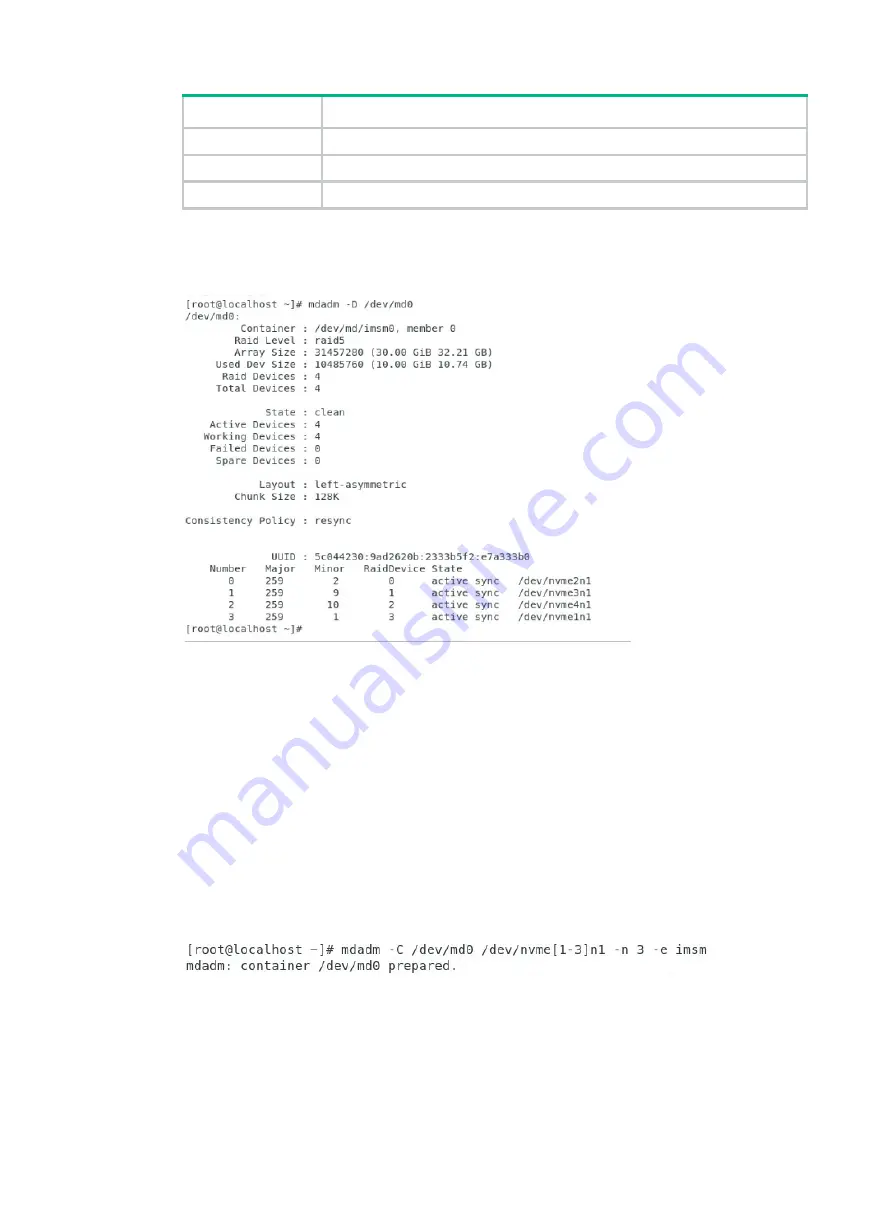
Execute the
mdadm –D /dev/md0
command to view RAID information, including container
name, RAID level, strip size, number of NVMe drives, and RAID status, as shown in
Figure 26 Viewing RAID information
Configuring hot spare drives
Use one of the following methods to configure hot spare drives:
•
Configuring hot spare drives while creating a RAID array
•
Configuring hot spare drives after RAID array creation
Configuring hot spare drives while creating a RAID array
1.
Verify that VMD is enabled. For more information, see "
2.
Execute the
mdadm –C /dev/md0 /dev/nvme[1-3]n1 –n 3 –e imsm
command to create
a container, as shown in
. The number of NVMe drives for creating the container is
n
+ 1. This section takes 3 as an example.
Figure 27 Creating a container
3.
Execute the
mdadm –C /dev/md1 /dev/md0 –n 2 –l 1 –z 10G
command to create a
RAID array, as shown in
. The number of NVMe drives for creating the RAID array is
n
. This section takes 2 as an example.
Содержание UniServer R4300 G6
Страница 36: ...21 Figure 23 Selecting the controller and RAID level 4 Select drives and then click Next...
Страница 40: ...25 Figure 27 Selecting the RAID array to be deleted 2 In the dialog box that opens click Yes...
Страница 41: ...26 Figure 28 Confirming the deletion 3 Verify that the RAID array has been deleted on the Volumes page...
Страница 65: ...23 Figure 36 Modifying RAID parameters 6 Confirm the RAID volume information and then click Create Volume...
Страница 66: ...24 Figure 37 Confirming RAID creation 7 Click OK to complete the RAID creation...
Страница 70: ...28 Figure 41 Setting the selected drive as a hot spare drive 4 In the dialog box that opens click Yes...
Страница 73: ...31 Figure 44 Deleting a RAID array 3 In the dialog box that opens click Yes as shown in Figure 45...
Страница 164: ...89 Figure 158 Selecting Main Menu 2 Select Controller Management and press Enter...
Страница 301: ...70 Figure 116 Array Configuration screen 3 On the screen as shown in Figure 117 select the target array and press Enter...
Страница 312: ...81 Figure 129 Erasing a drive 3 On the screen as shown in Figure 130 select the erase pattern and press Enter...
Страница 321: ...90 Figure 138 Configure Controller Settings screen for the RAID P460 B2...
Страница 330: ...99 Figure 147 Manage Arrays screen 5 On the screen as shown in Figure 148 select Create Logical Drive...
Страница 469: ...19 Examples Viewing physical drive informatoin Syntax mnv_cli info o pd Examples...
Страница 512: ...6 2 Select Main Menu and then press Enter Figure 9 Selecting Main Menu 3 Select Drive Management and then press Enter...
Страница 513: ...7 Figure 10 Selecting Drive Management 4 Select the target drive and then press Enter...
Страница 514: ...8 Figure 11 Select the target drive 5 View the value of the Status field...
Страница 521: ...15 Figure 22 Selecting the storage controller 2 Select Main Menu and then press Enter Figure 23 Selecting Main Menu...
Страница 529: ...23 Figure 33 Identifying a storage controller 2...


