background image

DVMS 1600/800 Duplex  Getting Started Guide

Document 900.0144 Rev 3.00

9

Quad (2 x 2) mode: Press FUNCTION and Camera 4, then 
press again to start Quad sequencing.

Nine (3 x 3) mode: Press FUNCTION and Camera 9, then 
press again to start Nine page sequencing.

Hex (4 x 4) mode: Press FUNCTION and Camera 16.

Video text display

Set how the transaction text is displayed on each camera, including 
video termination, on the Camera Setup screen (MENU 


System Setup 

 Video Inputs). The Camera Setup screen 

displays.

To change the text that displays on the video clips:

1.

Go to the Camera Title field. 

2.

Activate the box by pressing Enter, then press 

"

 or 

!

 or 

the jog wheel to change the value. 

Camera 1

 button inserts or 

appends a letter. 

Camera 2

 button deletes a letter.

3.

Press Enter to confirm your changes.

4.

In the Position field, select where you wish the title to display 
on the video clip.

5.

In the Text Position field, select where you wish the time and 
date to appear on the video clip.

6.

When you have finished making your selections, select 
Accept to confirm your changes and exit this screen.

Cash Reg.#: Identifies the cash 
register to which the camera is 
mapped. For more information, see 

Point of sale interface

, page

 14

.

Termination: When enabled, 
DVMS 1600/800 unit automatically 
detects whether video is present 
and updates the switcher setup 
when cameras are present.

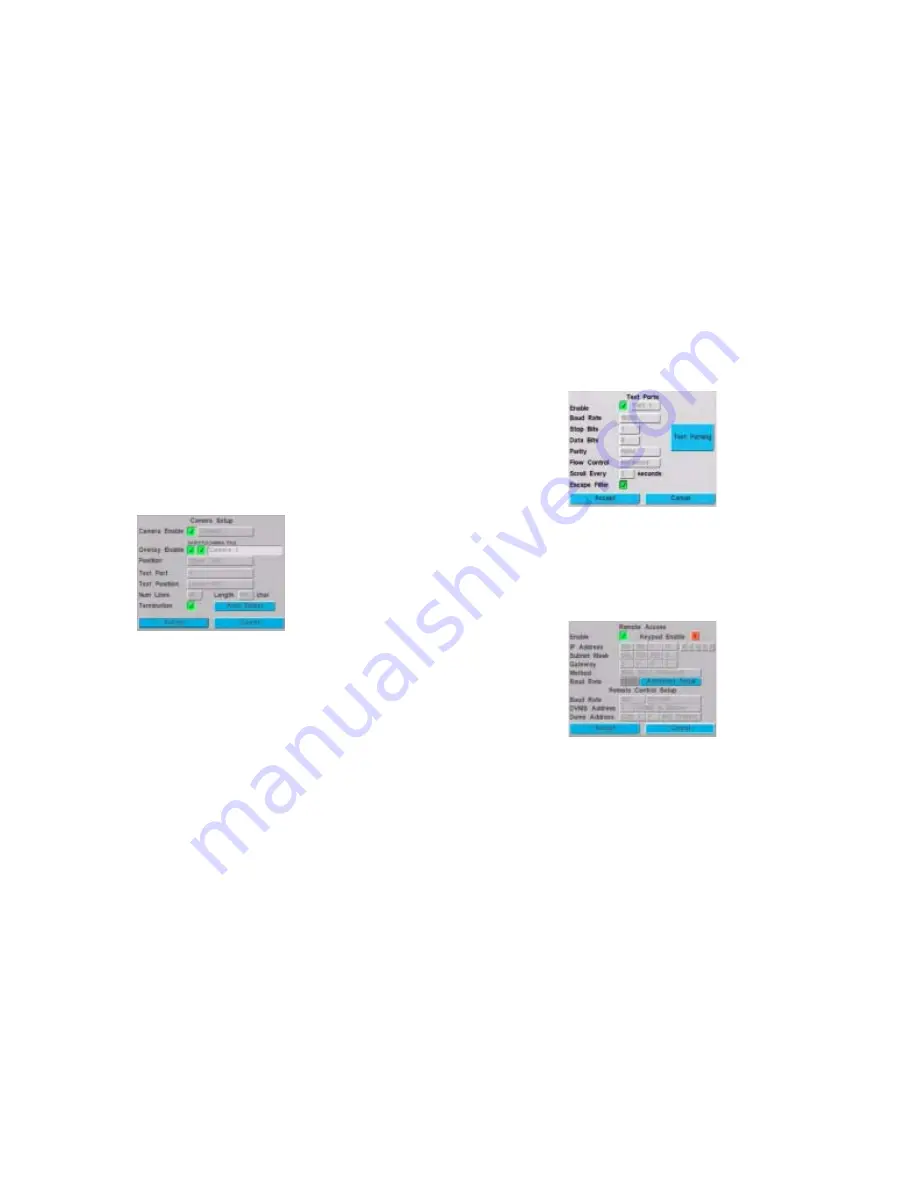
Transaction text ports

Enter the technical data associated with the input device for each 
connected port (up to 4) on the Text Ports screen (MENU 


System Setup 

 Text Ports).

Remote access

Enable remote access if you wish to configure or control the 
DVMS 1600/800 unit remotely through a modem or network 
connection. Go to the Remote Access screen (MENU 


System Setup 

 Remote Access).

To select a 10/100BaseT network interface:

1.

Select IEEE 802.3 (Ethernet) in the Method field.

2.

Power down the DVMS 1600/800 unit.

3.

Plug in the appropriate network module (specified above) into 
the rear PCMCIA port.

4.

Power up the DVMS 1600/800 unit.

Text port: You must enable each 
connected port before the system accepts 
information from that port.

IP Address: You must obtain a unique, 
fixed IP address from your Network 
Administrator or Internet Service 
Provider that is different from any PC 
connected to your network.

Содержание dvms 1600

Страница 1: ...DVMS 1600 800 Duplex Getting Started Guide...

Страница 2: ...REDUCE THE RISK OF ELECTRIC SHOCK DO NOT REMOVE THE COVER NO USER SERVICEABLE PARTS INSIDE REFER SERVICING TO QUALIFIED SERVICE PERSONNEL RISK OF ELECTRIC SHOCK DO NOT OPEN ctions accompany Warranty...

Страница 3: ...nt recording 16 Stop recording alarm 16 Pre event recording 16 Reports 17 Create a report 17 Reset to factory defaults 17 Operation 18 Start or stop recording 19 Live monitoring 20 Control PTZ cameras...

Страница 4: ...ming from front panel Full remote management with Remote Access Software RAS Simultaneous recording and playback Pan tilt and zoom control Covert setup Advanced features Up to 60 images per second rec...

Страница 5: ...information for example text and audio recorded on the hard drive a On the Disk Setup screen Storage Setup Disk Setup select Format All b When the system asks if you wish to proceed select OK 4 Conne...

Страница 6: ...SCSI port Connect 68 pin SCSI cable to external SCSI disk storage device total 3 IDs 1 to 4 ATMs Communications port DTE 1 4 Text ports ATM ECR POS Async ASCII 1 RS 232 1 RS 485 Telemetry control 4 w...

Страница 7: ...r DVMS 1600 800 unit is connected to all the peripheral equipment you need to program your system The following sections describe how to complete the initial system setup tasks Note The DVMS 1600 800...

Страница 8: ...s recording again after five minutes of inactivity User permissions There are two password levels Administrator and User Administrator level allows access to all system operation and configuration lev...

Страница 9: ...S 1600 800 unit Enable administrative access If this field is disabled that user cannot use any of the functions accessed with the MENU button At least one user must have administrative access enabled...

Страница 10: ...8 hours to record timelapse and then only record events motion alarm text in the alternate times Advanced Program both normal day and alternate night recording Setup menu select Main Monitor to access...

Страница 11: ...t Accept to confirm your changes and exit this screen Cash Reg Identifies the cash register to which the camera is mapped For more information see Point of sale interface page 14 Termination When enab...

Страница 12: ...rreversible data stored video loss To avoid reformatting the system Silent Witness recommends that you add an optional archive drive For detailed information on installing and configuring additional s...

Страница 13: ...elapse mode simple or advanced on the User Preferences screen go to the Timelapse Recording screen MENU Timelapse Recording to set Record rate fps and compression setting Recording times for each day...

Страница 14: ...rate or set a record rate for each camera On the Timelapse Recording screen click Normal Setup Note The global rate is common for timelapse VCR type recording Typically 24 hour timelapse mode is equi...

Страница 15: ...ecording The DVMS 1600 800 unit can detect three event types motion detection text inputs and alarm inputs When the disk is full that is the When Disk Full field on the Disk Setup screen is set to Sto...

Страница 16: ...r normal ASCII text input Enable Video Loss System takes action when a lost video signal is detected from an enabled camera Output DVMS 1600 800 unit sends a signal to an alarm output when it detects...

Страница 17: ...to reset a Use the DVMS front panel buttons to move to the first square you want to assign to zone 1 Press the Camera 1 button to assign that square to zone 1 Move to any additional squares you want...

Страница 18: ...tely prior to an event from selected cameras enable this option on the Pre event Setup screen MENU Event Recording Pre event Setup Note The total number of fps recorded by all 16 cameras cannot add up...

Страница 19: ...ing screens appears 4 After you set the report criteria select OK to return to the Create New Report screen 5 In the When to search field select the desired start and end time parameters for the syste...

Страница 20: ...ation of the main monitor REC Enable and disable toggle local recording to the hard drive PLAY Initiates local playback of latest video information from the hard drive FUNCTION Activate secondary func...

Страница 21: ...ter Select a function for menu change or operation During playback it can be used to terminate the Playback function MENU Navigate up through the menus or increment to a larger value FUNCTION Navigate...

Страница 22: ...mera Full screen view Camera 4 Any four cameras 2 x 2 Camera 9 Any nine cameras 3 x 3 Camera 16 All 16 cameras 4 x 4 2 Press FUNCTION Camera 3 to display the PTZ control menu on the video monitor Pres...

Страница 23: ...n number then press Execute Search for clips or images 1 Press FUNCTION PLAY then enter your user name and password when prompted 2 On the Search screen enter begin and end dates to search for images...

Страница 24: ...an archive drive After you have configured an archive drive see Set drive partitions page 11 save downloaded images to an archive drive 1 Find the clip s you wish to copy a Press FUNCTION then press...

Страница 25: ...the sequence and it does not display a multi screen display Whichever cameras are not disabled on the Covert Setup screen To start automatic sequencing mode 1 Select the cameras you wish to display an...

Страница 26: ...capacity is proportioned Go to the Disks screen MENU Storage Setup Disks Hot swap the removable drive The Hot Swap feature permits you to take out a removable hot swappable recording device IDE or SCS...

Страница 27: ...rn the unit to Silent Witness Customer Service to have them reset it for you Upgrade the DVMS firmware Occasionally you may need to upgrade the DVMS firmware to support the latest feature set Upgrades...

Страница 28: ...silentwitness com Document 900 0144 Rev 3 00 June 5 2003 Specifications subject to change without notice Imperial conversions are approximate www silentwitness com Toll free 1 888 289 2288 Internatio...

Отзывы: