


Introduction
Please read thoroughly this operation manual and
attached safety instructions to enjoy your new gas hot air
turbine. We further recommend to retain the operation
manual for future references. We reserve right to make
technical changes for the purpose of improvement in the
course of continuous product development.
This is the original operation manual.
Device description (figure A/B)
1.
Fan
2.
Shell
3.
Base
4.
Handle
5.
Piezo-ignition button
6.
ON/OFF switch
7.
Reduction valve
8.
Gas hose/reduction valve connection
9.
Gas hose/heater connection
10.
Reduction valve/gas cylinder connection
11.
Gas valve button
12.
Gas cylinder valve
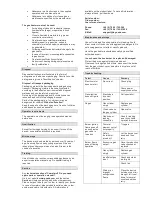
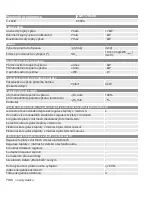
Technical data
GGH 10
Connection:
230V~50Hz
Heating power:
10 kW
Consumption:
about 0.73 kg/h
Operating pressure:
300 mbar
Turbine capacity:
500 m³/h
Type of gas:
propane/butane
Length of power cable:
2m
Degree of protection:
IPX4
Weight:
5,4kg
GGH 10 INOX
Connection:
230V~50Hz
Heating power:
10 kW
Consumption:
about 0.73 kg/h
Operating pressure:
300 mbar
Turbine capacity:
500 m³/h
Type of gas:
propane/butane
Length of power cable:
2m
Degree of protection:
IPX4
Weight:
5,5kg
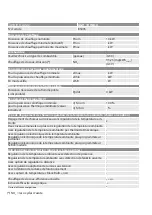
Nominal heat output
Pnom
10kW
Minimum heat output (indicative)
Pmin
-
Maximum continuous heat output
Pmax
-
At nominal heat output
elmax
-
At minimum heat output
elmin
-
In standby mode
elSb
-
Single stage heat output and no room
temperature control
yes
With mechanic thermostat room
temperature control
-
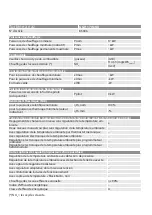
GGH 17 INOX
Connection:
230V~50Hz
Heating power:
17 kW
Consumption:
about 1.24 kg/h
Operating pressure:
500 mbar
Turbine capacity:
500 m³/h
Type of gas:
propane/butane
Length of power cable:
2m
Degree of protection:
IPX4
Weight:
7kg
Nominal heat output
Pnom
17kW
Minimum heat output (indicative)
Pmin
-
Maximum continuous heat output
Pmax
-
At nominal heat output
elmax
-
At minimum heat output
elmin
-
In standby mode
elSb
-
Single stage heat output and no room
temperature control
yes
With mechanic thermostat room
temperature control
-
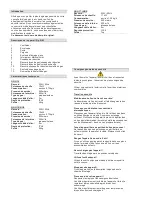
General safety instructions
Read and observe all instructions contained herein before
commissioning and operation of the device.
Keep the safety instructions for future reference!
Only use outdoors and away from combustible materials.
Safe work
Keep your workplace tidy!
Disorder on workplace may result in injuries.
Consider surrounding conditions!
Do not expose to rain.
Do not use in moist or wet environment.
Provide good lighting.
Do not use close to flammable liquids or gases (except for
substances required for operation - here propane/butane).
Keep other persons in a safe distance!
Other persons, particularly children, may not touch the
device and power cable. Keep them in a sufficient distance
from your workplace.
Store your device properly!
The device, if not used, should be stored in a dry and
closed space, out of reach of children.
Do not overload your device!
You will work better and more safely if the device is used
at performance power for which it is designed to.
Use correct device!
Do not use the device for purposes other than intended.
Secure your device correctly!
Connect your device according to instructions in
"Assembly" section.
Take care of your tools!
Observe maintenance directions and instructions.
Check tool cable regularly and ask an authorized specialist
to replace the same if damaged.
Check extension cable regularly and replace, if damaged.
Keep handles dry, without traces of oils and greases.
Be careful!
Be aware of what you are doing. Approach your work with
sound mind. Do not use the device if you are tired.
Check the device for damage!
Before use, check thoroughly all safeguards and slightly
damaged parts if they are still functioning properly.
Check whether rotary parts operate freely and not jammed
or damaged.
All parts must be installed properly and must comply with
conditions so that perfect operation of the device is
ensured.
Damaged safeguards and parts must be either repaired or
replaced by an authorized workshop, unless specified
otherwise in this operation manual.
Replace damaged switches in a service workshop. Do not
use the devices with malfunctioning ON/OFF switch.
WARNING!
Use of non-compliant accessories may result in an injury.
Have your device repaired by an electrician only!
This device complies to applicable safety provisions.
Repairs may be performed by an electrician with the use of
genuine spare parts, otherwise the user may be exposed
to injury hazard.
Safety instructions specific for this device
•
This device may be used outside only,
however, it must be protected against
moisture or rain.
•
Gas cylinder must be always protected against
freeze and minus temperature at any times.
•
The device may be used for heating only.
•
Attention! Open flame tightness test is
strictly prohibited.
•
Do not operate under ground level.
•
Do not move and lift the device if in use.
•
Radiation area must be at least 2 metres
from persons and all flammable substances.
•
Keep 50 cm distance between walls and rear or
sides of the device.
•
If gas leaks (smell), close the gas cylinder valve
immediately and keep the device out of reach of
all flammable sources.
•
Check tightness of all connections.
•
If gas leakage remains, call an expert before re-
commissioning.
•
Assembly and maintenance of the device must
comply with laws and directives of a country
where the device is used.
•
Do never turn the gas cylinder upside down
even though you think it is empty! This
procedure may jam the hose with residues from
the gas cylinder and cause fire hazard and
immediate damage of the device.
•
Do not disassemble the protective grid and/or
other parts of the heater.
•
Keep children out of reach of the burner.
•
Do not operate the device without supervision!
•
Do not cover the device!
•
Do not use for drying of clothes etc.!
•
Do not touch the protective grid and thermal
shield, otherwise burning injury may occur!
Assembly and commissioning instructions (Fig.
A/B/C)
Do not use the device close to flames, sparks or
flammable substances
(except for substances required
for operation - here propane/butane).
Operate the device on a flat and stable surface.
Step 1 (C/1)
Plug the device to a socket (230V~50Hz).
Step 2 (C/2)
•
Connect the reduction valve
(B/7)
with the gas
hose connection
(B/8)
.
•
Connect the reduction valve
(B/7)
with the fitted
gas hose to the gas cylinder valve
(B/12)
.
•
Connect the gas hose connection
(B/9)
with the
heater.
Step 3 (C/3)
Screw out the gas cylinder valve
(B/12)
.
Check the screw closures by tightness test
spray or use a soap liquor. Retighten, if necessary.
Step 4 (Fig. C/4)
Press ON/OFF switch
(A/6)
.
Step 5 (Fig. C/5)
From suction side check whether the fan
(A/1)
revolves.
Step 6 (Fig. C/6)
•
If the fan
(A/1)
revolves, keep the gas valve
button
(A/11)
pressed and at the same time,
press repeatedly the ignition button
(A/5)
until
the burner ignites.
•
Hold the gas valve button
(A/11)
pressed for 10
to 20 more seconds.
•
Check whether the gas heater works
uninterruptedly.
Turning off (Fig. D)
Step 1 (Fig. D/1)
To turn the heater off, first screw in the gas cylinder valve
(B/12)
.
Step 2 (Fig. D/2)
Turn off the device with the use of ON/OFF switch
(A6)
.
Step 3
Unplug the device from the socket to disconnect power
supply.
Replacement of gas cylinder
•
Always replace the gas cylinder outside and out
of reach of flames or flammable sources without
presence of other persons!
•
Close the gas cylinder valve.
(B/12)
•
Screw out the reduction valve
(7)
.
•
Ensure you have the reduction valve seal
available.
•
Connect the device to a new gas cylinder and
proceed according to instructions in "Assembly
and commissioning instructions".
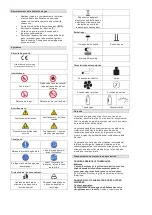
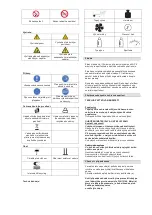
Identification
Product safety:
The product complies with
relevant EU standards
Prohibitions:
No flame!
No operation in closed
spaces!
No smoking!
No pulling the plug!
Warning:


