background image


DrawingBoard IV 27 


Replacing the Cursor Batteries 

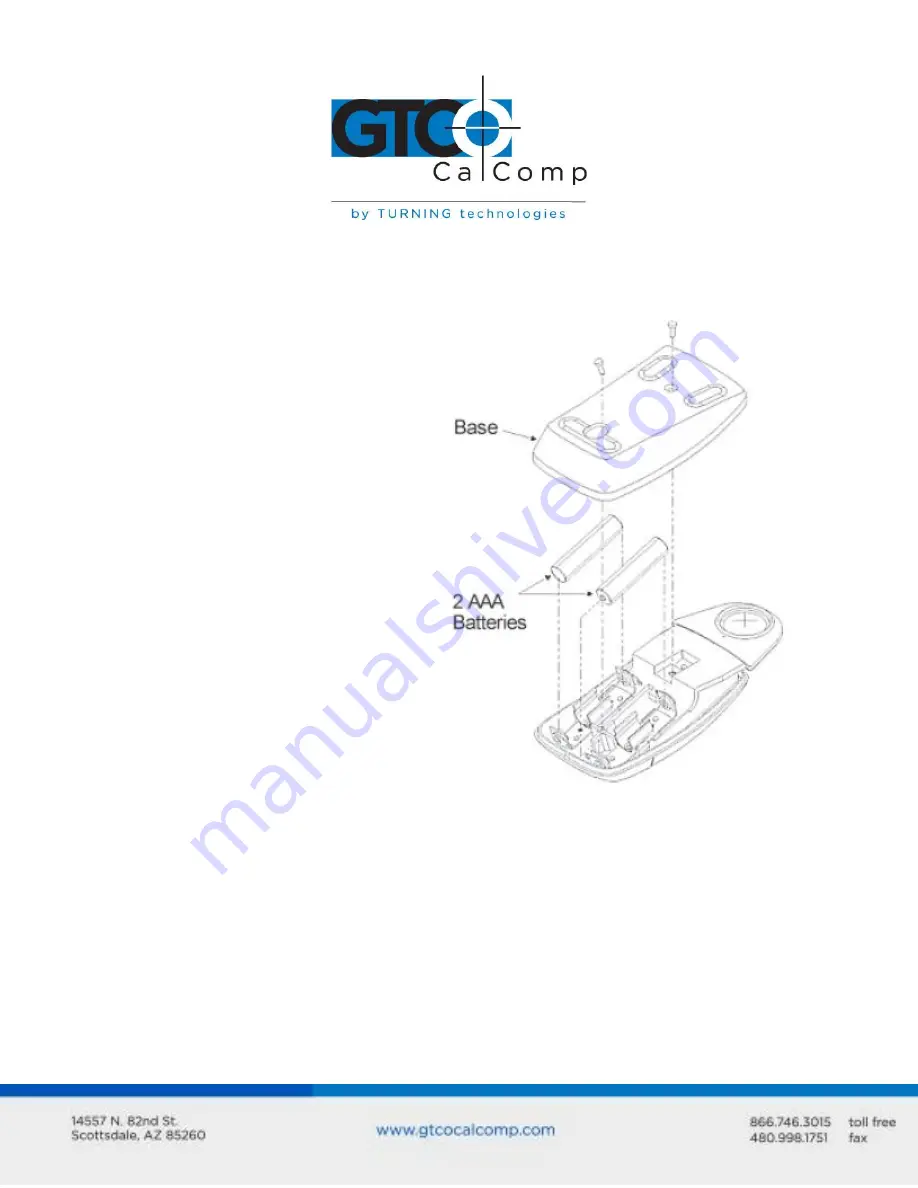
The cordless cursor requires two AAA batteries.  The average battery life for the cursor 
batteries is 2,000 hours. 

To replace the batteries: 

1.


Place the cursor face down in the 
palm of your hand.  Use a Phillips 
screwdriver to remove the two 
screws located on the bottom of 
the cursor (see figure).  Remove 
the cursor base. 

2.


Remove the old batteries from the 
battery casings. 

3.


Place the new batteries in the 
casings, matching the polarity of 
each battery with the markings on 
the connector strips (match + to 
+). 

4.


Reposition the cursor base.  
Replace the screws with the 
Phillips screwdriver. 


NOTE: 

When you replace the cordless cursor batteries, the cursor will reset to the default 

frequency.  If you changed the frequency of the cursor before replacing the batteries, you 
will need to do so again after replacing the batteries (see the 

Reducing Monitor 

Interference

 section in 

Troubleshooting

). 


Содержание Drawingboard IV

Страница 1: ...DrawingBoard IV 1 ...

Страница 2: ... the Pen Click Tip Pen Pressure Pen Learning Basic Movements Clicking and Double Clicking Dragging Customizing the Tablet Overview of the Menu Strip Selecting a Pre Programmed Setup Selecting a Custom Setup Tablet Options Recommended Setups for Common PC Software Packages Restoring a Pre Programmed Setup Caring for the Tablet Cleaning the Tablet Replacing the Pen Tip Replacing the Pen Batteries Re...

Страница 3: ...hart Returning your Tablet for Repair Specifications Parts and Accessories Glossary Regulatory Statements and Warranty Radio and Television Interference Canada European Union Emission Directive European Union WEEE Directive Japan CE Certification Warranty for U S Canada 28 29 29 30 31 32 33 34 35 40 40 40 41 41 42 42 43 ...

Страница 4: ... tool options Surfaces can be opaque or backlit System Requirements and Compatibility DrawingBoard IV is equipped with an RS 232 serial interface and is compatible with most industry standard personal computers The included TabletWorks software provides a WinTab compliant driver that is compatible with the versions of Microsoft Windows shown below After installing the PC software DrawingBoard IV w...

Страница 5: ...is inside the drawing area and blinks if it is outside the drawing area Pointing Tools There are two types of pointing tools available with DrawingBoard IV pens and cursors Pointing tools are available in both corded and cordless versions The cordless pointing tools are powered by batteries Each tool goes into a battery saving sleep mode when no button has been pressed for one to five minutes depe...

Страница 6: ...et with attached Controller Pointing Tool cursor or pen Power Supply Serial Cable TabletWorks CD ROM Registration Card and Quick Start Instructions Installing the Tablet All cable connections are made at the rear of the tablet Turn off your computer and make sure the tablet power switch is in the off position 1 Connect the serial cable Attach the round end of the serial cable to the socket labeled...

Страница 7: ...light will turn on If you are using a cordless pointing tool turn it on by pressing any button on the tool The power light will glow steadily if the pointing tool is inside the drawing of the tablet If the pointing tool is outside the drawing area the power light will blink Installing the Software The TabletWorks software included with DrawingBoard IV allows you to use your tablet both as a mouse ...

Страница 8: ...detected up to 1 2 above the drawing area This allows you to trace through materials placed on the surface such as a drawing or a book Also before using the pointing tool be sure that sleep mode is turned off by pressing any button on the tool Using the Cursor When you use the cursor the intersection point of the crosshairs on the lens identifies the point you are selecting The crosshairs are etch...

Страница 9: ...click tip the pressure tip and the lite touch tip The differences among these pens are tilt and height sensitivity On all three pens the pen tip is Button 0 and is used as the pick or left mouse button The lower side button is Button 1 and the upper side is Button 2 The functions these buttons provide are defined through the TabletWorks software or through your own software application Click Tip P...

Страница 10: ...in the same place You can also double click by pressing the pen or cursor button that has been defined as a double click button see TabletWorks Help Dragging Dragging is the action of moving the pointing tool during a selection To drag click on an object but instead of lifting the pen tip or releasing the cursor button hold it down while moving the transducer or corresponding object on the screen ...

Страница 11: ...you to set specific tablet options by turning different combinations of Configuration keys ON or OFF When Configuration Mode is OFF the keys function as Macro keys Macros can be recorded only with the TabletWorks software see TabletWorks Help 3 Save and 3 Restore Keys The Save and Restore keys work hand in hand They are used to save or recall a setup to or from one of three save areas There are th...

Страница 12: ...ed setups The Default setup is available when you power on the digitizer To select one of the other setups 1 Turn on Configuration Mode by clicking on the Config Exit key 2 Click on the desired Restore key 3 Click on the Config Exit key again to exit Configuration Mode The new setup is activated The following table lists the tablet options used by the pre programmed setups Default Save 2 Save 3 Mo...

Страница 13: ...e you need to work A B or C You can determine which bank you are in by placing the transducer over one of the Bank keys The Indicator light is on if the Bank is active 3 Determine whether the Configuration keys are ON or OFF by placing the transducer over each key If the key is ON the Indicator light is ON 4 Repeat steps 2 and 3 for the remaining Banks as required 5 After you have completed your s...

Страница 14: ...rious tablet options available through Configuration keys on the Menu Strip Follow the procedure described on the previous page using the keys shown for the option The circles represent the Indicator light on the tablet Defining operating mode Setting up increment mode ...

Страница 15: ...DrawingBoard IV 15 Turning on prompt mode Setting up data rate for CalComp 2000 format Setting up data rate for Summagraphics MM ASCII format Setting up data rate for Summagraphics MM binary format ...

Страница 16: ...DrawingBoard IV 16 Setting up resolution Resolutions up to 10 000 lpi are available on the large format high accuracy tablets for applications that support it ...

Страница 17: ...DrawingBoard IV 17 Setting up format ...

Страница 18: ...DrawingBoard IV 18 Adding line feed Setting up data stop bits Setting up baud rate Setting up parity Setting corded frequency ...

Страница 19: ...aphics MM or CalComp 2000 commands Using ESC for 9X00 commands Sending data out of proximity Turning on pressure pen data Turning on pen height data Turning on pen tilt data Turning on pen tilt correction Changing tablet to mouse mode ...

Страница 20: ...proximity Setting up CTS line enable Rotating the tablet Removing CR on ASCII formats Controlling pen sound Controlling tablet speaker Changing tilt data to pressure data Using the high accuracy cursor with a small format tablet ...

Страница 21: ...PC Software Applications The following sections show the Configuration key setups for some common PC software packages Setup the Configuration keys as shown below see Selecting a Custom Setup The circles represent the Indicator light on the digitizer ...

Страница 22: ...DrawingBoard IV 22 ...

Страница 23: ...DrawingBoard IV 23 ...

Страница 24: ...areas the pre programmed setup will be overwritten To restore the original setup set the Configuration keys as shown below using the procedure on the following page The circles represent the power light on the tablet Bank C does not vary for these applications so it is not included in the description ...

Страница 25: ...r knives on the tablet surface Do not use the tablet surface for any purpose other than drawing tracing or digitizing Do not drill any holes on the digitizer or controller Cleaning the Tablet To clean the tablet s surface use a soft non abrasive cloth Hardened dirt may be removed with a slightly dampened cloth Do not clean pencil lines with a soft cleanser or pencil eraser This may create an undes...

Страница 26: ... the pen cover to expose the batteries 2 Remove the old batteries by turning the pen over and gently tapping it letting the batteries fall into your other hand 3 Insert the new batteries as they are shown in the figure above towards pen tip 4 Replace the pen cover and screw the pen cap onto the pen NOTE When you replace the pen batteries the pen will reset to the default frequency If you changed t...

Страница 27: ...ase 2 Remove the old batteries from the battery casings 3 Place the new batteries in the casings matching the polarity of each battery with the markings on the connector strips match to 4 Reposition the cursor base Replace the screws with the Phillips screwdriver NOTE When you replace the cordless cursor batteries the cursor will reset to the default frequency If you changed the frequency of the c...

Страница 28: ...ription of the problem Name and version of software package Type of computer being used DrawingBoard IV model and serial number see bottom of digitizer Type of transducer 4 Be at your computer when you call Reducing Monitor Interference If you are experiencing monitor interference with your tablet you can reduce the interference by changing the frequency your transducer uses Transducers with the f...

Страница 29: ...en the pointing tool is inside the drawing area Does it blink when the pointing tool is outside the drawing area The power light will blink if the pointing tool has gone into sleep mode Press any button on the tool to activate it If the power light continues to blink and the pointing tool is in the drawing area change the pointing tool s battery Are all cable connections tight Power cable to seria...

Страница 30: ... another component of your system Did the software work in the past If the software package worked with the tablet in the past then the problem lies with the new setup Check all the connectors Is the tablet still plugged into the same port If yes reset the tablet by unplugging and re plugging the power supply and restart the software Did you reset or power down the computer During reset and power ...

Страница 31: ...s connected to a COM port that shares the same IRQ as the tablet COM port i e your tablet is connected to COM1 IRQ4 and your modem is connected to COM3 IRQ4 Press any button on the tool If the configuration light is on click on the Config Exit key on the Menu Strip Is the serial port being used correctly identified in your software application Check that the power cable is installed correctly Repl...

Страница 32: ...Technical Support at 1 866 746 3015 or email us at gtco support gtcocalcomp com Technical Support will assist you in determining if your tablet is defective and will help you obtain a Return Merchandise Authorization RMA number Important Please do not return your product without first discussing the issue with and receiving an RMA from a GTCO CalComp by Turning Technologies Technical Support Speci...

Страница 33: ...170 pps cordless Electrical Specifications Feature Description Power Source Wall mount power supply with a 2 1 mm mono plug DC connector and positive outside diameter Input Voltage 12 to 17 VDC Current Draw 400 ma Regulatory Specifications Feature Description Safety UL1950 EN60950 Electromagnetic Immunity FCC Class B DOC Class B VCCI Class II EN50082 1 and EN55022 Environmental Specifications Feat...

Страница 34: ...tablet lists the DrawingBoard IV systems and parts available for purchase To order any of the items listed below please contact GTCO CalComp by Turning Technologies at 1 866 746 3015 Toll Free fax to 480 998 1751 visit us online at www gtcocalcomp com or email to gtco sales gtcocalcomp com Tablets Model Description DB4 2024 DB4 2436 DB4 3648 DB4 4460 20 x 24 active area 24 x 36 active area 36 x 48...

Страница 35: ... the Active Area is within 010 inches of where it should be ASCII Abbreviation for American Standard Code for Information Interchange Baud Rate Rate of speed that data flows between a host computer and the digitizer It is the number of bits transmitted per second The lower the baud rate the slower the speed Bit Basic unit of information in the binary system either 0 or 1 Button Switch on the curso...

Страница 36: ...lt A value action or setting that a computer system assumes unless the user gives an explicit instruction to the contrary Drawing Area Area on the tablet surface intended for digitizing Referred to as the Active Area Format The form in which data is sent from the tablet DrawingBoard IV tablet can output 32 different formats Frequency Number of waves that pass a fixed point in one second Height See...

Страница 37: ...ate distinguishable locations that may be found within the distance of one inch LPmm Abbreviation for lines per millimeter Metric unit of measurement for resolution measuring the number of separate distinguishable locations that may be found within the distance of one millimeter Mouse Mode Operating mode that emulates Microsoft and Mouse Systems mouse drivers Data constantly transmits when the cur...

Страница 38: ... time the computer sends a prompt character to the unit Prompting can operate with any mode except Mouse mode Proximity Greatest distance above the drawing area that the pointing tool can be raised and still be sensed by the tablet RAM Abbreviation for Random Access Memory a specific type of memory used by the computer Resolution Distance increment that the tablet outputs in lines inch or lines mm...

Страница 39: ...ransmission Stop Bits One or two stop bits are transmitted with each data byte They mark a completed transmission Track Mode The digitizer transmits coordinate data points continuously but only while the cursor button or pen tip is depressed This mode is also called Switch Stream by some manufacturers X Direction Horizontal direction across the face of the tablet Y Direction Vertical distance up a...

Страница 40: ...the equipment off and on the user is encouraged to try to correct the interference by one or more of the following measures Reorient or relocate the receiving antenna Increase the separation between the equipment and the receiver Connect the equipment into an outlet on a circuit different from that to which the receiver is connected Reorient or coil cables Consult the dealer or an experienced Radi...

Страница 41: ... use of natural resources It may contain hazardous substances that could impact health and the environment In order to avoid the dissemination of the hazardous substances into the environment and to diminish the pressure on our natural resources GTCO CalComp by Turning Technologies encourages you to return this product to the appropriate take back system facility These facilities reuse or recycle ...

Страница 42: ...648 and DB4 4460 Product Options All Conforms to the following product specifications Safety UL 1950 EN 60950 1988 A1 A2 EMC CISPR22 1985 EN 55022 1988 Class B EN 50082 1 1992 IEC 801 2 1991 4kV CD 8kV AD Criterion B IEC 801 3 1984 3V m Criterion A IEC 801 4 1988 1kV power lines 5kV data lines Criterion B Supplementary Information The product herewith complies with the requirements of the Low Volt...

Страница 43: ...charged after the first 90 days of use and calculated from the date of original consumer purchase This payment may be made by Visa MasterCard or American Express A copy of the sales receipt or invoice will be required for warranty verification Conditions Except as specified below this warranty covers all defects in material or workmanship in the products The following are not covered by the warran...

Страница 44: ... your name address telephone number fax number email address and a description of the problem 5 If GTCO CalComp by Turning Technologies determines that the unit is not defective within the terms of the warranty the consumer shall pay the cost of all freight charges as well as any repair charges Technical Support Web based Technical Support is available free of charge at www gtcocalcomp com where c...

Страница 45: ...ights which vary from state to state or province to province To obtain service on your GTCO CalComp by Turning Technologies product call our Technical Support Department at 1 866 746 3015 or fax us at 480 998 1751 We can also be contacted through our website at www gtcocalcomp com in US at EUOffice gtcocalcomp com in Germany at infos calcomp fr in France Important All products returned to GTCO Cal...

Страница 46: ...nformation contained in this document is subject to change without notice GTCO CalComp by Turning Technologies assumes no responsibility for technical or editorial errors or omissions that may appear in this document or for the use of this material Nor does GTCO CalComp by Turning Technologies make any commitment to update the information contained in this document This document contains proprieta...

Отзывы: