background image

17 


+H


+H


+H


AUX (Auxiliary relay) 


From 

GecApp crono Wi-Fi

 you can 

ENABLE, DISABLE 

or

 SET 

to 

AUTOMATIC mode

 the 

AUX 

output (Auxiliary relay).


From the 

HOME PAGE

 enter the 

Settings MENU

 by pressing simultaneously for 2 seconds the 

the touch area of 

TEMPERATURE

 measured and the touch area of the 

HOUR.


-Press the keys “  

-H  

” or “  

+H               

and select 

AUX 

-Press and hold for about 2 seconds 

AUX

Use the keys “ 

-H 

” or “ 

+H 

”      scroll through the modes “

On”

, “

OFF” 

, “

Auto” 

or press “

Exit” 

to 

return to 

Home page


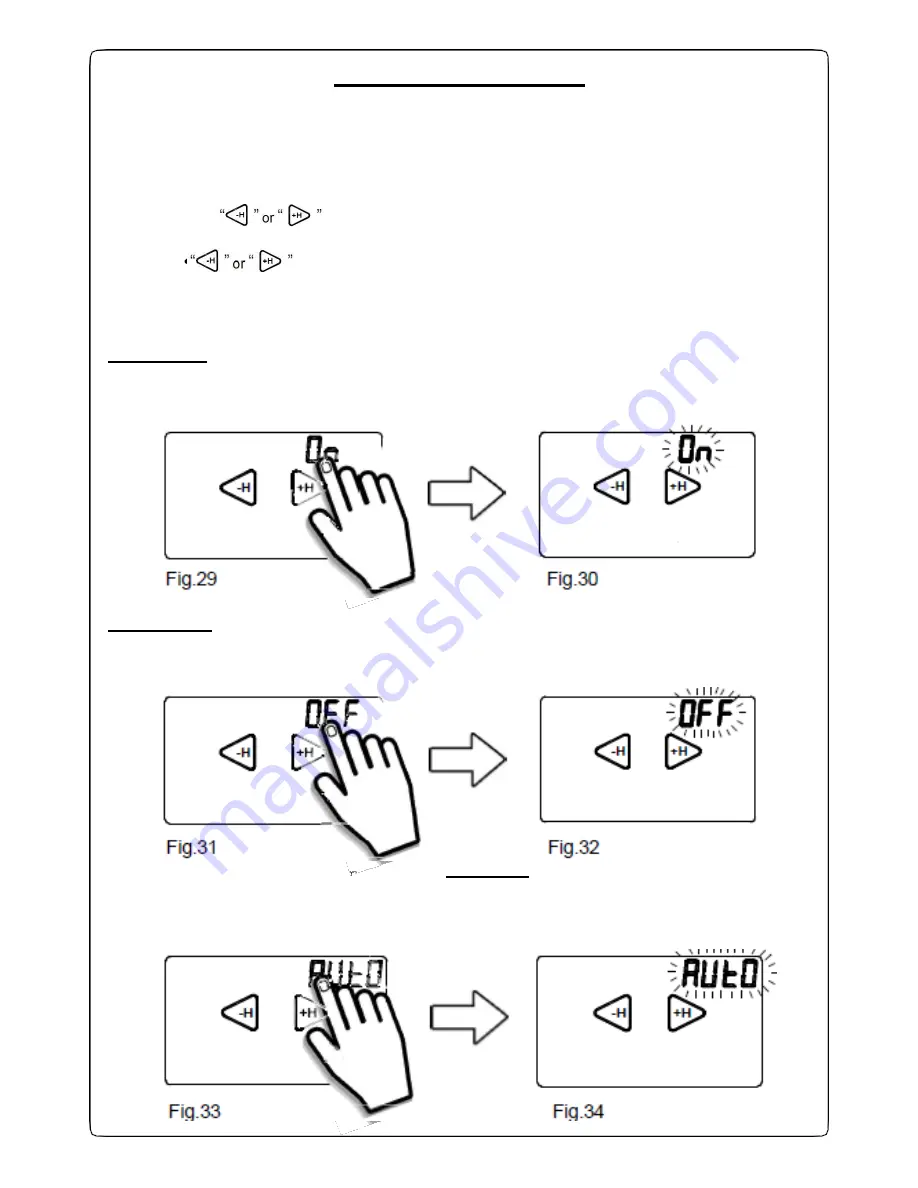
To 

ENABLE 

the 

AUX 

output press for about 2 seconds the word 

“On” 

(Fig.29). 

The word 

“On” 

will flash once (Fig.30).


After 5 seconds,

 GecApp crono Wi-Fi

 will return to the 

Home Page.


-H 

-H 

+H


Fig.29 

Fig.30 


To 

DISABLE 

the 

AUX 

output press for about 2 seconds the word 

“OFF” 

(Fig.31). The 

word 

“OFF” 

will flash once (Fig.32).


After 5 seconds,

 GecApp crono Wi-Fi

 will return to the 

Home Page.


-H 

-H 

+H


Fig.31 

Fig.32 

To set the 

AUX

 output to AUTOMATIC mode

 press and

 hold for about 2 seconds the word 

“AUTO” 

(Fig.33). 

The word 

“Auto” 

will flash once (Fig.34). 


After 5 seconds,

 GecApp crono Wi-Fi

 will return to the 

Home Page.


-H 

-H 

+H


Fig.33 

Fig.34 

Содержание Gecapp crono Wi-Fi

Страница 1: ...he App Wi Fi timer GECA HAS DEVELOPED A SMARTPHONE TABLET APP ABLE TO INTERFACE IN A SIMPLE AND INTUITIVE MANNER TO THE CONNECTED DEVICES THE USER CAN CHECK AT ANY TIME THE STATUS OF THE RELAYS AND CHANGE IT AS NEEDED ...

Страница 2: ......

Страница 3: ...ignal quality PAGE 14 Wi Fi submenu PAGE 45 Problems solutions WiFi module ON WiFi module OFF Wi Fi setup PAGE 47 APP mode for op system Android PAGE 48 Set up new device PAGE 16 Wi Fi module reset PAGE 50 App Home page interface PAGE 17 AUX Auxiliary relay PAGE 51 Possible errors Add Smartphone Tablet Add Delete device PAGE 18 Correction of temperature measured Cort PAGE 52 Send settings via App ...

Страница 4: ...4 ...

Страница 5: ...5 THE CHRONO Wi Fi timer ...

Страница 6: ...rogrammable thermostats installed in your home or in Manual mode On Off it allows you to enable disable external devices and or systems POWER SUPPLY 230Vac 50 60Hz N B BEFORE CONNECTING THE PROGRAMMABLE THERMOSTAT GecApp crono Wi Fi CUT OFF THE MAINS VOLTAGE Remove the two screws from the Base of the GecApp crono Wi Fi and remove the RED COVER if installed to access the power supply terminals N B ...

Страница 7: ...temperature probe 4 metre long code 2 030 1037 to EXT PROBE terminals M1 Fig 4 After connecting the external temperature probe set the switch S1 in Fig 4 at the rear of the programmable thermostat to position Ext and set the type of PROBE in the Settings MENU of the programmable thermostat The programmable thermostat GecApp crono Wi Fi will use the EXT PROBE as room temperature sensor Fig 4 Fig 2 ...

Страница 8: ...set to ON the auxiliary relay is ON Closed If the GecApp crono Wi Fi is set to OFF the auxiliary relay is OFF Open to MANUAL mode ON OFF If you set the auxiliary Relay to ON the AUX output will be ON Closed If you set the auxiliary Relay to OFF the AUX output will be OFF Open The AUX output can be set via the App or via the programmable thermostat GecApp crono Wi Fi in the Settings MENU AUX ATTENT...

Страница 9: ...ogrammable thermostat to the Base using the screws A 3 Install the Flap on the Front side by inserting the 4 hooks into the slots Fig 9 FIRST START UP Once the programmable thermostat GecApp crono Wi Fi is powered it runs a checkup cycle switching on all display sections by enabling the charge for a few seconds Fig 10 Thereupon the programmable thermostat GecApp crono Wi Fi displays the Home page ...

Страница 10: ...SEASON PRESSED EDIT SEASON TOUCH INPUT OUTPUT PROGR MANUAL PRESSED PASSWORD PRESSED ACCESS WEEKLY PROGRAMMING TOUCH DECREASE TEMPERATURE SLOWLY TOUCH DECREASE TEMPERATURE FAST PRESSED 10 TEMPERATURE MEASURED DECREMENT HOUR MINUTE HEATING AIR CONDITIONING SYSTEM WORKING SUMMER WINTER MODE MANUAL PROGRAM DECREMENT OF SET TEMPERATURE AND TEMPERATURE DIFFERENTIAL INCREMENT OF SET TEMPERATURE AND TEMPE...

Страница 11: ...m 27 0 C to 28 9 C 1st SLIDER which includes temperatures from 15 0 C to 26 9 C Let s suppose you set the temperature of time 0 Programming the temperature at 18 C in the FIRST HALF HOUR as the TIME 0 column will change its height from the pre set program Fig 14 Programming the temperature to 25 C in the SECOND HALF HOUR the HOURS column 0 will remain unchanged Fig 15 Fig 14 Fig 15 Therefore Progr...

Страница 12: ...ing Submenus WIFI AUX Cort Sond rSt Exit To enter the Submenu press and hold for about 2 seconds the name of the desired Submenu In the submenu the WI FI module can be Enabled On Disabled OFF Set up Set Reset rSt In the AUX submenu you can set the Auxiliary relay switched on On switched off OFF in automatic mode Auto In the submenu Cort you can compensate the temperature measured by the programmab...

Страница 13: ...ld the word Exit for about two seconds you will go back to the HOME PAGE SIGNAL QUALITY The display of GecApp crono Wi Fi shows the Signal quality symbol It represents the Quality of the signal between the GecApp crono Wi Fi programmable thermostat and the WI FI network of your home The signal quality can be POOR signal quality SUFFICIENT signal quality GOOD signal quality EXCELLENT signal quality...

Страница 14: ...Fi module press for about 2 seconds the word On Fig 20 The word On and Signal quality will begin to flash Fig 21 If you have previously set up the GecApp crono Wi Fi it will connect to your Wi Fi network set After 5 seconds GecApp crono Wi Fi will return to the Home Page If the message ER1 is displayed it means that there is no mains voltage WARNING If there is no mains voltage the Wi Fi module is...

Страница 15: ...splay appears EXIT Fig 26 Fig 26 At this point the programmable thermostat GecApp crono Wi Fi is in Setup mode Note It is possible to exit the Setup mode by pressing Exit Att meaning hold will appear on the screen When the Att message appears wait a few seconds after which the thermostat will return to normal operation Now the Setup procedure is running on your Smartphone Tablet 1 Connect the Smar...

Страница 16: ...n It Fig 25 indicating the start of the RESET procedure of the Wi Fi network connection Thereupon the programmable thermostat GecApp crono Wi Fi displays the Home page Fig 27 Fig 28 To restore the connection to the Wi Fi network repeat the SETUP procedure This function is used to restore Wi Fi module s factory settings The entire setup process of the Wi Fi connection will be therefore lost ...

Страница 17: ...ress Exit to return to Home page To ENABLE the AUX output press for about 2 seconds the word On Fig 29 The word On will flash once Fig 30 After 5 seconds GecApp crono Wi Fi will return to the Home Page H H H Fig 29 Fig 30 To DISABLE the AUX output press for about 2 seconds the word OFF Fig 31 The word OFF will flash once Fig 32 After 5 seconds GecApp crono Wi Fi will return to the Home Page H H H ...

Страница 18: ... Wi Fi measures on display a temperature of 20 0 C compared to an actual temperature of 22 5 C in the room In this case you can use the Temperature Correction function and set the value to 2 5 C so that 20 C 2 5 C 22 5 C From the HOME PAGE enter the Settings MENU by pressing simultaneously for 2 seconds the the touch area of TEMPERATURE measured and the touch area of the HOUR Press the keys H or H...

Страница 19: ...eset the programmable thermostat The rSt function allows you to reset the GecApp crono Wi Fi The rSt reset all parameters of the Programmable thermostat except for those of the Wi Fi network From the HOME PAGE enter the Settings MENU by pressing simultaneously for 2 seconds the the touch area of TEMPERATURE measured and the touch area of the HOUR Press the keys H or H and select rSt To reset GecAp...

Страница 20: ...20 EXIT exit the Settings menu By pressing the word Exit for about 2 seconds you will exit the Settings menu and return to the Home page fig 45 H H Fig 45 ...

Страница 21: ... SCHEDULE you set the temperature for each half an hour per day and per every WEEK day LU Touch C or C to increase or decrease the TEMPERATURE by 0 2 C Fig 50 Hold the keys C or C the temperature Fig 50 will vary by 1 0 C Touch H or H to set the temperature in the previous or next half an hour Tap the touch area of theHOUR to advance the day of PROGRAMMING Fig 51 After programming touch the touch ...

Страница 22: ...ogram will flash e g Tuesday MA Fig 53 Use the keys H or H to scroll through the days of the week and to confirm the DAY to which to copy press COPY By repeatedly pressing the word COPY the day will be copied to all days of the week Fig 56 Touch at any time the touch zone of TEMPERATURE to exit the function COPY SETTING DAY AND TIME If the programmable thermostat is in STAND BY ON mode Fig 57 tap ...

Страница 23: ... seconds the key Fig 64 to switch to MANUAL mode The GecApp Crono Wi Fi behaves now as simple room thermostat By tapping C or C Fig 65 you will increase or decrease the TEMPERATURE by 0 2 C in WINTER and SUMMERmode Hold the keys C or C the temperature will vary by 1 0 C After a few seconds without performing any operation or simply by touching the touch zone of TEMPERATURE you can switch to MANUAL...

Страница 24: ...lash Fig 68 Press the keys H or H Fig 69 to set how many HOURS you want the programmable thermostat to work in MANUAL mode To set the MINUTES press on the touch area of MINUTES Press the keys H or H to set how many MINUTES you want the programmable thermostat to work in MANUAL mode The maximum range is 99 hours and 59 minutes By touching the key after you set the time interval the timer will start...

Страница 25: ...rompted Then tap the button to change the OPERATING MODE Fig 71 ON OFF To activate the display simply touch it To turn the device off hold the ON OFF button Fig 72 for about 2 seconds The appliance will switch to shutdown mode disabling the system When GecApp Crono Wi Fi is off OFF only the HOUR and the TEMPERATURE measured are displayed alternating with the worda OFF Fig 73 To switch on the progr...

Страница 26: ...to modify any parameter using the display before the unlock It will be instead possible to modify parameters via Smartphone Tablet You can exit the PASSWORD setting at any time simply by pressing the button or waiting 12 seconds without touching the display of the programmable thermostat To unlock the programmable thermostat press and hold the symbol Fig 78 and enter the PASS WORD Confirm the PASS...

Страница 27: ...urned off when the temperature measured is SET TEMPERATURE SEMI_TEMPERATURE DIFFERENTIAL The TEMPERATURE DIFFERENTIAL is preset on the programmable thermostat to 0 4 C in WINTER mode and 0 8 C in SUMMER mode See for example Modes WINTER SET TEMPERATURE 20 0 C TEMPERATURE DIFFERENTIAL 0 4 C TEMPERATURE MEASURED 20 0 0 2 C 19 8 C HEATING SYSTEM ON TEMPERATURE MEASURED 20 0 0 2 C 20 2 C HEATING SYSTE...

Страница 28: ...ogrammable thermostats or other devices Operating temperature 9 9 C 45 C Contact capacity REL1 AUX 250Vac 5A resistive load Installation Wall or box 503 Available colours White or Anthracite Weight 194g without batteries Temperature monitoring devices class 1 Contribution of temperature controller to seasonal room heating performance 1 in accordance with Council Directive 2010 30 EC Regulation 811...

Страница 29: ...29 Notes ...

Страница 30: ...30 ...

Страница 31: ...31 APPLICATION ...

Страница 32: ... mode Instruction Programmable thermostat Setup section 2 With Smartphone Tablet connect to the network of the device called GecApp Crono Wi Fi If your Smartphone Tablet fails to connect to the Wi Fi GecApp crono Wi Fi network exit the Setup and run the RESET of the Wi Fi module as indicated below and then repeat the Setup procedure 3 Activate the application GecApp by pressing the icon geca Fig 2...

Страница 33: ... the top right to send the settings to the Programmable thermostat The programmable thermostat displays the message Att Wait Fig 5 and in a few seconds the Home page will appear Fig 6 Fig 5 Fig 6 When the symbol Signal quality will stop blinking it means that the programmable thermostat is connected to the Wi Fi network selected On Smartphone Tablet will be thus created a new device with its contr...

Страница 34: ...F TEMPERATURE CHART Daily weekly program of temperatures set for every half hour Fig 7 SEND Send settings to GecApp Crono Wi Fi at home CONTROL PANEL NEW STATUS settings of GecApp Crono Wi Fi Automatic Program Timed Manual program Max 16h and 59 min Manual Program 20 0 C Manual Program Temperature and timed Manual Program Increase Manual temperature Decrease Manual temperature Winter Mode Summer M...

Страница 35: ...t the Setup If you still have problems please contact the customer support ADD SMARTPHONE TABLET In order to manage the programmable thermostat GecApp crono Wi Fi already configured by another device Smartphone or Tablet proceed as follows Make sure you are connected to a Wi fi network to which is connected the programmable thermostat to be associated and to have downloaded the application GecApp ...

Страница 36: ...martphone Tablet you will see the STATUS of home GecApp crono Wi Fi Fig 8 Fig 9 SEND SETTINGS VIA APP STATUS GecApp crono Wi Fi Using the buttons on the CONTROL PANEL Fig 7 set the desired operating mode and press the key SEND After a few seconds you will receive a push notification to confirm the STATUS The STATUS of the Programmable Thermostat GecApp crono Wi Fi is updated with the new settings ...

Страница 37: ...ows 1 Set the GecApp Crono Wi Fi to ON Fig 10 2 Set the AUTOMATIC Program Fig 10 3 Set the WINTER mode Fig 10 4 Press the key SEND Fig 10 The programmable thermostat at home will receive the new settings within a period of 15 seconds Upon the successful update of settings on your Smartphone Tablet you will receive a push notification like Parameters updated successfully and will update the STATUS ...

Страница 38: ...OUR 1 To set the temperature of each HALF HOUR go to the desired HALF HOUR and use the keys e to increase or decrease the grades C Fig 13 2 To confirm press the key At this point the interface goes directly to the next HALF HOUR so that if you want to set the same temperature you only have to press the key 3 Then proceed to daily programming 4 To copy the daily program of the day e g MONDAY on oth...

Страница 39: ...tings within a period of 15 seconds Upon the successful update of settings on your Smartphone Tablet you will receive a push notification like Parameters updated successfully On the display of your Smartphone Tablet in the Home page you will see a graph of temperatures just programmed ...

Страница 40: ... the keys and Fig 15 set the temperature you want to have in your apartment home 5 Press the key SEND Fig 16 The programmable thermostat at home will receive the new settings within a period of 15 seconds Upon the successful update of settings Fig 16 on your Smartphone Tablet you will receive a push notification like Parameters updated successfully On the display of your Smartphone Tablet in the H...

Страница 41: ... time is stored in the memory for all subsequent times you want to use the TIMED MANUAL MODE 6 With the buttons and set the temperature you want to have in your apartment home Fig 19 and press the key SEND The programmable thermostat at home will receive the new settings within a period of 15 seconds Upon the successful update of settings on your Smartphone Tablet you will receive a push notificat...

Страница 42: ...cApp Crono Wi Fi is ON the Auxiliary relay will be ON Closed If the GecApp Crono Wi Fi is OFF the Auxiliary relay will be OFF Open the Auxiliary relay If you set the Auxiliary relay Aux to pre ON mode Close If you set the Auxiliary relay Aux to pre OFF mode Open the Auxiliary relay Aux will be After setting the Auxiliary relay press the key Fig 22 to send to the GecApp crono Wi Fi the new settings...

Страница 43: ...tification is sent The push notification is sent to all users who are associated with the GecApp Crono Wi Fi Maximum temperature and minimum temperature by default are disabled 1 Enable to activate the threshold Temp Maximum and Threshold of Min Temp Fig 23 2 Click on the temperature value 3 Slide the digits C setting the Min and Max Temp threshold Fig 24 4 Confirm with the key 5 Press the key to ...

Страница 44: ... Fig 25 2 Click on the temperature value 3 Scroll the digits present C setting the Antifreeze Temperature Fig 26 4 Set the Anti freeze Temperature and press the key 5 Press the key to send to the GecApp crono Wi Fi the new settings The Antifreeze temperature can be disabled by setting The programmable thermostat at home will receive the new settings within a period of 15 seconds approx Upon the up...

Страница 45: ...he Wi Fi module by setting it to OFF in the Settings menu When you activate the Wi Fi module the following message appears Er1 No power from the mains Check that the Programmable thermostat is connected to the mains 230Vac 50 60Hz Flashing and switching off of the symbol Contact the technical support The app displays Device not in network Press the icon and select the device again Check that the P...

Страница 46: ...46 ...

Страница 47: ...47 THE APPLICATION ...

Страница 48: ...ostat Setup section 2 With Smartphone Tablet connect to the network of the device called GecApp Crono Wi Fi If your Smartphone Tablet fails to connect to the Wi Fi GecApp crono Wi Fi network exit the Setup and run the RESET of the Wi Fi module as indicated below and then repeat the Setup procedure 3 Activate the application GecApp by pressing the icon geca Fig 2 Fig 2 4 The first time you use the ...

Страница 49: ...nd the settings to the Programmable thermostat The programmable thermostat displays the message Att Wait Fig 5 and in a few seconds the Home page will appear Fig 6 Fig 5 Fig 6 When the symbol Signal quality will stop blinking it means that the programmable thermostat is connected to the Wi Fi network selected On Smartphone Tablet will be thus created a new device with its control interface After a...

Страница 50: ...OFF TEMPERATURE CHART Daily weekly program of temperatures set for every half hour Fig 7 Send settings to GecApp Crono Wi Fi at homea CONTROL PANEL NEW STATUS settings of GecApp Crono Wi Fi Automatic Program Timed Manual program Max 16h and 59 min Manual Program 20 0 C Manual Program Temperature and timed Manual Program Increase Manual temperature Decrease Manual temperature Winter Mode Summer Mod...

Страница 51: ...t the Setup If you still have problems please contact the customer support ADD SMARTPHONE TABLET In order to manage the programmable thermostat GecApp crono Wi Fi already configured by another device Smartphone or Tablet proceed as follows Make sure you are connected to a Wi fi network to which is connected the programmable thermostat to be associated and to have downloaded the application GecApp ...

Страница 52: ...martphone Tablet you will see the STATUS of home GecApp crono Wi Fi Fig 8 Fig 9 SEND SETTINGS VIA APP STATUS GecApp crono Wi Fi Using the buttons on the CONTROL PANEL Fig 7 set the desired operating mode and press the key SEND After a few seconds you will receive a push notification to confirm the STATUS The STATUS of the Programmable Thermostat GecApp crono Wi Fi is updated with the new settings ...

Страница 53: ...ows 1 Set the GecApp Crono Wi Fi to ON Fig 10 2 Set the AUTOMATIC Program Fig 10 3 Set the WINTER mode Fig 10 4 Press the key SEND Fig 10 The programmable thermostat at home will receive the new settings within a period of 15 seconds Upon the successful update of settings on your Smartphone Tablet you will receive a push notification like Parameters updated successfully and will update the STATUS ...

Страница 54: ... HALF HOUR 1 To set the temperature of each HALF HOUR go to the desired HALF HOUR and use the keys and to increase or decrease the grades C Fig 13 2 To confirm press the key At this point the interface goes directly to the next HALF HOUR so that if you want to set the same temperature you only have to press the key 3 Then proceed to daily programming 4 To copy the daily program of the day e g MOND...

Страница 55: ...tings within a period of 15 seconds Upon the successful update of settings on your Smartphone Tablet you will receive a push notification like Parameters updated successfully On the display of your Smartphone Tablet in the Home page you will see a graph of temperatures just programmed ...

Страница 56: ... buttons and Fig 15 set the temperature you want to have in your apartment home 5 Press the key SEND Fig 16 The programmable thermostat at home will receive the new settings within a period of 15 seconds Upon the successful update of settings Fig 16 on your Smartphone Tablet you will receive a push notification like Parameters updated successfully On the display of your Smartphone Tablet in the Ho...

Страница 57: ... the Programmable thermostat The set time is stored in the memory for all subsequent times you want to use the TIMED MANUAL MODE 7 With the keys and set the temperature you want to have in your apartment home Fig 19 and press the key SEND The programmable thermostat at home will receive the new settings within a period of 15 seconds Upon the successful update of settings on your Smartphone Tablet ...

Страница 58: ...he If the GecApp Crono Wi Fi is ON the Auxiliary relay will be ON Closed If the GecApp Crono Wi Fi is OFF the Auxiliary relay will be OFF Open If you set the Auxiliary relay Aux to pre ON mode Close If you set the Auxiliary relay Aux to pre OFF mode Open the Auxiliary relay Aux will be sem the Auxiliary relay Aux After setting the Auxiliary relay press the key OK Fig 22 to send to the GecApp crono...

Страница 59: ... The push notification is sent to all users who are associated with the GecApp Crono Wi Fi Maximum temperature and minimum temperature by default are disabled 1 Enable to activate the threshold Temp Maximum and Threshold of Min Temp Fig 23 2 Press on degrees 40 0 C 3 With the buttons and set the threshold of Maximum temperature and Minimum Temperature 4 Store the temperature threshold by pressing ...

Страница 60: ...emperature Fig 25 2 Press on degrees 5 0 C 3 Use the keys and to set the Anti freeze Temperature Fig 26 4 Store the Anti freeze Temperatura by pressing OK 5 Press SEND to send to the GecApp crono Wi Fi the new settings The Antifreeze temperature can be disabled by pressing on The programmable thermostat at home will receive the new settings within a period of 15 seconds Upon the successful update ...

Страница 61: ...power from the mains Check that the Programmable thermostat is connected to the mains 230Vac 50 60Hz Flashing and switching off of the symbol Contact the technical support The app displays Device not in network Press the icon and select the device again Check that the Programmable thermostat has an active internet connection Possible lack of electricity in the building You do not receive push noti...

Страница 62: ...62 Notes ...

Страница 63: ...Notes 63 ...

Страница 64: ...eems necessary either aesthetic or functional at any time and without prior notice Tecnocontrol Srl Via Miglioli n 47 20090 Segrate MI Italy Ph 39 02 26922890 www tecnocontrol it GECA Srl Via E Fermi n 98 25064 Gussago BS Italy Ph 39 030 3730218 www gecasrl it ...

Отзывы: