background image

Special Functions

ķ

43

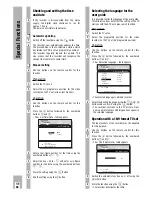
The child lock

All functions can be locked using the child lock. 
Even a cassette that is inserted into the recorder
after locking remains in the recorder until you
unlock it again.
The child lock can be activated so that the recorder
is blocked for all functions or so that programmes
that are unsuitable for children cannot be recorded.
A few TV stations broadcast information concern-
ing such broadcasts.

Use the buttons on the remote control for this 
function.

Activating the child lock

Press the 

h

followed by the numbered buttons 

4

and 

2

.

– The » Child lock « table appears.

To lock all functions, enter the four-digit code
numbered buttons 

1

… 

0

and confirm with the

G

button.

– The recorder switches the table off.

Ń

!

The recorder is locked.

Should you forget or misplace your code number,
your specialist dealer will be able to help.

Ǻ

Your personal code number

2

1

Ǻ

Activating the VPS child lock 

Press the 

h

button followed by the numbered 

buttons 

4

and 

2

.

– The » Child lock « table appears.

To activate the VPS child lock, select the line with
the 

D

button and press the 

F

button.

Use the 

C

button to select the » Code number «

line.

Enter the four-digit code number using the number-
ed buttons 

1

… 

0

and confirm with the 

G

button.
– The recorder switches the table off.

Ń

!

Watching or recording programmes that are unsuit-
able for children is not possible. All other functions
can be used.

Switching the child lock off

Press any button.
– The » Child lock « table appears.

Enter the four-digit code number using the number-
ed buttons 

1

… 

0

and confirm with the 

G

button.
– The recorder switches the table off and the lock is

released.

Switching the VPS child lock off

Press the 

h

button followed by the numbered

buttons 

and 

2

.

– The » Child lock « table appears.

Enter the four-digit code number using the number-
ed buttons 

1

… 

0

and confirm with the 

G

button.

Select the » VPS child lock « line using the 

D

button and press the 

E

button.

Confirm the setting with the 

G

button.

– The recorder switches the table off and the lock is

de-activated.

4

3

2

1

2

1

4

3

2

1

GRUNDIG
TEXT-PROGRAMMING

Code number:

-

- - -

VPS Child lock:

OFF

0-9 : Enter code number

ˆ

ʺ

: Select

OK : Confirm

i : Return to Info menu

GRUNDIG
TEXT-PROGRAMMING

Code number:

- - - -

VPS Child lock:

OFF

< > : VPS Child lock On/Off

ˆ

ʺ

: Select

OK : Confirm

i : Return to Info menu

Child lock

Child lock

Содержание GV 740 HiFi

Страница 1: ...VIDEORECORDER GV 740 HiFi...

Страница 2: ...iate recordings and TIMER recordings automatic selection 22 TIMER Recording 23 28 The options 23 Programming with the ShowView system variant 1 24 25 Recorder messages 25 Checking altering and erasing...

Страница 3: ...hich makes seemingly complicated settings and data entries easy and understandable for everyone The correct menus table and dialogue lines from which you can determine the next possible operat ing ste...

Страница 4: ...ER CASS IN RECORD L R AUDIO IN MAN Do not expose the recorder or the cassette to any moisture The recorder is intended for use in dry rooms If you wish to operate it in the open air make absolutely su...

Страница 5: ...a TIMER is TIMER programmed Display lights up when a CASS IN cassette is in the video recorder Display lights up during recording RECORD L AUDIO IN R Sound input left right for camcorder VIDEO IN Soc...

Страница 6: ...sert the supplied aerial cable into the socket on the recorder and into the aerial socket on the TV set 3 2 1 Connecting Connecting the recorder to the mains Insert the mains cable supplied into the m...

Страница 7: ...Exhausted batteries must be removed The manufacturer cannot be held responsible for damage resulting from battery leakage Batteries even ones not containing heavy metals do not belong in the household...

Страница 8: ...the remote control are located on two separate levels The buttons that are required for essential operat ing functions are located on the upper level The buttons that are required for convenience fun...

Страница 9: ...king function Buttons under the flap Calls up the time Switches the recorder off standby Selects page 100 overview in tele text mode Displays concealed information in teletext mode Increases the chara...

Страница 10: ...VIDEO IN TIMER CASS IN RECORD L R AUDIO IN MAN Calling up the info table Press the h button on the remote control 1 GRUNDIG TEXT PROGRAMMING Info 1 Record Programming 2 A1 A2 Record Prepared 3 Telete...

Страница 11: ...back to the channel setting using the F button Enter and store the channel number frequency on the TV set see TV operating instructions A test picture will appear on the TV screen which is transmitted...

Страница 12: ...he recorder s transmitter off and on If your recorder receives many TV stations between the channels 21 and 69 in the UHF band you may experience picture interference when using your recorder To avoid...

Страница 13: ...r on teletext pages The numbers for the teletext pages where the pro gramme indexes are given can vary from station to station You can now decide which page from the pro gramme index you will want to...

Страница 14: ...n and the numbered buttons 5 and 1 The Sprachwahl Select language table appears When the recorder is switched on for the first time The Installation table appears immediately after the h button is pre...

Страница 15: ...mbered buttons 5 and 2 Display on recorder SEL TV PROG I Select programme position 1 on the TV set Press the G button on the remote control for the recorder Display on recorder WAIT and The recorder s...

Страница 16: ...ialogue lines of the Programme table For how to enter satellite TV station data read chapter Operation with a satellite receiver on page 39 Instead of entering the channel number you can enter the fre...

Страница 17: ...termined the recorder automatically switches to the five digit tape length display When playing back programmes recorded in the NTSC system the recorder switches automatically to five figure tape leng...

Страница 18: ...in stop mode Terminate fast winding with the H button Eject the cassette by pressing the N button Switch the recorder off using the A button Instant playback one touch play If the recorder is connect...

Страница 19: ...ur norms standards MESECAM colour norm When playing back MESECAM recordings press the PAL SEC button on the remote control as often as it takes for MESEC to appear in the recorder display The TV set m...

Страница 20: ...yback begins Manual During playback the DC buttons can be used to adjust the picutre definition to suit your personal taste Brief display on recorder SHARPN I 2 1 3 2 1 Locating certain recordings Vid...

Страница 21: ...nd tape To do this press the X Y buttons while in stop function Terminate fast winding with the H button Remove the cassette by pressing the N button Switch the recorder off using the A button 8 7 6 5...

Страница 22: ...you will see seamless transitions without flaws This is called assembly editing 4 3 2 1 1 2 1 2 1 Special features of audio recording The different audio tracks of your recorder Your recorder has two...

Страница 23: ...on 6 5 4 3 2 1 Recording subtitles for immediate recording and TIMER recordings automatic selection You can activate the recorder in such a way that it records the subtitles offered by TV stations How...

Страница 24: ...nmes on one day you must decide which one is to be recorded completely if there is a risk of alterations to timing Example You wish to record the 1st station from 20 15 to 21 45 and the 2nd second sta...

Страница 25: ...V V button to start programming The data is indicated on the TV screen and on the display on the recorder Only the on screen display is described in the example Use the numbered buttons 1 0 to enter t...

Страница 26: ...4 Remaining playing time Display Rest REST and the remaining playing time of the cassette If the remaining playing time is negative and marked in red a cassette with insufficient playing time was inse...

Страница 27: ...CHECK button as often as necessary until the coloured marker is at the required TIMER position Erase the data of the TIMER position using the CLEAR button 3 2 1 4 3 2 1 1 Interrupting the record stand...

Страница 28: ...changed with the buttons B PROGRAM B DAY B START B STOP The messages from the recorder and the explanations for them can be found on Pages 25 and 26 Confirm timer settings with G button the remaining...

Страница 29: ...off Z ED EW green daily or weekly recording at the same time If the picture sound signal is to be recorded from an external device that has been connected to the corresponding sockets instead of from...

Страница 30: ...can be called up from an index at the touch of a button Select teletext by pressing the h button followed by the numbered button 3 The teletext page 100 teletext index appears Select the subject by pr...

Страница 31: ...sub pages may be collected under one page number These are advanced automatically by the TV station Multiple pages can be recognised by a display underneath the time To view the sub page for a longer...

Страница 32: ...sound until the red display 1dB lights up during the loudest passages Please note the Insert options described in the next chapter 4 3 2 1 from a second recorder camcorder CD i player Connection Conne...

Страница 33: ...nd sources The insert options Insert Dubbing The new picture sound signal is inserted The new sound signal is recorded onto the longitudinal and helical tracks and the original sound signal is erased...

Страница 34: ...IN R and VIDEO IN Display CV In playback picture search mode find the place on the tape where the recording to be inserted should end then press the RESET button The tape position is marked electroni...

Страница 35: ...ts up during the loudest passages Select long play mode if desired using the SP LP button on the remote control Begin audio recording using the K button Terminate recording using the H button 3 2 1 2...

Страница 36: ...audio track Press the TRACKING button on the remote control to select an audio track and adjust the audio track using the F E buttons on the remote control 1 Adding a parallel sound track Simulcast mo...

Страница 37: ...epeatedly until MIX appears in the display on the recorder If the recorder is connected to an audio mixer you can hear the hifi original sound of the video cassette with the sound from external sound...

Страница 38: ...ctivate this function again press the CODE button the numbered buttons 8 5 1 3 and the G one after the other on the remote control 4 3 2 1 If the recorder receives coded TV programmes from private sta...

Страница 39: ...e receiver using an appropriate cable Insert the aerial plug from the house aerial into the II socket on the recorder Connect the socket on the recorder and the aerial socket on the TV set using the a...

Страница 40: ...buttons then press the G button The Programme table appears Select the data line Sat using the C button Activate satellite reception using the F button Select the line Name using the D button and ente...

Страница 41: ...n 7 6 5 4 3 2 1 7 6 5 4 3 2 1 ShowView Timer recording from a satellite receiver with control cable Switch the TV set on and select the programme position for the video recorder AV programme position...

Страница 42: ...time is indicated briefly The recorder is in record standby mode All drive mechanism functions of the recorder are now blocked To programme further TV programmes first press the TIMER ON OFF button t...

Страница 43: ...inuous playback mode Preparation for continuous playback mode Insert a recorded cassette Start playback using the T button Press the H button at the point where play back is to end Press the CODE butt...

Страница 44: ...th the D button and press the F button Use the C button to select the Code number line Enter the four digit code number using the number ed buttons 1 0 and confirm with the G button The recorder switc...

Страница 45: ...clock continues to run for approx 7 hours The time is not visible in the display Automatic updating Switch off the recorder using the button The recorder now automatically updates the time The precon...

Страница 46: ...ote control of both recorders Remote control switch at VIDEO 2 position to operate your GV 740 Remote control switch at VIDEO 1 position to operate the second recorder If the VIDEO 1 2 switch is not a...

Страница 47: ...g you can switch the TV set to standby using the A button Use the e button to switch the TV set back on 3 2 1 1 2 TV 1 2 TV SP LP ON OFF CLEAR ER SV V STOP DAY START 9 3 6 2 2 1 VIDEO 1 VIDEO 2 TV Rem...

Страница 48: ...defective recorded on the TV set or ask your neighbour if s he can receive this station Recording not possible The cassette is protected against Cover the opening at the back of the new recording cass...

Страница 49: ...ly 95 seconds 2 Euro AV sockets 21 pin DIN EN 50049 Aerial input socket coaxial B input 75 DIN 45325 Aerial output socket coaxial S output 75 DIN 45325 Audio sockets R L 2 phono R L 2 phono Satellite...

Страница 50: ...d Box 4050 Solna 00 46 8 6 29 85 30 GRUNDIG DANMARK A S Lejrvej 19 V rl se 00 45 44 48 68 22 SF 02271 GRUNDIG NORGE A S Glynitveien 25 Postboks 234 Ski 00 47 64 87 82 00 GRUNDIG BELUX N V Deltapark W...

Страница 51: ...GB 3103 166 19701 GV 740 HiFi 7453 082 B 3...

Отзывы: