


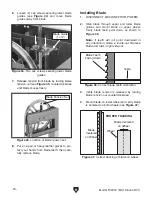


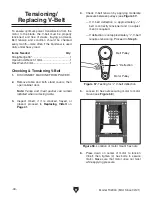


Straightedge
Belt Pulley
Motor
Touching Evenly
Figure 59. Checking pulley alignment with a
straightedge.
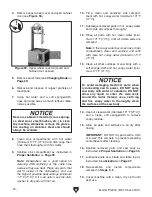
Belt Pulley
Motor Pulley
Figure 60. V-belt installed on pulley grooves
(saw body removed for clarity).
Model T32304 (Mfd. Since 02/21)
-41-
7. Check V-belt tension by applying moderate
pressure between pulleys (see
Figure 57 on
Page 40).
— If V-belt deflection is approximately
1
⁄
4
",
belt is correctly tensioned. Proceed to
Step 8.
— If there is more than
1
⁄
4
" deflection, loosen
(4) motor mount hex bolts and hex nuts,
then repeat
Steps 6–7 until properly ten-
sioned. If tension cannot be achieved,
proceed to
Replacing V-Belt.
8. Hold a straightedge close to the center of
both pulleys, and make sure straightedge
fully extends across rims of both pulleys (see
Figure 59).
— If pulleys are parallel and coplanar,
straightedge will touch the top and bottom
rims on both pulleys. No further adjust-
ment is required.
— If pulleys are parallel but not coplanar,
straightedge will touch the top and bot-
tom rims on one pulley, but will not touch
either rim on the other pulley. In this case,
loosen (4) carriage bolts securing motor
mount, then re-position motor so straight-
edge touches the top and bottom rims on
both pulleys. Repeat
Steps 6–8.
9. Re-install table, fences, and both stand cov-
ers, then close cabinet door.
Replacing V-Belt
1. DISCONNECT MACHINE FROM POWER!
2. Remove table, fences, and both stand cov-
ers, then open cabinet door.
3. Loosen (4) hex bolts securing motor to motor
mount (see
Figure 58 on Page 40).
4. Raise motor, then remove V-belt from motor
pulley and belt pulley.
5. Fit replacement V-belt into belt pulley groove,
raise motor, then fit V-belt into motor pulley
groove (see
Figure 60).
6. Properly tension V-belt (refer to Steps 4–7 of
Tensioning V-Belt on Page 40).
7. Re-install table and both stand covers, then
close cabinet door.
Содержание T32304
Страница 52: ......