


Model T28366 (Mfd. Since 04/18)
-27-
This machine features a self-centering vise that
provides maximum support, while still providing
enough clearance for cutting at a variety of angles.
Each vise jaw is independently adjustable left
or right to provide proper support and blade
clearance for the cut. The jaws provide the best
support during cutting operations when positioned
as close to the blade as possible.
Item(s)
Needed
Qty
Hex Wrench 6mm .............................................. 1
Adjusting Vise
To adjust vise jaws:
1. DISCONNECT MACHINE FROM POWER!
2. Set cutting angle (refer to Adjusting Miter
Angle on Page 28 for instructions).
3. Lower saw blade to check jaw clearance.
— If saw blade lowers completely without
touching jaws, no further adjustments are
necessary.
— If saw blade contacts jaws, perform
Steps 4–8.
5. Slide jaws away from blade, then lower blade
and position each jaw approximately
1
⁄
2
" away
from blade (see
Figure 37).
Note: At certain angle settings, it may not
be possible to set vise jaw within
1
⁄
2
" of work-
piece. If this is the case, then just adjust jaw
as far as it can go while still being securely
clamped.
6. Tighten cap screw for each jaw.
7. Turn vise handwheel clockwise until jaws
clamp workpiece in desired position.
8. Repeat Step 3 to re-check blade clearance.
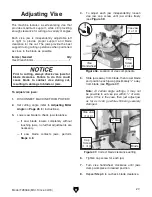
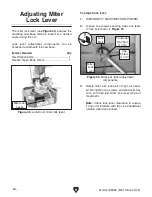
Figure 37. Correct blade clearance setting.
Blade
Figure 36. Location of vise components.
4. To adjust each jaw independently, loosen
vise jaw cap screw until jaw slides freely
(see
Figure 36).
Vise Jaw
(1 of 4)
Prior to cutting, always check vise jaws for
blade clearance. Failure to do this could
cause blade to contact vise during cut,
resulting in damage to blade or jaws.
Vise Jaw
(1 of 4)
Cap
Screw
(1 of 4)
Cap
Screw
(1 of 4)
Vise
Handwheel
1
⁄
2
" Gap