


Model T28366 (Mfd. Since 04/18)
-15-
4. Lift and place machine:
— If lifting and placing machine without help,
proceed to
Step 5.
— If lifting and placing machine with help,
lift machine off pallet and carefully place
machine onto workbench or optional
T28367 stand, and proceed to
Step 8.
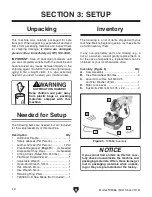
5. Thread (4) eye bolts (see Figure 10) into
machine base, then thread lifting straps
through eye bolts. If using larger lifting straps,
attach shackles (not included) to eye bolts.
6. Use forklift or other lifting equipment to
lift machine off pallet and carefully place
machine onto workbench or optional T28367
stand.
7. Remove eye bolts from machine base.
8. Mount machine to workbench using
following instruction in
Bench Mounting or to
optional stand following instructions included
with Model T28367.
Bench Mounting
Figure 12. "Direct Mount" setup.
Machine Base
Workbench
Lag Screw
Flat Washer
Another option is a "direct mount" (see example
below) where the machine is secured directly to
the workbench with lag screws and washers.
The base of this machine has mounting holes
that allow it to be fastened to a workbench or
other mounting surface to prevent it from moving
during operation and causing accidental injury or
damage.
The strongest mounting option is a "Through
Mount" (see example below) where holes are
drilled all the way through the workbench—and
hex bolts, washers, and hex nuts are used to
secure the machine in place.
Machine Base
Workbench
Hex
Bolt
Flat Washer
Flat Washer
Lock Washer
Hex Nut
Figure 11. "Through Mount" setup.
Number of Mounting Holes ............................ 2
Diameter of Mounting Hardware Needed ..
1
⁄
2
"
Bench Mounting
Figure 10. Lifting and placing machine.
Lifting
Straps
Eye Bolt
(1 of 4)