


Model G0833P (Mfd. Since 06/17)
-45-
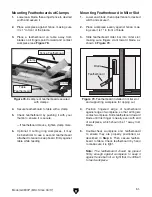
Making Auxiliary Fence
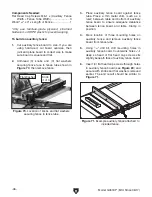
An auxiliary fence is necessary if you are resawing
a workpiece that is taller than it is wide. The fence
should be no less than
1
⁄
2
" shorter than the board
to be resawn.
The fence should be similar to the one in
Figure 69
when installed.
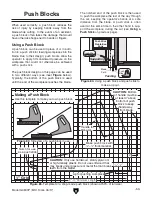
Figure 69. Example of auxiliary fence attached
to Model G0833P fence face.
Fence
Auxiliary Fence
M6-1 Flat
Head Cap Screw
Assembled Auxiliary Fence
Tools Needed:
Qty
Clamps ...............................................................2
Drill ....................................................................1
Drill Bit
7
⁄
32
" ........................................................1
Countersink Drill Bit ............................................1
Hex Wrench 5mm ...............................................1
Ruler ...................................................................1
#8 x 2"
Wood Screw
Assembled
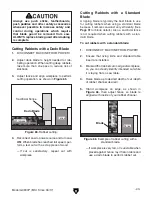
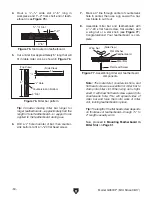
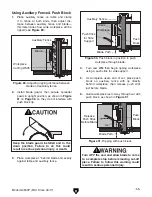
Resaw Barrier
3
⁄
4
"
3
⁄
4
"
Figure 68. Resaw barrier.
Making Resaw Barrier
When resawing, the resaw barrier acts in tandem
with the rip fence to provide tall support for the
workpiece. This minimizes the probability of it
binding against the blade and causing kickback.
Tools Needed:
Qty
Table Saw ..........................................................1
Jointer and Planer ....................... Recommended
Clamps ............................................... 2 Minimum
Drill ....................................................................1
Drill Bits
1
⁄
8
",
9
⁄
64
" ....................................... 1 Each
Countersink Bit ...................................................1
Components Needed for Resaw Barrier:
Wood*
3
⁄
4
" x 5
1
⁄
2
" x Length of Fence ...................1
Wood*
3
⁄
4
" x 3" x Length of Fence ......................1
Wood Screws #8 x 2" ........................................4
Wood Glue .........................................As Needed
*Only use furniture-grade plywood, kiln-dried
hardwood, or HDPE plastic to prevent warping.
To build a resaw barrier:
1. Cut your wood pieces to size specified above.
If you are using hardwood, cut pieces over-
size, then joint and plane them to correct size
to make sure they are square and flat.
2. Pre-drill and countersink four holes approxi-
mately
3
⁄
8
" from bottom of 5
1
⁄
2
" tall wood piece.
3. Glue end of 3" board, clamp boards at a 90°
angle with larger board in vertical position, as
shown in
Figure 68, then fasten together with
wood screws.
Содержание Polar Bear G0833P
Страница 92: ......